
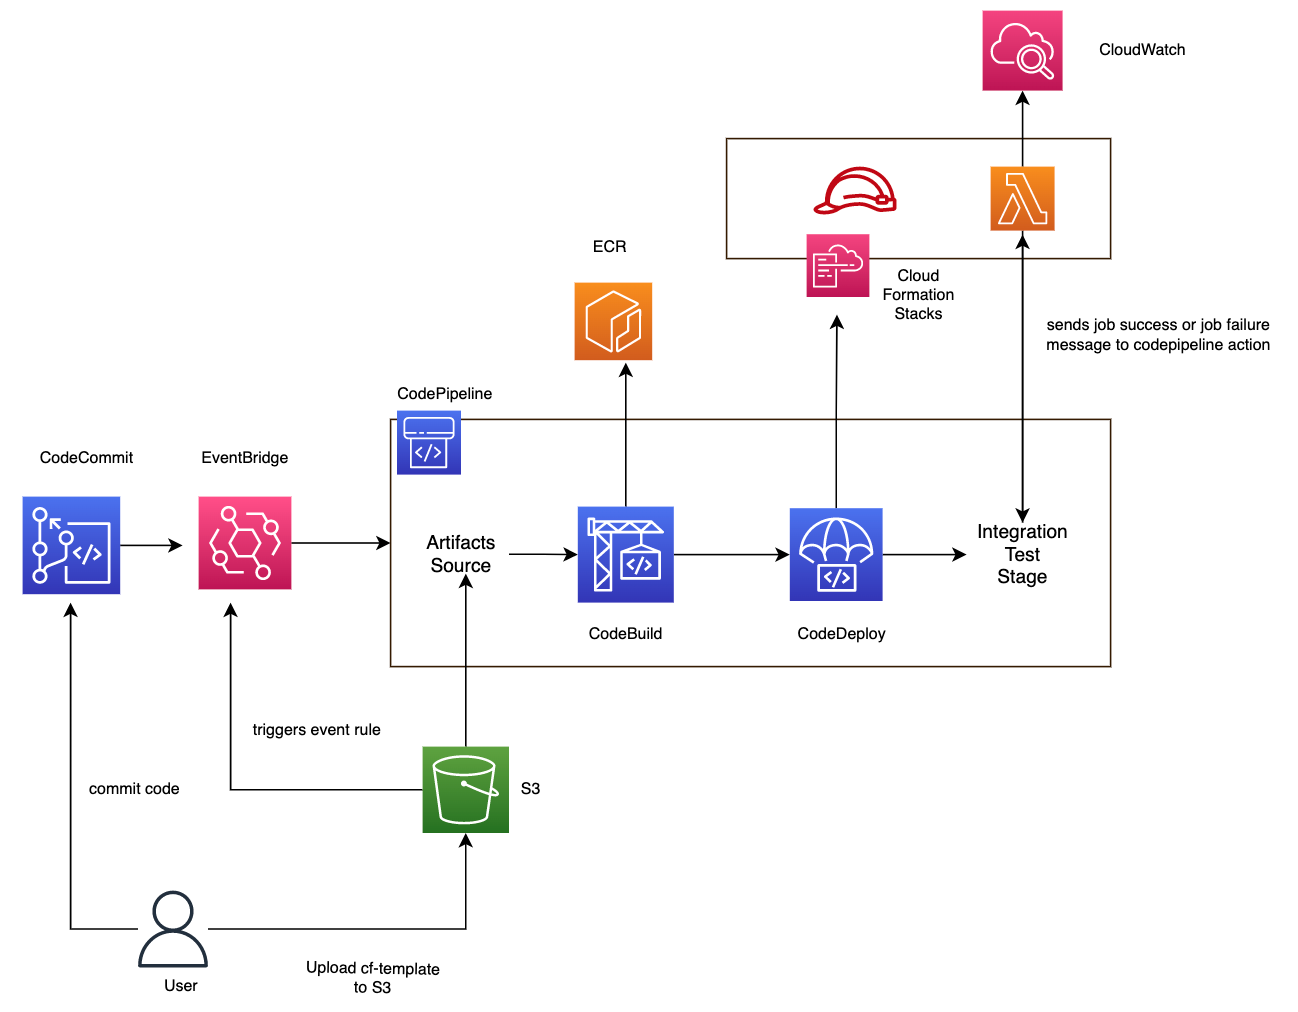
In this example, we will configure AWS CodePipeline to build an ECR image and deploy the latest version to lambda container. The application code will stream tweets using python tweepy library. First we need to setup code pipeline and the various stages to deploy application code to lambda image which will stream tweets when invoked. Typically, a codepipeline job contains the following stages but could be fewer or more depending on the application for e.g. could have more envs for testing before deplopyoing to prod. [1][2].
Source In this step the latest version of our source code will be fetched from our repository and uploaded to an S3 bucket. The application source code is maintained in a repository configured as a GitHub source action in the pipeline. When developers push commits to the repository, CodePipeline detects the pushed change, and a pipeline execution starts from the Source Stage. The GitHub source action completes successfully (that is, the latest changes have been downloaded and stored to the artifact bucket unique to that execution). The output artifacts produced by the GitHub source action, which are the application files from the repository, are then used as the input artifacts to be worked on by the actions in the next stage. [1][2].
Build During the build step we will use this uploaded source code and automate our manual packaging step using a CodeBuild project. The build task pulls a build environment image and builds the application in a virtual container.
Unit Test The next action in the Prod Stage is a unit test project created in CodeBuild and configured as a test action in the pipeline.
Deploy to Dev/Test Env This deploys the application to a dev/test env environment using CodeDeploy or another action provider such as CloudFormation.
Integration Test This runs end to end Integration testing project created in CodeBuild and configured as a test action in the pipeline.
Deploy to ProdEnv This deploys the application to a production environment. Could configure the pipeline so this stage requires manual approval to execute [3]
Creating the source repo, roles, artifacts and code pipeline
The cf templates folder contains the roles resources and deployment resource configs. We will need to create these stacks with cloudformation before they are used within the pipeline for stack updates [1]
1
2
3
4
5

$ aws cloudformation create-stack --stack-name CodeDeployLambdaTweets --template-body file://cf-templates/CodeDeployLambdaTweepy.yaml
$ aws cloudformation create-stack --stack-name RoleCloudFormationforCodeDeploy --template-body file://cf-templates/roles/CloudFormationRole.yaml
$ aws cloudformation create-stack --stack-name RoleCodePipeline --template-body file://cf-templates/roles/CodepipelineRole.yaml
$ aws cloudformation create-stack --stack-name RoleLambdaImage --template-body file://cf-templates/roles/RoleLambdaImageStaging.yaml
We can validate the cloudformation templates before deploying by using aws cloudformation validate-template --template-url <s3_url> (remote) or aws cloudformation validate-template --template-body <file://path-to-local-file> (local) command to check the template file for syntax errors. During validation, AWS CloudFormation first checks if the template is valid JSON. If it isn’t, CloudFormation checks if the template is valid YAML. If both checks fail, CloudFormation returns a template validation error [13]. Note: The aws cloudformation validate-template command is designed to check only the syntax of your template. It does not ensure that the property values that you have specified for a resource are valid for that resource. Nor does it determine the number of resources that will exist when the stack is created.
Next, we will zip the cf templates folder in the repo. This is required for the Deploy stage in codepipeline and needs to be read in the source stage and output as artifacts. We will copy this zipped folder to S3 and configure code pipeline in defintion file so that action in source stage reads from the s3 location of template file
1
2
3
$ cd cf-templates
$ zip template-source-artifacts.zip CodeDeployLambdaTweepy.yaml roles/*
$ aws s3 cp template-source-artifacts.zip s3://codepipeline-us-east-1-49345350114/lambda-image-deploy/template-source-artifacts.zip
Now we can create the codepipeline (with the source, build and deploy stages) from the definition json file using the command below [2]. The definition json assumes code pipeline role is created as described above.
It is worth having a look at the configuration file to understand the settings before we create the pipeline.
1
2
3
4
5
6
7
8
9
10
11
12
13
14
15
16
17
18
19
20
21
22
23
24
{
    "name": "CodeCommitSource",
    "actionTypeId": {
        "category": "Source",
        "owner": "AWS",
        "provider": "CodeCommit",
        "version": "1"
    },
    "runOrder": 1,
    "configuration": {
        "BranchName": "master",
        "OutputArtifactFormat": "CODE_ZIP",
        "PollForSourceChanges": "false",
        "RepositoryName": "deploy-lambda-image"
    },
    "outputArtifacts": [
        {
            "name": "CodeCommitSourceArtifact"
        }
    ],
    "inputArtifacts": [],
    "region": "us-east-1",
     "namespace": "SourceVariables"
   }
This creates a code commit repository named deploy-lambda-image and configures the output artifact CodeCommitSourceArtifact for the CodeCommit action. This is a ZIP file that contains the contents of the configured repository and branch at the commit specified as the source revision for the pipeline execution. We will later pass this artifact to the build stage.
The next action in the source stage will be for loading the cloud formation templates zip file that we previously uploaded to the S3 bucket.
1
2
3
4
5
6
7
8
9
10
11
12
13
14
15
16
17
18
19
20
21
22
{
                        "name": "CFTemplatesArtifact",
                        "actionTypeId": {
                            "category": "Source",
                            "owner": "AWS",
                            "provider": "S3",
                            "version": "1"
                        },
                        "runOrder": 1,
                        "configuration": {
                            "PollForSourceChanges": "false",
                            "S3Bucket": "codepipeline-us-east-1-49345350114",
                            "S3ObjectKey": "lambda-image-deploy/template-source-artifacts.zip"
                        },
                        "outputArtifacts": [
                            {
                                "name": "CFTemplatesArtifact"
                            }
                        ],
                        "inputArtifacts": [],
                        "region": "us-east-1"
                    }
This action will also create an output artifact CFTemplatesArtifact so we can pass this to a downstream code deploy stage The build stage includes information about how to run a build, including where to get the source code, which build environment to use, which build commands to run, and where to store the build output [6][7]. It uses a buildspec.yml file (which will be included when copying the source code in the next section) to run a build [4][9]. This action uses the CodeCommitSourceArtifact containing the application code which needs to be built.
1
2
3
4
5
6
7
8
9
10
11
12
13
14
15
16
17
18
19
20
21
22
23
24
25
26
27
 {
"name": "Build",
"actions": [
    {
        "name": "Build-Tweepy-Stream",
        "actionTypeId": {
            "category": "Build",
            "owner": "AWS",
            "provider": "CodeBuild",
            "version": "1"
        },
        "runOrder": 1,
        "configuration": {
            "BatchEnabled": "false",
            "EnvironmentVariables": "[{\"name\":\"IMAGE_REPO_NAME\",\"value\":\"tweepy-stream-deploy\",\"type\":\"PLAINTEXT\"},{\"name\":\"IMAGE_TAG\",\"value\":\"latest\",\"type\":\"PLAINTEXT\"},{\"name\":\"AWS_DEFAULT_REGION\",\"value\":\"us-east-1\",\"type\":\"PLAINTEXT\"},{\"name\":\"AWS_ACCOUNT_ID\",\"value\":\"[ACCT_ID]\",\"type\":\"PLAINTEXT\"}]",
            "ProjectName": "Build-Twitter-Stream"
        },
        "outputArtifacts": [],
        "inputArtifacts": [
            {
                "name": "CodeCommitSourceArtifact"
            }
        ],
        "region": "us-east-1"
    }
]
}
We will be building docker image to push to ECR [8]. We set the following environment variables as they are referenced to in the buildspec.yml.
- AWS_DEFAULT_REGION: us-east-1
- AWS_ACCOUNT_ID with a value of account-ID
- IMAGE_TAG with a value of Latest
- IMAGE_REPO_NAME: tweepy-stream-deploy
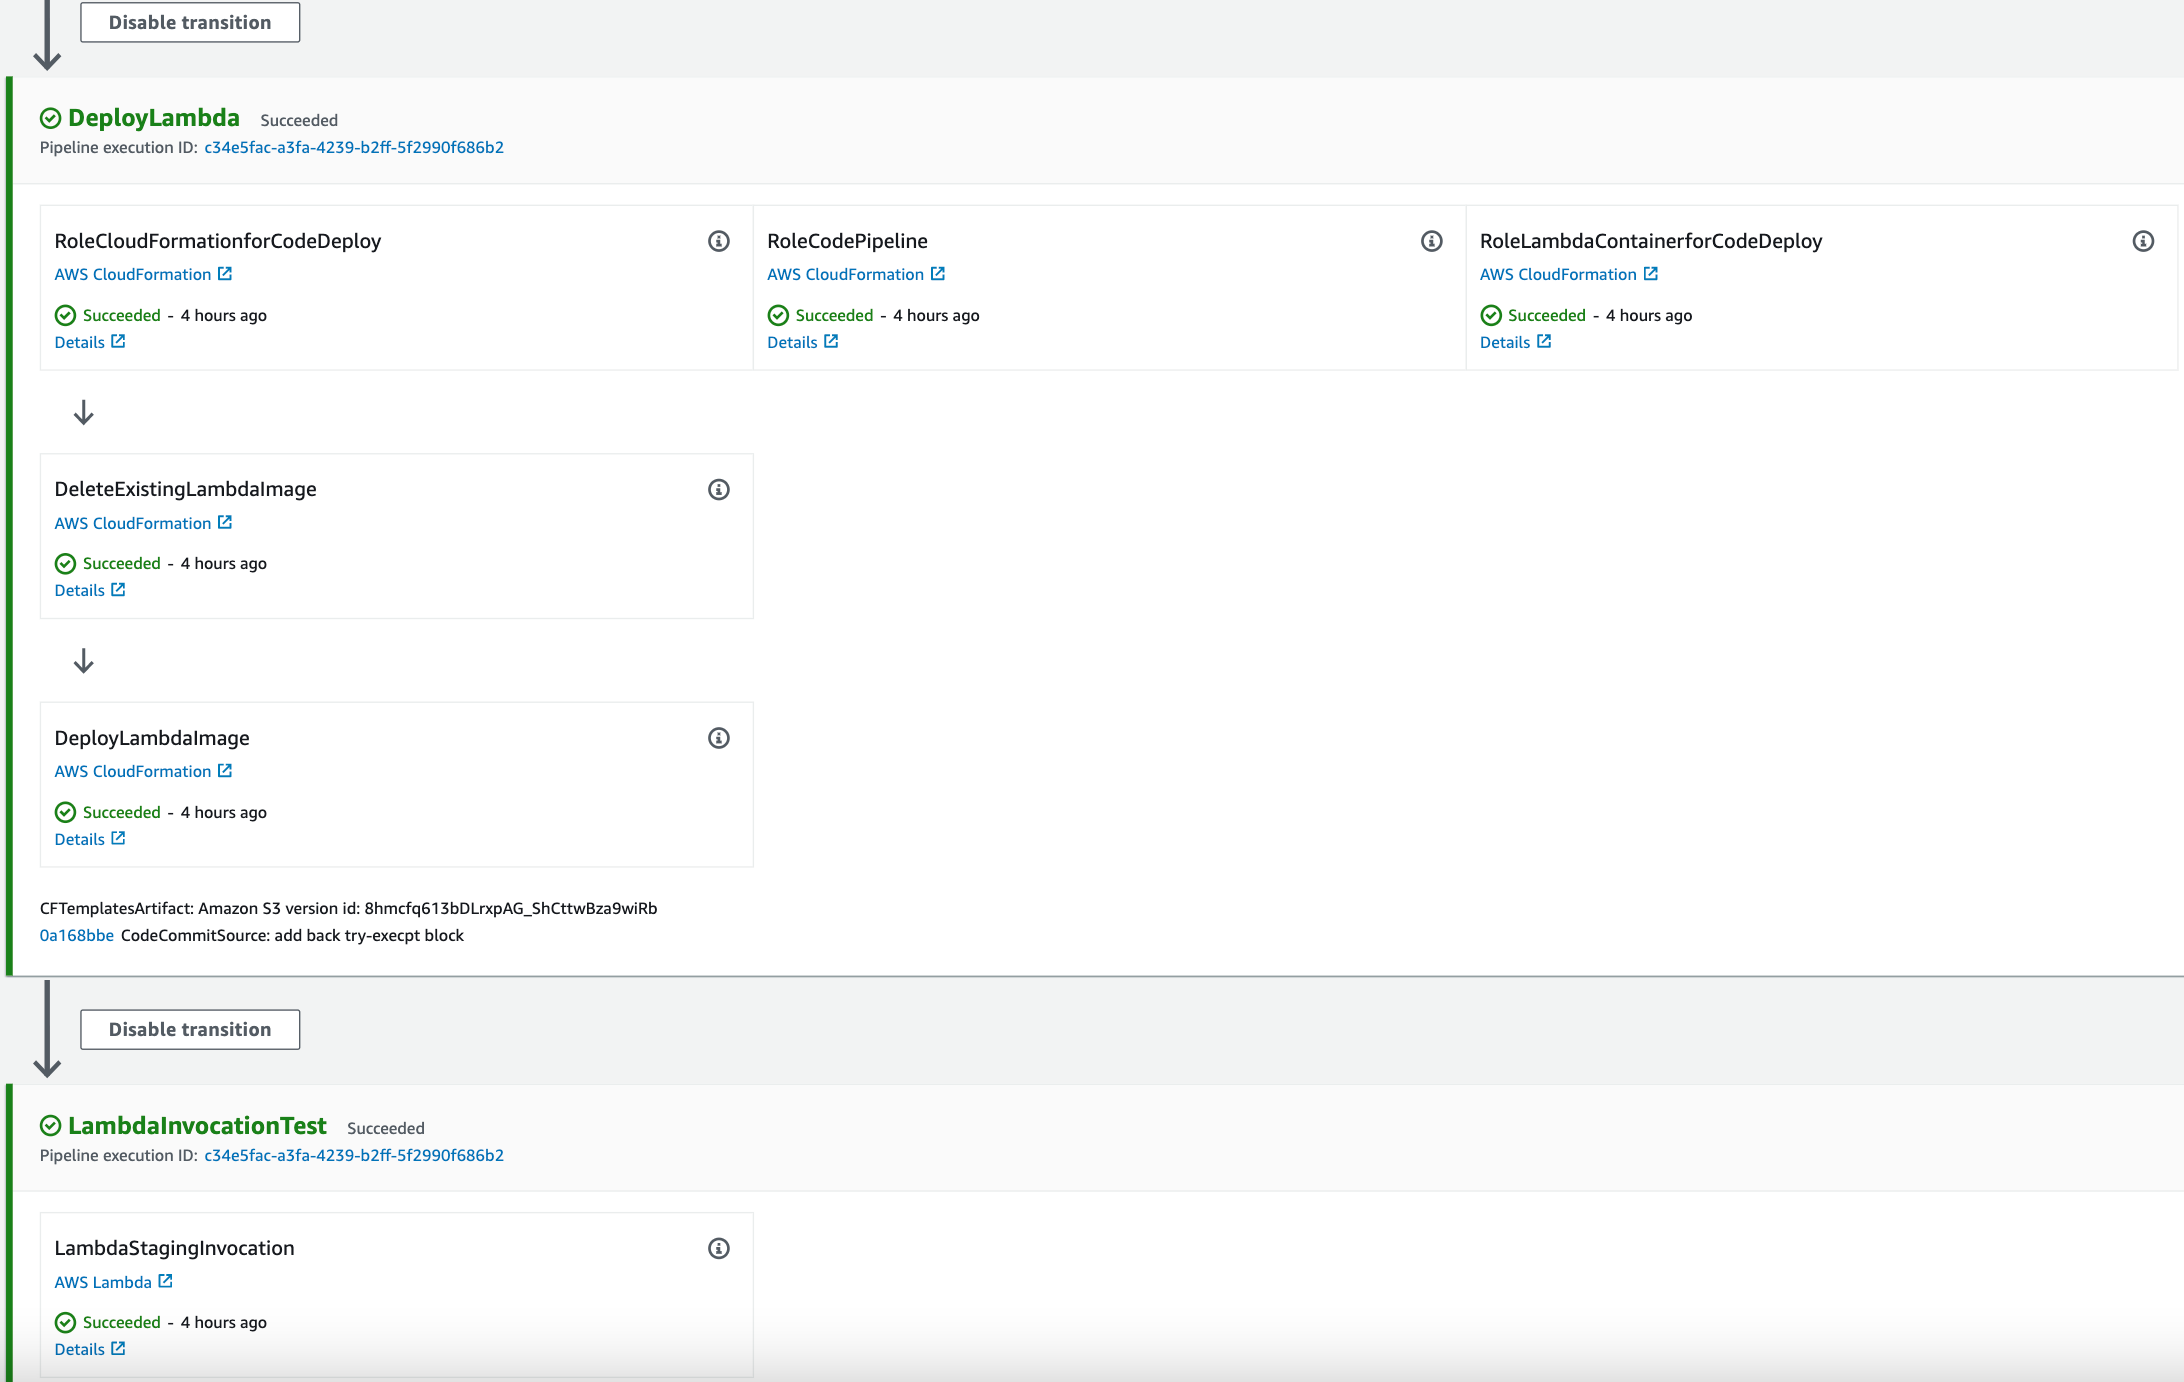
The next stage is DeployLambda stage, which has multiple actions for creating required resource roles and deploying the lambda image. All these actions use the CFTemplatesartifact from the source stage, to reference the path to the cloud formation template (in the TemplatePath property) relative to the root of the artifact.
These will use CloudFormation as Action provider and the Input Artifact would need to be the CloudFormation Template script which is output from one of the previous stages e.g. Source. We provide the stack name and cloudformation role in the configuration. The ActionMode will depend on whether we need to create, update or delete the stack.
The template filename path with reference to the input artifact (the template filepath is generated automatically depending on the filename set).
The first three actions will update the roles for CloudFormation, CodePipeline and Lambda, if the cloudformatiom templates have changed. The runOrder property is set to value of 1 for these actions so that they run in parallel. The next action deletes any existing lambda image which may exist. The runOrder value is incremented to 2 so that it runs after the roles are created.
1
2
3
4
5
6
7
8
9
10
11
12
13
14
15
16
17
18
19
20
21
22
 {
    "name": "DeleteExistingLambdaImage",
    "actionTypeId": {
        "category": "Deploy",
        "owner": "AWS",
        "provider": "CloudFormation",
        "version": "1"
    },
    "runOrder": 2,
    "configuration": {
        "ActionMode": "DELETE_ONLY",
        "RoleArn": "arn:aws:iam::376337229415:role/CloudFormationRole",
        "StackName": "CodeDeployLambdaTweets"
    },
    "outputArtifacts": [],
    "inputArtifacts": [
        {
            "name": "CFTemplatesArtifact"
        }
    ],
    "region": "us-east-1"
}
Then we will deploy the lambda image using cloudformation in the final action DeployLambdaImage in this stage. In the configuration, we specify the OutputFileName and the output artifact name, which we will pass to the next stage.
1
2
3
4
5
6
7
8
9
10
11
12
13
14
15
16
17
18
19
20
21
22
23
24
25
26
27
28
{
    "name": "DeployLambdaImage",
    "actionTypeId": {
        "category": "Deploy",
        "owner": "AWS",
        "provider": "CloudFormation",
        "version": "1"
    },
    "runOrder": 3,
    "configuration": {
        "ActionMode": "CREATE_UPDATE",
        "OutputFileName": "lambda-codedeploy-output",
        "RoleArn": "arn:aws:iam::376337229415:role/CloudFormationRole",
        "StackName": "CodeDeployLambdaTweets",
        "TemplatePath": "CFTemplatesArtifact::CodeDeployLambdaTweepy.yaml"
    },
    "outputArtifacts": [
        {
            "name": "LambdaDeployArtifact"
        }
    ],
    "inputArtifacts": [
        {
            "name": "CFTemplatesArtifact"
        }
    ],
    "region": "us-east-1"
}
In the final stage of codepipeline, we will do a test invocation of the deployed lambda image. We will use that artifact from the previous stage as input. The configuration parameters set the function name and parameter values for invoking the lambda function i.e. we will stream tweets with the keyword Machine Learning for a duration of 10 secs.
1
2
3
4
5
6
7
8
9
10
11
12
13
14
15
16
17
18
19
20
21
22
23
24
25
26
27
28
29
30
{
    "name": "LambdaInvocationTest",
    "actions": [
        {
            "name": "LambdaStagingInvocation",
            "actionTypeId": {
                "category": "Invoke",
                "owner": "AWS",
                "provider": "Lambda",
                "version": "1"
            },
            "runOrder": 1,
            "configuration": {
                "FunctionName": "codedeploy-staging",
                "UserParameters": "{\"keyword\": \"Machine Learning\", \"duration\":10}"
            },
            "outputArtifacts": [
                {
                    "name": "LambdaInvocationArtifact"
                }
            ],
            "inputArtifacts": [
                {
                    "name": "LambdaDeployArtifact"
                }
            ],
            "region": "us-east-1"
        }
    ]
}
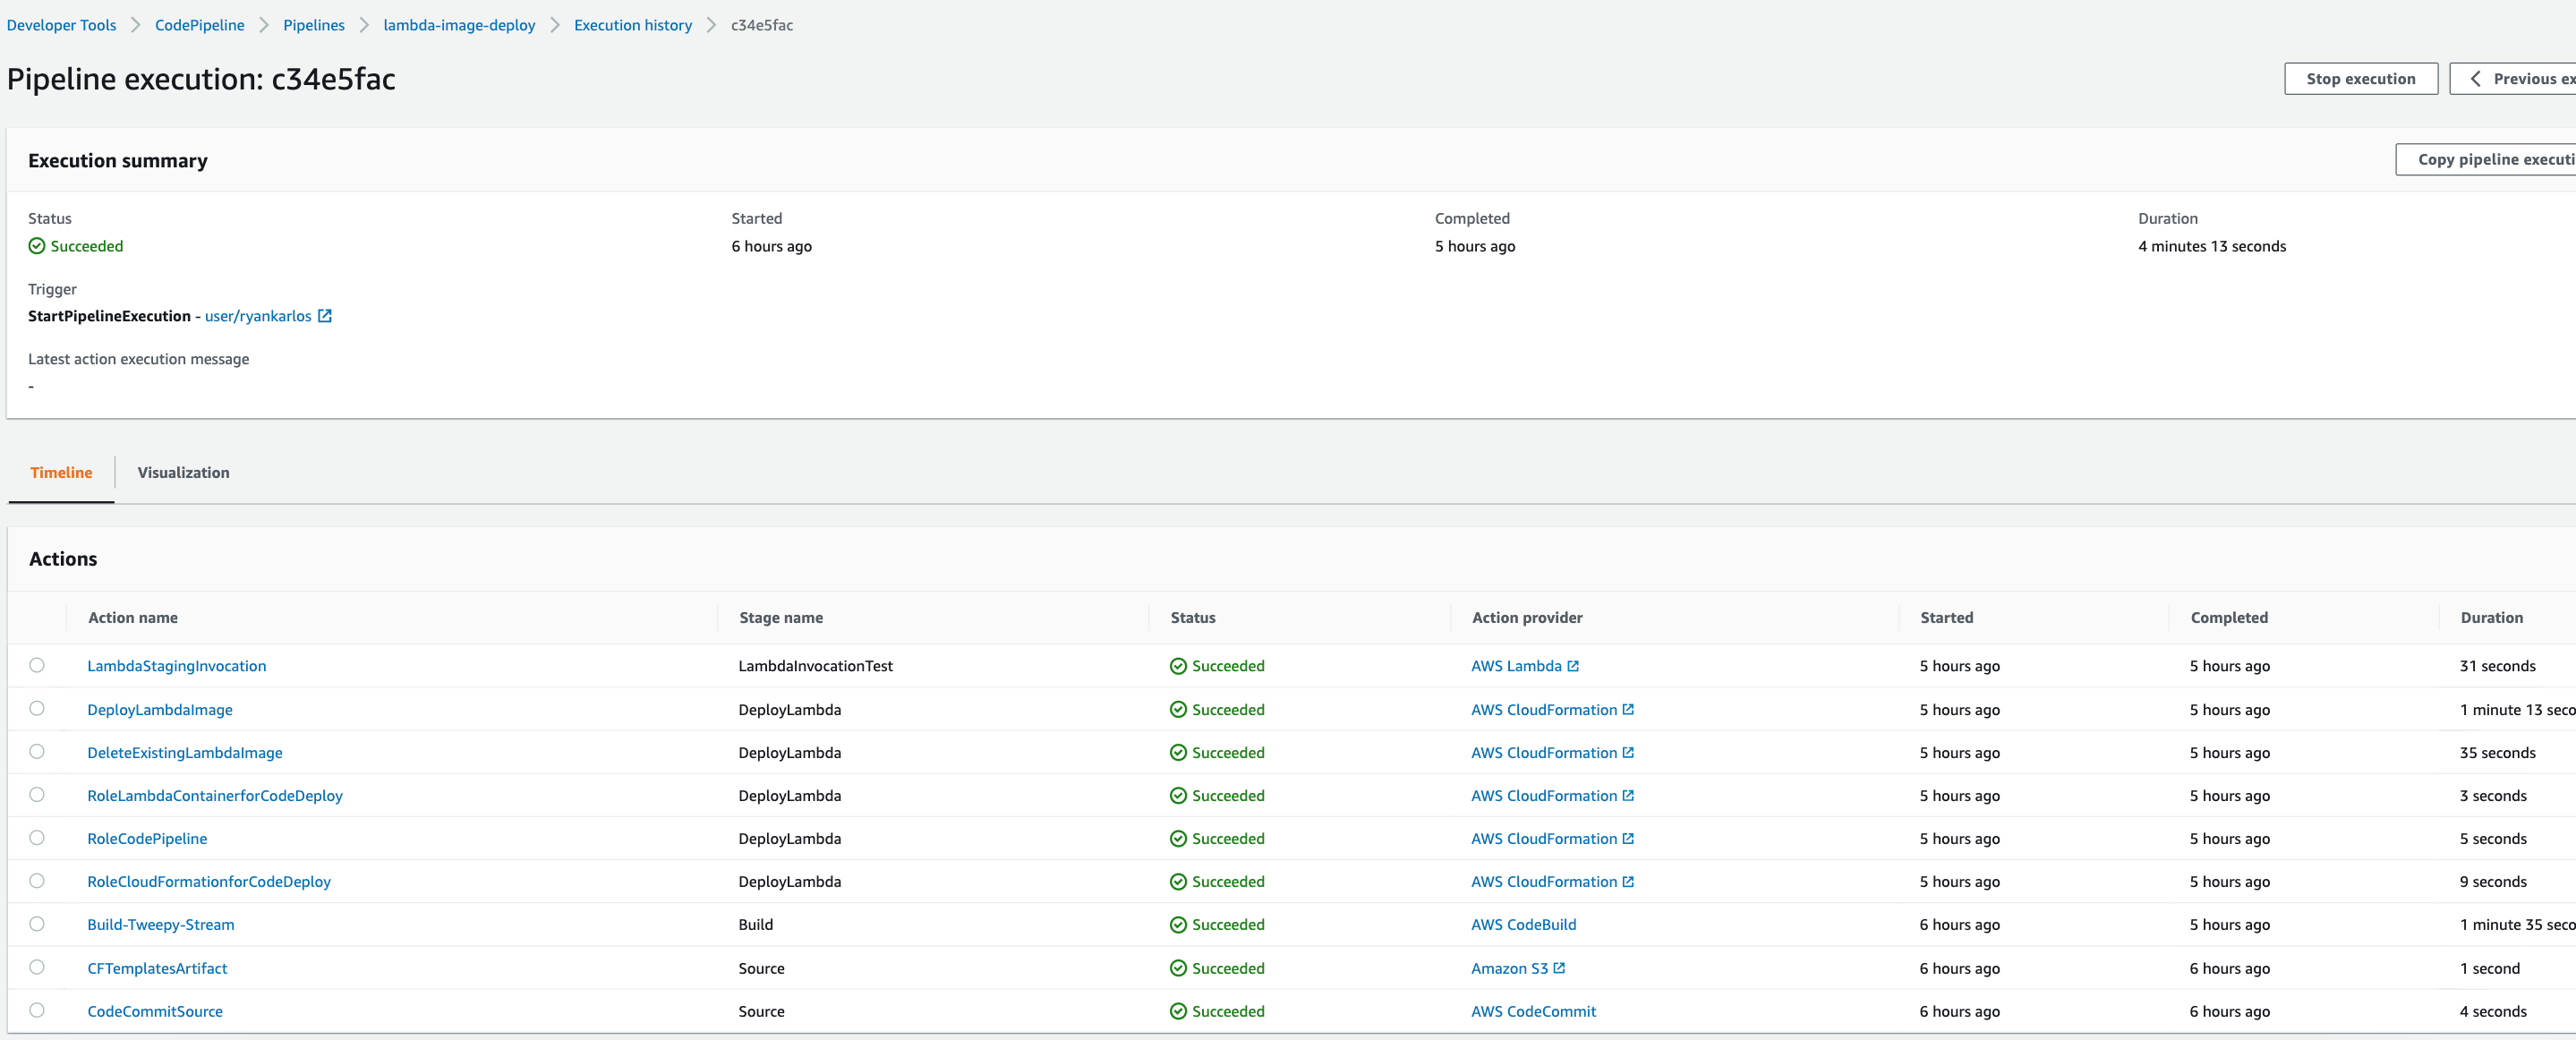
Now we can create code pipeline using the following command in cli [14].
1
$ aws codepipeline create-pipeline --cli-input-json file://cp-definitions/deploy-lambda-image.json
This should create the pipeline which should be visible in the console or via cli list-pipelines
1
2
3
4
5
6
7
8
9
10
11
12
13
aws codepipeline list-pipelines

{
    "pipelines": [
        {
            "name": "lambda-image-deploy",
            "version": 30,
            "created": "2022-05-30T03:11:28.501000+01:00",
            "updated": "2022-06-02T00:19:21.596000+01:00"
        }
    ]
}
The next section will configure our setup to be able to pull and push to code commit repository from our local machine. The code commit respository that we have just created in code pipeline is empty so we also need to copy the application code into the repository before running codepipeline end to end.
Set up a local repository
In this step, you set up a local repository to connect to your remote CodeCommit repository. This assumes using ssh keys installed on your machine. If not setup ssh keys already using ssh-keygen as in docs Upload your SSH public key to your IAM user. Once you have uploaded your SSH public key, copy the SSH Key ID. Edit your SSH configuration file named “config” in your local ~/.ssh directory. Add the following lines to the file, where the value for User is the SSH Key ID.
1
2
3
Host git-codecommit.*.amazonaws.com
User Your-IAM-SSH-Key-ID-Here
IdentityFile ~/.ssh/Your-Private-Key-File-Name-Here
Once you have saved the file, make sure it has the right permissions by running the following command in the ~/.ssh directory: chmod 600 config
Clone the code commit repository to your local computer and start working on code. You can get the ssh uri from the console under Clone URL for the code commit repo. Navigate to a local directory (e.g. ‘/tmp’) where you’d like your local repository to be stored and run the following command
1
$ git clone ssh://git-codecommit.us-east-1.amazonaws.com/v1/repos/deploy-lambda-image
Now we will copy all the files from the following folder into the local directory you created earlier (for example, /tmp/deploy-lambda-image). Be sure to place the files directly into your local repository. The directory and file hierarchy should look like this, assuming you have cloned a repo named deploy-lambda-image into the /tmp directory:
1
2
3
4
5
6
7
8
9
10
11
12
/tmp
   └-- deploy-lambda-image
        ├── README.md
        ├── __init__.py
        ├── appspec.yaml
        ├── buildspec.yml
        ├── dockerfile
        ├── local_run.py
        ├── main_twitter.py
        ├── requirements.txt
        ├── secrets.py
        └── tweets_api.py
Run the following commands to stage all of the files, commit with a commit message and then push the files to the CodeCommit repository
1
2
3
git add .
git commit -m "Add sample application files"
git push
The files you downloaded and added to your local repo have now been added to the main branch in your CodeCommit MyDemoRepo repository and are ready to be included in a pipeline.
Optional: Pushing to both Github and CodeCommit
Assuming you also have the repository in github and you may also want to configure git to push to both code commit and github repos when running git push origin master,as codecommit and github cannot be automatically synced.
When we cloned the codecommit repo to local machine, the remote url is set automatically for fetch and push. We can check this by running the following command
1
2
3
4
$ git remote -v

origin	ssh://git-codecommit.us-east-1.amazonaws.com/v1/repos/deploy-lambda-image (fetch)
origin	ssh://git-codecommit.us-east-1.amazonaws.com/v1/repos/deploy-lambda-image (push)
we will have to manually add an extra push-url for github repo
1
$ git remote set-url --add --push git://another/repo.git
origin maps to both github and aws code commit repo urls for git push actions
1
2
3
4
5
$ git remote -v

origin	ssh://git-codecommit.us-east-1.amazonaws.com/v1/repos/codecommit_dockerbuild (fetch)
origin	git@github.com:ryankarlos/codepipeline.git (push)
origin	ssh://git-codecommit.us-east-1.amazonaws.com/v1/repos/codecommit_dockerbuild (push)
Note: May need to run the following to add ssh key if get Permission denied (publickey) error when trying to push to remote
1
$ ssh-add --apple-use-keychain ~/.ssh/codecommit_rsa
Triggering code pipeline
Code Pipeline has been configured to trigger with every push to CodeCommit via EventBridge. This will start the source stage, transition to build phase if successful where the commands in buildspec.yml
will be executed in different phases of build process [9].
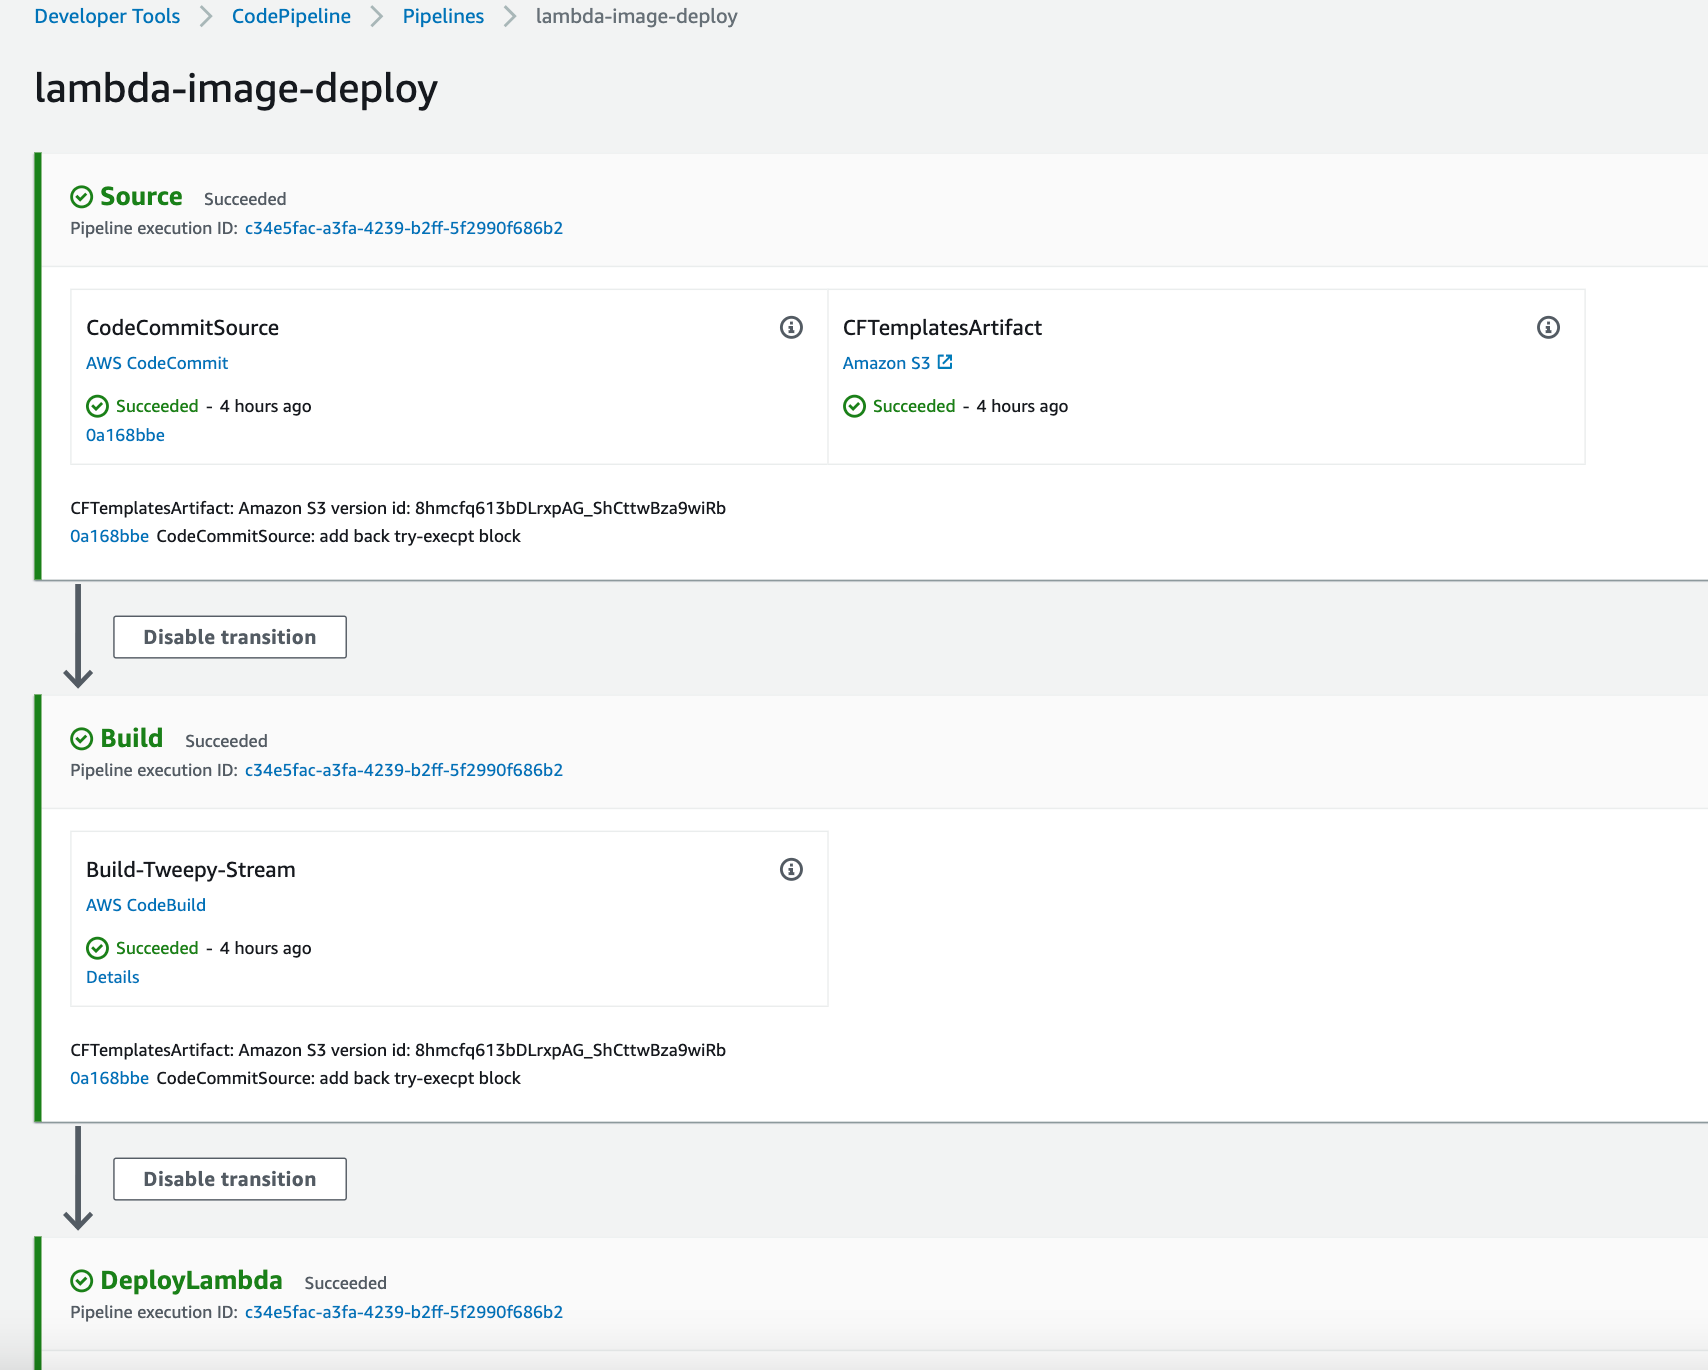
Finally, it will transition to Deploy and TestInvocation Stages if successful (as in diagram above). CodePipeline will also trigger automatically if the source artifact zip in S3 is updated.
For manual triggering, choose Release change on the pipeline details page on the console. This runs the most recent revision available in each source location specified in a source action through the pipeline.
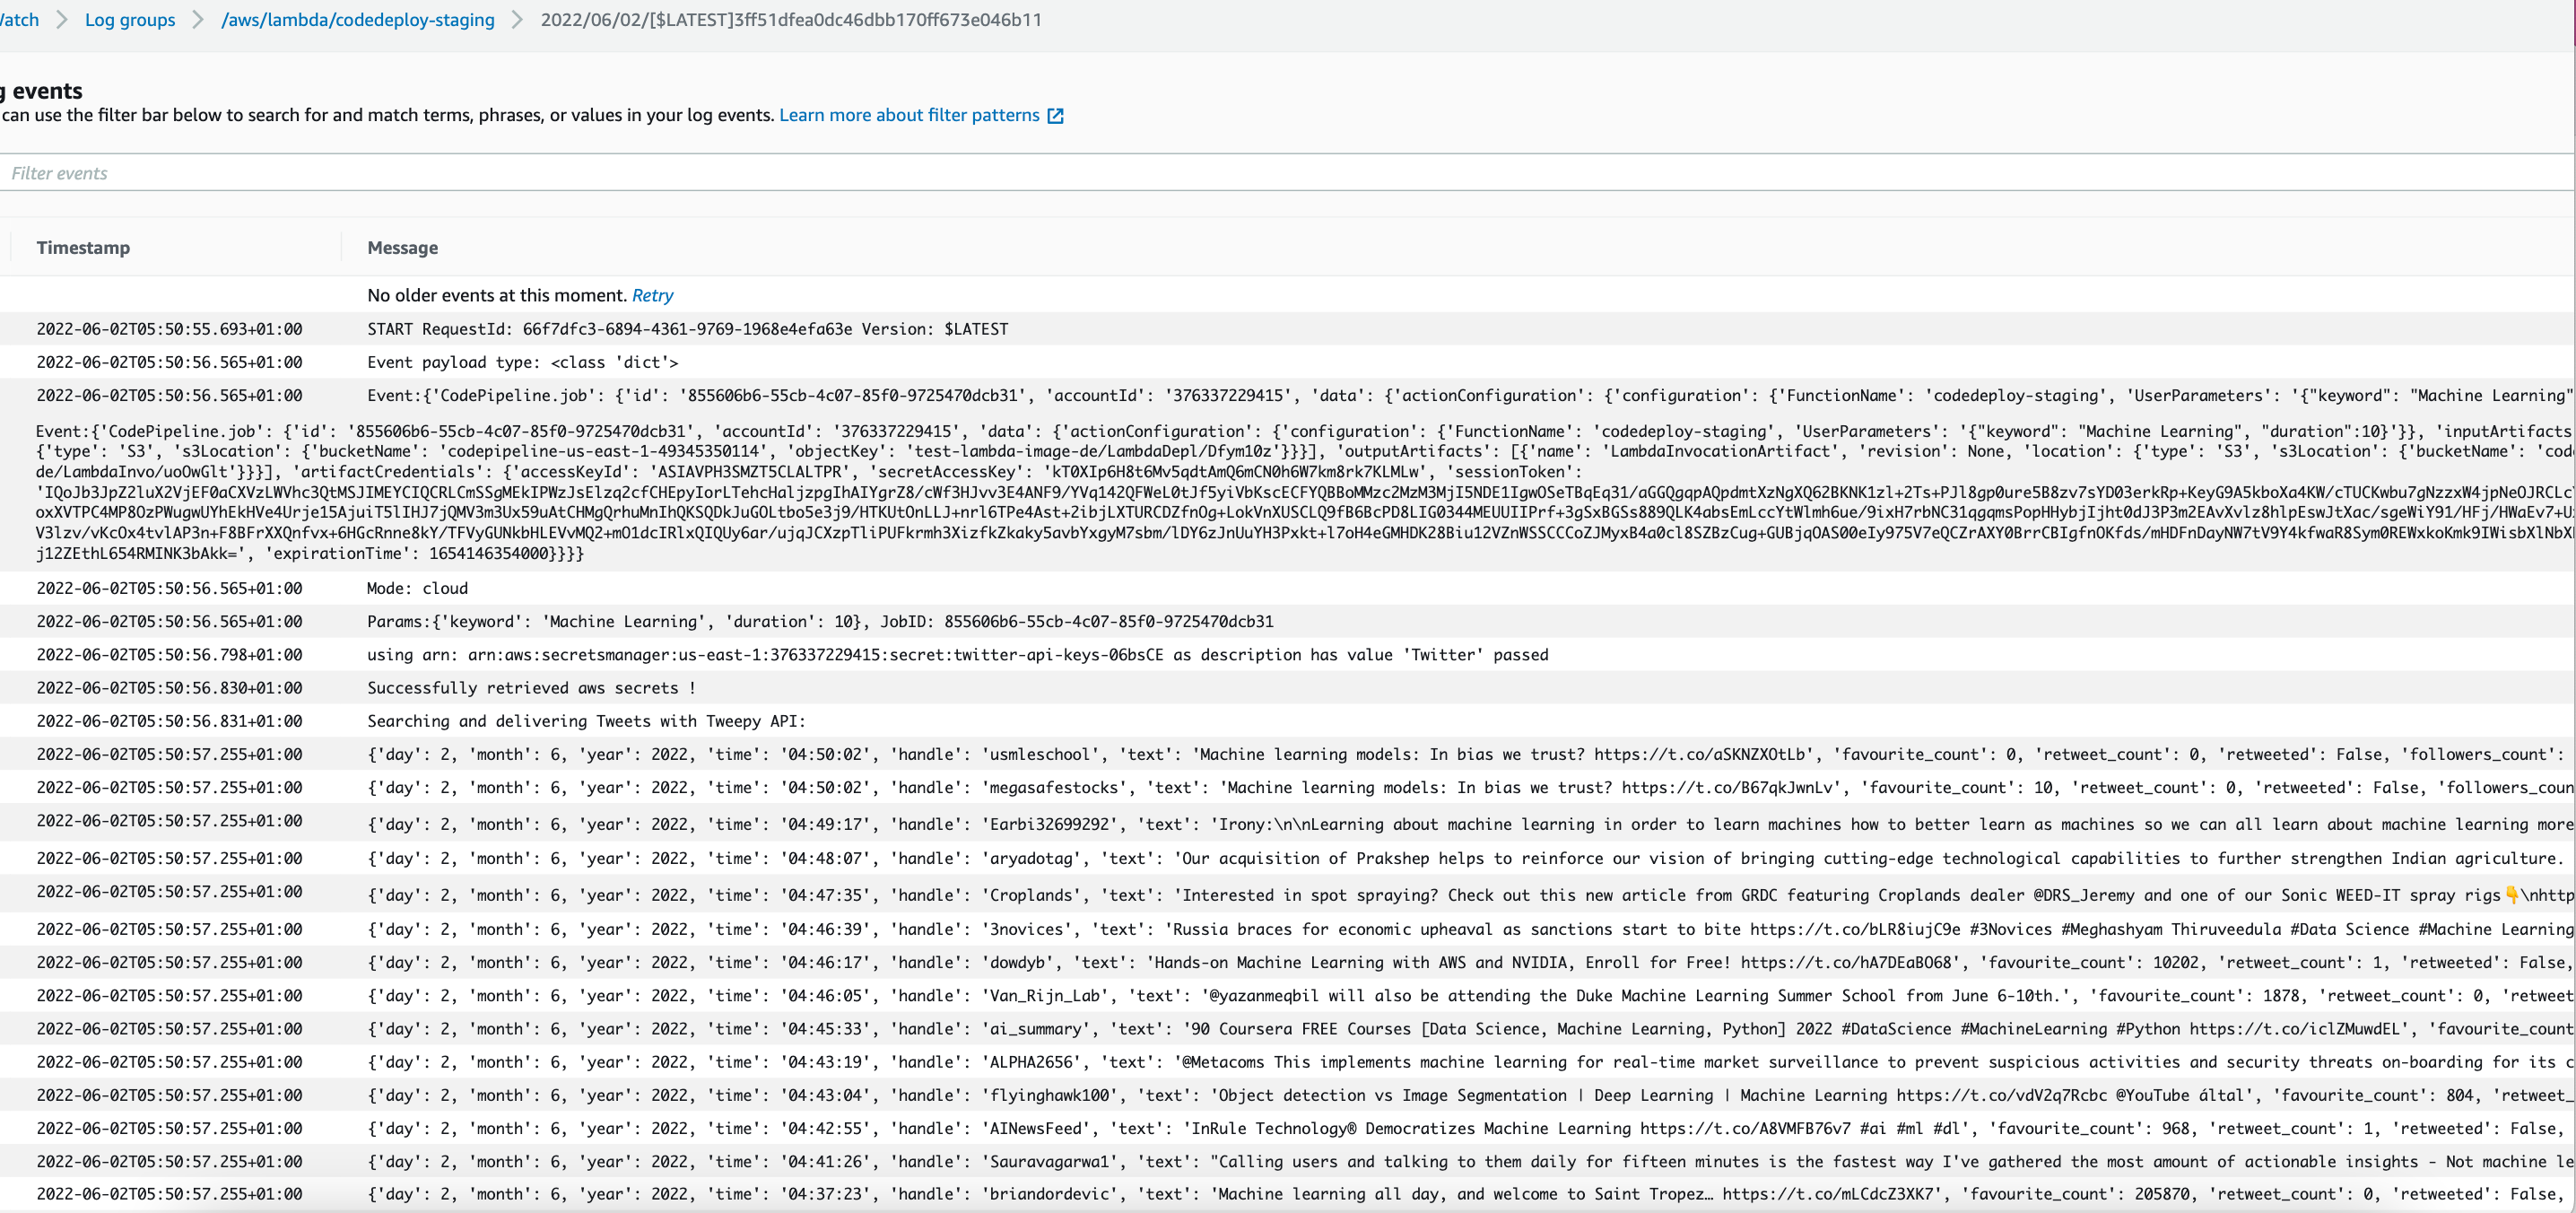
Once the pipeline has finished, we can check CloudWatch to see the invocation logs in the corresponding log stream. The main_twitter.handler includes put_job_success_result and put_job_failure_result codepipeline client methods to return the success/failure of the lambda execution to the pipeline, which will terminate the LambdaInvocationTest stage with success or failure appropriately.
Optional: Checking docker image contents from ECR
For images built from CodeBuild and pushed to ECR, if you want to check contents or run docker image locally from Amazon ECR, you can pull it to your local environment with the docker pull command. [4]
First you would need to authenticate your Docker client to the Amazon ECR registry that you intend to pull your image from. Authentication tokens must be obtained for each registry used, and the tokens are valid for 12 hours [5].
The following command can be run, replacing
1
2
$ aws ecr get-login-password --region us-east-1 | docker login --username AWS --password-stdin <AWS-ACCOUNT-ID>.dkr.ecr.us-east-1.amazonaws.com
Login Succeeded
Pull the image using the docker pull command below. Add the latest tag to pull the latest image update. [3]
1
$ docker pull 376337229415.dkr.ecr.us-east-1.amazonaws.com/tweepy-stream-deploy:latest
Check pulled image shows in local docker repistory
1
2
3
4
$ docker images

REPOSITORY                                                          TAG       IMAGE ID       CREATED          SIZE
376337229415.dkr.ecr.us-east-1.amazonaws.com/tweepy-stream-deploy   latest    a365efc56125   36 min(t(t((((((twitter)
Run docker image with entrpoint in interactive mode so can navigate and check folder structure
1
$ docker run -it --entrypoint sh a365efc56125
We can see the contents of the container. We should see all the python packages installed and the .py scripts. Check the main python script with cat command and check it contains the latest updated code
1
2
3
4
5
6
7
8
9
10
11
12
13
14
15
16
17
18
19
20
21
22
23
24
25
26
27
28
29
30
31
32
33
34
35
36
37
sh-4.2# cat main_twitter.py

def handler(event, context):
    from tweets_api import tweepy_search_api
    from secrets import get_secrets
    import itertools
    import boto3
    import json

    code_pipeline = boto3.client("codepipeline")
    response = get_secrets(mode="aws")
    api_keys = list(itertools.islice(response.values(), 4))
    print(f"Event:{event}")
    print("Searching and delivering Tweets with Tweepy API: \n")
    # special parsing strategy for event from code pipeline as structure is nested differently
    # and of str type so need to convert to dict and parse data key
    # Executing from local_run.py or passing in event for testing lambda function
    # invocation via console - event passed to handler is already of dict type
    if isinstance(event, str):
        params = json.loads(event)["CodePipeline.job"]["data"]["actionConfiguration"][
            "configuration"
        ]["UserParameters"]
    else:
        params = event.copy()
    try:
        tweepy_search_api(params, *api_keys)
        if params["mode"] == "cloud":
            job_id = event["CodePipeline.job"]["id"]
            code_pipeline.put_job_success_result(jobId=job_id)
    except Exception as e:
        print(str(e))
        if params["mode"] == "cloud":
            job_id = event["CodePipeline.job"]["id"]
            code_pipeline.put_job_failure_result(
                jobId=job_id, failureDetails={"message": str(e), "type": "JobFailed"}
            )
        raise
Optional: Manual Method of Lambda Image Deployment and Execution via cli
CodePipeline already automates these steps. However, for more control over creating and invoking the function, we can do this manually via the cli (assuming ECR URI has the build we need)
To create a new function - you can either do it via console or follow the cli command here. You would need to create a new role and grant permissions to lambda to performa actions to other services e.g. logs to cloudwatch, access data from S3 etc (see iam_permissions folder) [15]
For this case, Ive increased the memory size from default 128MB to 1024MB as was running into memory issues when streaming causing execution to error. Also default timeout is 3 secs, which has been overriden to 5 mins. Execution may finish before depending on what the duration parameter is set to payload
1
aws lambda create-function --region us-east-1 --function-name my-function --package-type Image --code ImageUri=<ECR Image URI> --role <arn-role> ----memory-size 1024 --timeout 300
To invoke the function, first fetch the arn. If you can’t remember, execute following command via cli and fetch value of “FunctionArn”
1
$ aws lambda list-functions
Then run the command in the code block below [16]. This includes payload, arn which was just accessed and json output file to store the response.
1
$ aws lambda list-functions
Then run following command listed in AWS docs This includes payload, arn which was just accessed and json output file to store the response.
1
2
3
4
5
6
7
$ aws lambda invoke --function-name <lambda-arn> --payload '{ "keyword": "machine learning", "delivery": "search", "duration": 15 }' --cli-binary-format 'raw-in-base64-out'  outfile.json

{
    "StatusCode": 200,
    "FunctionError": "Unhandled",
    "ExecutedVersion": "$LATEST"
}
Note I have set the –cli-binary-format parameter to raw-in-base64-out. Otherwise, i got the following error below. On doing a google search, i found a useful blog diagnosing the error [17] Seems by setting the --cli-binary-format parameter to raw-in-base64-out, a raw JSON string can be passed to the --payload parameter,
1
Invalid base64: "{"keyword": "machine learning", "delivery": "search", "duration": 15}"
For subsequent builds, the existing function config would need to be updated to using the latest docker image
1
2
3
4
5
6
7
8
9
10
11
12
13
14
15
16
17
18
19
20
21
22
23
24
25
$ aws lambda update-function-code --function-name LambdaTwitter --image-uri <image-uri>

{
    "FunctionName": "LambdaTwitter",
    "FunctionArn": "<functiom-arn>",
    "Role": "<role-arn>",
    "CodeSize": 0,
    "Description": "",
    "Timeout": 300,
    "MemorySize": 1024,
    "LastModified": "2022-04-18T04:27:04.000+0000",
    "CodeSha256": "4682f2366dd01d79d8696de41d91bc85c286e5905018727f43c7dd7935002d62",
    "Version": "$LATEST",
    "TracingConfig": {
        "Mode": "PassThrough"
    },
    "RevisionId": "66472954-e2ef-4461-b582-86d79a190da7",
    "State": "Active",
    "LastUpdateStatus": "InProgress",
    "LastUpdateStatusReason": "The function is being created.",
    "LastUpdateStatusReasonCode": "Creating",
    "PackageType": "Image",
    "ImageConfigResponse": {}
}
References
- [1] https://docs.aws.amazon.com/codepipeline/latest/userguide/concepts-devops-example.html
- [2] https://docs.aws.amazon.com/codepipeline/latest/userguide/concepts.html
- [3] https://docs.aws.amazon.com/codepipeline/latest/userguide/approvals-action-add.html.
- [4] https://docs.aws.amazon.com/AmazonECR/latest/userguide/docker-pull-ecr-image.html
- [5] https://docs.aws.amazon.com/AmazonECR/latest/userguide/registry_auth.html
- [6] https://docs.aws.amazon.com/codebuild/latest/userguide/getting-started-create-build-project-console.html
- [7] https://docs.aws.amazon.com/codebuild/latest/userguide/getting-started-run-build-console.html
- [8] https://docs.aws.amazon.com/codebuild/latest/userguide/sample-docker.html
- [9] https://docs.aws.amazon.com/codebuild/latest/userguide/getting-started-cli-create-build-spec.html
- [10] https://docs.aws.amazon.com/codecommit/latest/userguide/how-to-create-repository.html
- [11] https://docs.aws.amazon.com/codedeploy/latest/userguide/applications-create.html
- [12] https://docs.aws.amazon.com/codedeploy/latest/userguide/deployment-groups-create.html
- [13] https://docs.aws.amazon.com/AWSCloudFormation/latest/UserGuide/using-cfn-validate-template.html
- [14] https://docs.aws.amazon.com/codepipeline/latest/userguide/pipelines-create.html
- [15] https://docs.aws.amazon.com/cli/latest/reference/lambda/create-function.html
- [16] https://docs.aws.amazon.com/cli/latest/reference/lambda/invoke.html
- [17] https://bobbyhadz.com/blog/aws-cli-invalid-base64-lambda-error
Comments powered by Disqus.