
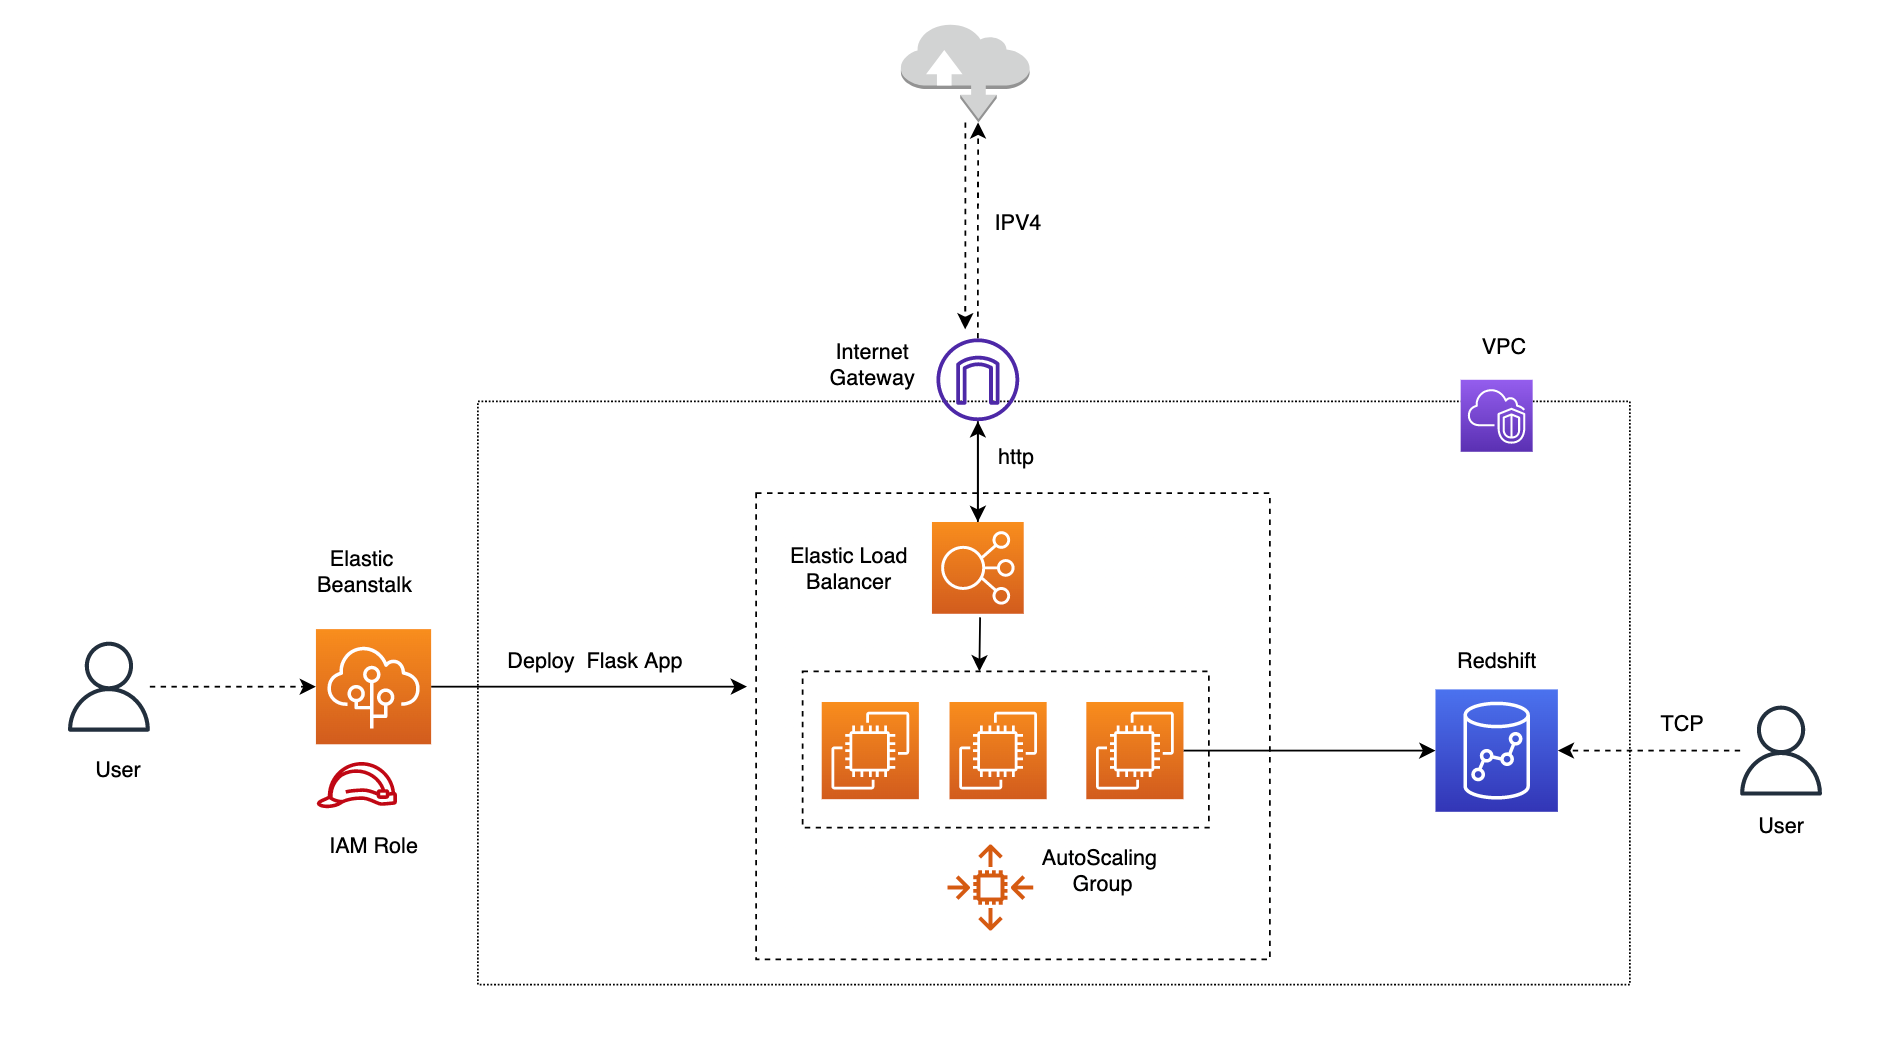
As an alternative to the workflow described in aws-vpc/code-deploy/README.md which involves manual steps to deploying an EC2 instance using AWS CodeDeploy - we can also use AWS Elastic Beanstalk to automate this and quickly provision and operate all necessary infrastructure (e.g. EC2, load balancers, auto scaling groups, security and networking etc) https://docs.aws.amazon.com/whitepapers/latest/overview-deployment-options/aws-elastic-beanstalk.html We can also create an RDS DB with EB or add one previously created to the EB environment. Furthermore, Amazon EC2 instances in EB environment can also connect to an outside RDS database. In this example, we will configure inbound rules in security group attached to RDS db to allow traffic from security group associated with Elastic DB instance. Although as mentioned in the AWS docs https://docs.aws.amazon.com/elasticbeanstalk/latest/dg/, this will create a dependency between EB and RDS security groups which means that we would need to delete this inbound rule before terminating EB application and all the resources. AWSHowTo.RDS.html The next few sections, will follow this tutorial in AWS docs with some modifications where we will also have a Redshift cluster in same VPC, and configure security group inbound rules to allow the EC2 instances in the EB environment to communciate with Redshift cluster and vice versa.
Installing and configuring Elastic Beanstalk cli
Assuming the other resources are created and active (instructions in README.md at repo root) First need to install Elastic Beanstalk cli. As per the instructions in the aws repo:
- First git clone the repo and then run the installer script. You should see the stdout as below
1
2
3
4
5
6
7
8
9
10
11
12
13
14
15
16
17
18
19
20
21
22
23
24
25
26
27
28
29
30
31
32
33
34
35
36
37
38
39
40
41
42
43
44
45
46
47
48
49
50
51
52
53
54
55
56
57
58
59
60
61
62
63
64
65
66
67
68
69
70
71
72
73
74
75
76
77
78
79
80
81
82
83
84
85
86
87
88
89
90
91
92
93
94
95
96
97
98
99
100
101
102
103
104
105
106
107
108
109
110
111
112
113
114
115
116
117
118
119
120
121
122
123
124
125
126
127
128
129
130
131
132
133
134
135
136
137
138
139
140
141
142
143
144
145
146
147
148
149
150
151
152
153
154
155
156
157
158
$ python ./aws-elastic-beanstalk-cli-setup/scripts/ebcli_installer.py

***********************************
1. Locating virtualenv installation
***********************************

******************************************
2. Creating exclusive virtualenv for EBCLI
******************************************
created virtual environment CPython3.9.1.final.0-64 in 1579ms
  creator CPython3Posix(dest=/Users/rk1103/.ebcli-virtual-env, clear=False, no_vcs_ignore=False, global=False)
  seeder FromAppData(download=False, pip=bundle, setuptools=bundle, wheel=bundle, via=copy, app_data_dir=/Users/rk1103/Library/Application Support/virtualenv)
    added seed packages: pip==22.0.4, setuptools==62.1.0, wheel==0.37.1
  activators BashActivator,CShellActivator,FishActivator,PowerShellActivator,PythonActivator,XonshActivator

************************
3. Activating virtualenv
************************

*******************
4. Installing EBCLI
*******************
Collecting awsebcli
  Downloading awsebcli-3.20.3.tar.gz (259 kB)
     ━━━━━━━━━━━━━━━━━━━━━━━━━━━━━━━━━━━━━━━ 259.2/259.2 KB 3.6 MB/s eta 0:00:00
  Preparing metadata (setup.py) ... done
Collecting botocore<1.24.0,>1.23.41
  Downloading botocore-1.23.54-py3-none-any.whl (8.5 MB)
     ━━━━━━━━━━━━━━━━━━━━━━━━━━━━━━━━━━━━━━━━ 8.5/8.5 MB 12.1 MB/s eta 0:00:00
Collecting cement==2.8.2
  Downloading cement-2.8.2.tar.gz (165 kB)
     ━━━━━━━━━━━━━━━━━━━━━━━━━━━━━━━━━━━━━━━ 165.8/165.8 KB 5.1 MB/s eta 0:00:00
  Preparing metadata (setup.py) ... done
Collecting colorama<0.4.4,>=0.2.5
  Downloading colorama-0.4.3-py2.py3-none-any.whl (15 kB)
Collecting future<0.17.0,>=0.16.0
  Downloading future-0.16.0.tar.gz (824 kB)
     ━━━━━━━━━━━━━━━━━━━━━━━━━━━━━━━━━━━━━━━ 824.5/824.5 KB 8.8 MB/s eta 0:00:00
  Preparing metadata (setup.py) ... done
Collecting pathspec==0.9.0
  Using cached pathspec-0.9.0-py2.py3-none-any.whl (31 kB)
Collecting python-dateutil<3.0.0,>=2.1
  Using cached python_dateutil-2.8.2-py2.py3-none-any.whl (247 kB)
Collecting requests<=2.26,>=2.20.1
  Using cached requests-2.26.0-py2.py3-none-any.whl (62 kB)
Requirement already satisfied: setuptools>=20.0 in /Users/rk1103/.ebcli-virtual-env/lib/python3.9/site-packages (from awsebcli) (62.1.0)
Collecting setuptools>=20.0
  Using cached setuptools-62.3.2-py3-none-any.whl (1.2 MB)
Collecting semantic_version==2.8.5
  Downloading semantic_version-2.8.5-py2.py3-none-any.whl (15 kB)
Collecting six<1.15.0,>=1.11.0
  Downloading six-1.14.0-py2.py3-none-any.whl (10 kB)
Collecting termcolor==1.1.0
  Using cached termcolor-1.1.0-py3-none-any.whl
Collecting wcwidth<0.2.0,>=0.1.7
  Downloading wcwidth-0.1.9-py2.py3-none-any.whl (19 kB)
Collecting PyYAML<5.5,>=5.3.1
  Using cached PyYAML-5.4.1-cp39-cp39-macosx_10_9_x86_64.whl (259 kB)
Collecting urllib3>=1.26.5
  Downloading urllib3-1.26.9-py2.py3-none-any.whl (138 kB)
     ━━━━━━━━━━━━━━━━━━━━━━━━━━━━━━━━━━━━━━━ 139.0/139.0 KB 3.4 MB/s eta 0:00:00
Collecting docker-compose<1.26.0,>=1.25.2
  Downloading docker_compose-1.25.5-py2.py3-none-any.whl (139 kB)
     ━━━━━━━━━━━━━━━━━━━━━━━━━━━━━━━━━━━━━━━ 139.2/139.2 KB 4.0 MB/s eta 0:00:00
Collecting blessed>=1.9.5
  Downloading blessed-1.19.1-py2.py3-none-any.whl (58 kB)
     ━━━━━━━━━━━━━━━━━━━━━━━━━━━━━━━━━━━━━━━━ 58.0/58.0 KB 1.9 MB/s eta 0:00:00
Collecting jmespath<1.0.0,>=0.7.1
  Using cached jmespath-0.10.0-py2.py3-none-any.whl (24 kB)
Collecting docopt<1,>=0.6.1
  Using cached docopt-0.6.2-py2.py3-none-any.whl
Collecting dockerpty<1,>=0.4.1
  Downloading dockerpty-0.4.1.tar.gz (13 kB)
  Preparing metadata (setup.py) ... done
Collecting websocket-client<1,>=0.32.0
  Downloading websocket_client-0.59.0-py2.py3-none-any.whl (67 kB)
     ━━━━━━━━━━━━━━━━━━━━━━━━━━━━━━━━━━━━━━━ 67.2/67.2 KB 746.8 kB/s eta 0:00:00
Collecting cached-property<2,>=1.2.0
  Using cached cached_property-1.5.2-py2.py3-none-any.whl (7.6 kB)
Collecting jsonschema<4,>=2.5.1
  Using cached jsonschema-3.2.0-py2.py3-none-any.whl (56 kB)
Collecting texttable<2,>=0.9.0
  Downloading texttable-1.6.4-py2.py3-none-any.whl (10 kB)
Collecting docker[ssh]<5,>=3.7.0
  Downloading docker-4.4.4-py2.py3-none-any.whl (147 kB)
     ━━━━━━━━━━━━━━━━━━━━━━━━━━━━━━━━━━━━━━━ 147.0/147.0 KB 3.2 MB/s eta 0:00:00
Collecting charset-normalizer~=2.0.0
  Downloading charset_normalizer-2.0.12-py3-none-any.whl (39 kB)
Collecting certifi>=2017.4.17
  Downloading certifi-2022.5.18.1-py3-none-any.whl (155 kB)
     ━━━━━━━━━━━━━━━━━━━━━━━━━━━━━━━━━━━━━━━ 155.2/155.2 KB 3.7 MB/s eta 0:00:00
Collecting idna<4,>=2.5
  Using cached idna-3.3-py3-none-any.whl (61 kB)
Collecting paramiko>=2.4.2
  Downloading paramiko-2.11.0-py2.py3-none-any.whl (212 kB)
     ━━━━━━━━━━━━━━━━━━━━━━━━━━━━━━━━━━━━━━━ 212.9/212.9 KB 4.5 MB/s eta 0:00:00
Collecting attrs>=17.4.0
  Downloading attrs-21.4.0-py2.py3-none-any.whl (60 kB)
     ━━━━━━━━━━━━━━━━━━━━━━━━━━━━━━━━━━━━━━━━ 60.6/60.6 KB 1.5 MB/s eta 0:00:00
Collecting pyrsistent>=0.14.0
  Downloading pyrsistent-0.18.1-cp39-cp39-macosx_10_9_universal2.whl (81 kB)
     ━━━━━━━━━━━━━━━━━━━━━━━━━━━━━━━━━━━━━━━━ 81.4/81.4 KB 1.7 MB/s eta 0:00:00
Collecting pynacl>=1.0.1
  Downloading PyNaCl-1.5.0-cp36-abi3-macosx_10_10_universal2.whl (349 kB)
     ━━━━━━━━━━━━━━━━━━━━━━━━━━━━━━━━━━━━━━━ 349.9/349.9 KB 5.2 MB/s eta 0:00:00
Collecting cryptography>=2.5
  Downloading cryptography-37.0.2-cp36-abi3-macosx_10_10_x86_64.whl (2.8 MB)
     ━━━━━━━━━━━━━━━━━━━━━━━━━━━━━━━━━━━━━━━━ 2.8/2.8 MB 8.7 MB/s eta 0:00:00
Collecting bcrypt>=3.1.3
  Downloading bcrypt-3.2.2-cp36-abi3-macosx_10_10_universal2.whl (50 kB)
     ━━━━━━━━━━━━━━━━━━━━━━━━━━━━━━━━━━━━━━━━ 50.0/50.0 KB 1.4 MB/s eta 0:00:00
Collecting cffi>=1.1
  Downloading cffi-1.15.0-cp39-cp39-macosx_10_9_x86_64.whl (178 kB)
     ━━━━━━━━━━━━━━━━━━━━━━━━━━━━━━━━━━━━━━━ 179.0/179.0 KB 3.8 MB/s eta 0:00:00
Collecting pycparser
  Using cached pycparser-2.21-py2.py3-none-any.whl (118 kB)
Building wheels for collected packages: awsebcli, cement, future, dockerpty
  Building wheel for awsebcli (setup.py) ... done
  Created wheel for awsebcli: filename=awsebcli-3.20.3-py3-none-any.whl size=363068 sha256=4252199464c2d9b7f000cbc69b3f6b8825c097277e723f7302afacd43203de20
  Stored in directory: /Users/rk1103/Library/Caches/pip/wheels/53/a5/e0/fab45c199fdf641ecf356dbad7c0496d81176702ba33900c7d
  Building wheel for cement (setup.py) ... done
  Created wheel for cement: filename=cement-2.8.2-py3-none-any.whl size=99518 sha256=1e474d9912dfd9f8b34f171971b9c7bf0365a0f37bd9328478579e462b7c83ee
  Stored in directory: /Users/rk1103/Library/Caches/pip/wheels/85/d0/bd/0b0c9c00b98cc56399892889b9be920c7f5dc39fc812712a16
  Building wheel for future (setup.py) ... done
  Created wheel for future: filename=future-0.16.0-py3-none-any.whl size=487809 sha256=230d6c40df904259456af5e76b2514859b19b3b3d64f071738c3a9dd7c10544f
  Stored in directory: /Users/rk1103/Library/Caches/pip/wheels/6e/bc/19/ea1496b17b60d45b1503dfb87704b1246bfaca822ce9880fd9
  Building wheel for dockerpty (setup.py) ... done
  Created wheel for dockerpty: filename=dockerpty-0.4.1-py3-none-any.whl size=16614 sha256=86d22423db073229553cd7c5819fe1defa9efc56bf4f9099e0e335c420c42052
  Stored in directory: /Users/rk1103/Library/Caches/pip/wheels/54/c7/ff/ead8e8870db7e414df11981d8fb6d0d09b51f467c34791bde4
Successfully built awsebcli cement future dockerpty
Installing collected packages: wcwidth, texttable, termcolor, future, docopt, cement, cached-property, urllib3, six, setuptools, semantic_version, PyYAML, pyrsistent, pycparser, pathspec, jmespath, idna, colorama, charset-normalizer, certifi, attrs, websocket-client, requests, python-dateutil, jsonschema, dockerpty, cffi, blessed, pynacl, docker, cryptography, botocore, bcrypt, paramiko, docker-compose, awsebcli
  Attempting uninstall: setuptools
    Found existing installation: setuptools 62.1.0
    Uninstalling setuptools-62.1.0:
      Successfully uninstalled setuptools-62.1.0
Successfully installed PyYAML-5.4.1 attrs-21.4.0 awsebcli-3.20.3 bcrypt-3.2.2 blessed-1.19.1 botocore-1.23.54 cached-property-1.5.2 cement-2.8.2 certifi-2022.5.18.1 cffi-1.15.0 charset-normalizer-2.0.12 colorama-0.4.3 cryptography-37.0.2 docker-4.4.4 docker-compose-1.25.5 dockerpty-0.4.1 docopt-0.6.2 future-0.16.0 idna-3.3 jmespath-0.10.0 jsonschema-3.2.0 paramiko-2.11.0 pathspec-0.9.0 pycparser-2.21 pynacl-1.5.0 pyrsistent-0.18.1 python-dateutil-2.8.2 requests-2.26.0 semantic_version-2.8.5 setuptools-62.3.2 six-1.14.0 termcolor-1.1.0 texttable-1.6.4 urllib3-1.26.9 wcwidth-0.1.9 websocket-client-0.59.0
WARNING: You are using pip version 22.0.4; however, version 22.1.2 is available.
You should consider upgrading via the '/Users/rk1103/.ebcli-virtual-env/bin/python -m pip install --upgrade pip' command.

***********************
5. Creating EB wrappers
***********************

***************
6. Finishing up
***************
Success!

    Note: To complete installation, ensure `eb` is in PATH. You can ensure this by executing:

    1. Bash:

       echo 'export PATH="/Users/rk1103/.ebcli-virtual-env/executables:$PATH"' >> ~/.bash_profile && source ~/.bash_profile

    2. Zsh:

       echo 'export PATH="/Users/rk1103/.ebcli-virtual-env/executables:$PATH"' >> ~/.zshenv && source ~/.zshenv
- As per the last bit in the output above which contains instructions on how to add the executable to $PATH
1
echo 'export PATH="/Users/rk1103/.ebcli-virtual-env/executables:$PATH"' >> ~/.bash_profile && source ~/.bash_profile
Initilaise Elastic Beanstalk cli repo
Initialize your EB CLI repository with the eb init command. https://docs.aws.amazon.com/elasticbeanstalk/latest/dg/create-deploy-python-flask.html Select the desired options that come up e.g.
- Select a default region: us-east-1 : US East (N. Virginia)
- Enter Application Name : eb-flask
- It appears you are using Python. Is this correct? (Y/n): y
- Select a platform branch: Python 3.8 running on 64bit Amazon Linux 2
- Select a keypair: aws-eb (or create new one)
Deploy Flask Application to Elastic Beanstalk
Following resources are created and managed by AWS Elastic Beanstalk during deployment as described in the docs :
- EC2 instance and Load balancer including security groups
- Auto Scaling group
- Amazon S3 bucket
- Amazon CloudWatch alarms
- AWS CloudFormation stack
- Domain name
We can deploy the application with selected vpc and subnets already created and vpc security group
1
$ eb create eb-flask  --vpc.id vpc-04fbebf4ff05101c6 --vpc.elbpublic --vpc.ec2subnets subnet-0b9a8d47f89cf7849,subnet-0802014b04846f0ed --vpc.securitygroup sg-0808c1d97bf20a775
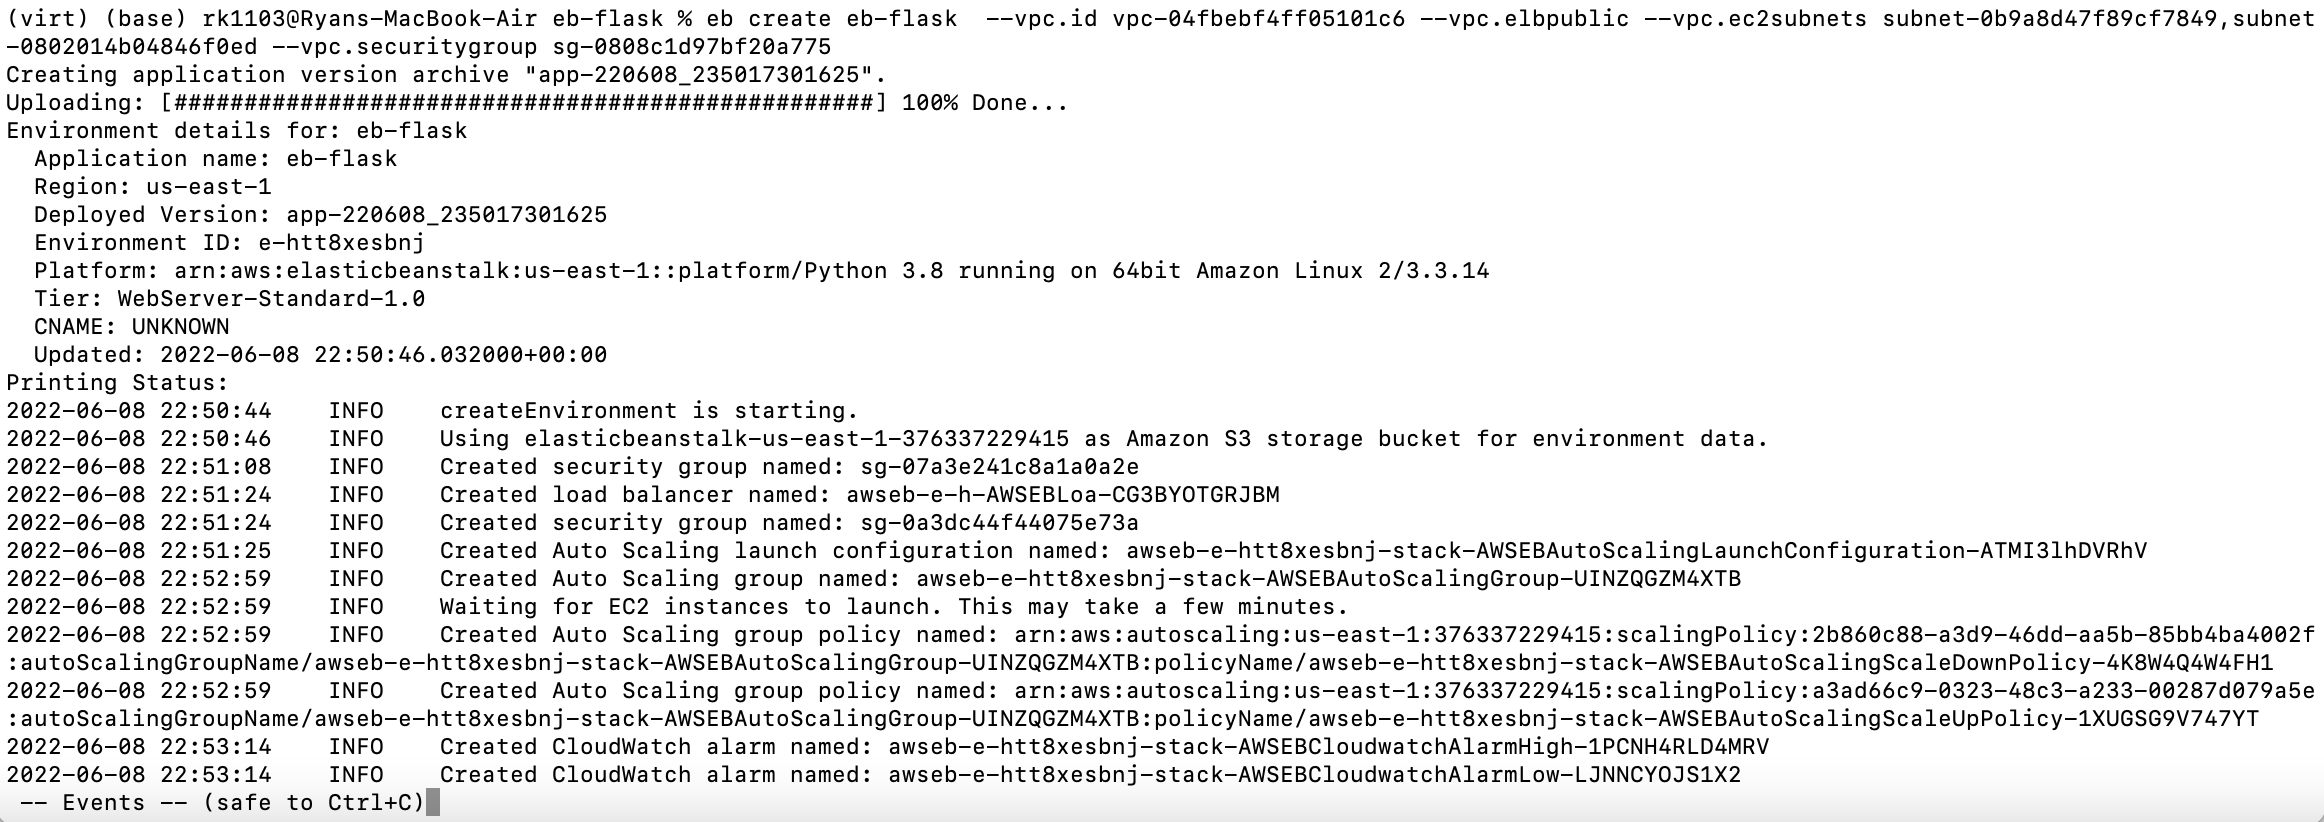
The EC2 instance created by eb, does not automatically have an elastic IP associated so it can only be accessed from inside the VPC using the internal IP. So if required to ssh into it we need to assign an Elastic IP to the instance.
- Go into the EC2 dashboard, then in the NETWORK & SECURITY menu go to Elastic IPs.
- Click on Allocate a new address.
- Right click on the new IP and select Associate address.
- Associate it with the EC2 instance
You should now see public ip4 address visible in the instance summary. Go to connect -> SSH client for instructions on how to ssh into the instance as below
1
2
3
4
5
6
7
8
9
10
11
12
13
14
15
16
17
$ cd ~/.ssh
$ chmod 400 aws-eb
$ ssh -i "aws-eb" ec2-user@ec2-18-233-255-138.compute-1.amazonaws.com
  _____ _           _   _      ____                       _        _ _
 | ____| | __   ___| |_(_) ___| __ )  ___  __ _ _ __  ___| |_ __ _| | | __
 |  _| | |/ _ \/ __| __| |/ __|  _ \ / _ \/ _\ | '_ \/ __| __/ _\ | | |/ /
 | |___| | (_| \__ \ |_| | (__| |_) |  __/ (_| | | | \__ \ || (_| | |   <
 |_____|_|\__,_|___/\__|_|\___|____/ \___|\__,_|_| |_|___/\__\__,_|_|_|\_\

 Amazon Linux 2 AMI

 This EC2 instance is managed by AWS Elastic Beanstalk. Changes made via SSH
 WILL BE LOST if the instance is replaced by auto-scaling. For more information
 on customizing your Elastic Beanstalk environment, see our documentation here:
 http://docs.aws.amazon.com/elasticbeanstalk/latest/dg/customize-containers-ec2.html

[ec2-user@ip-10-0-1-41 ~]$ ls
When the environment creation process completes, open your web site with eb open from cli. This will open a browser using the domain name created for your application
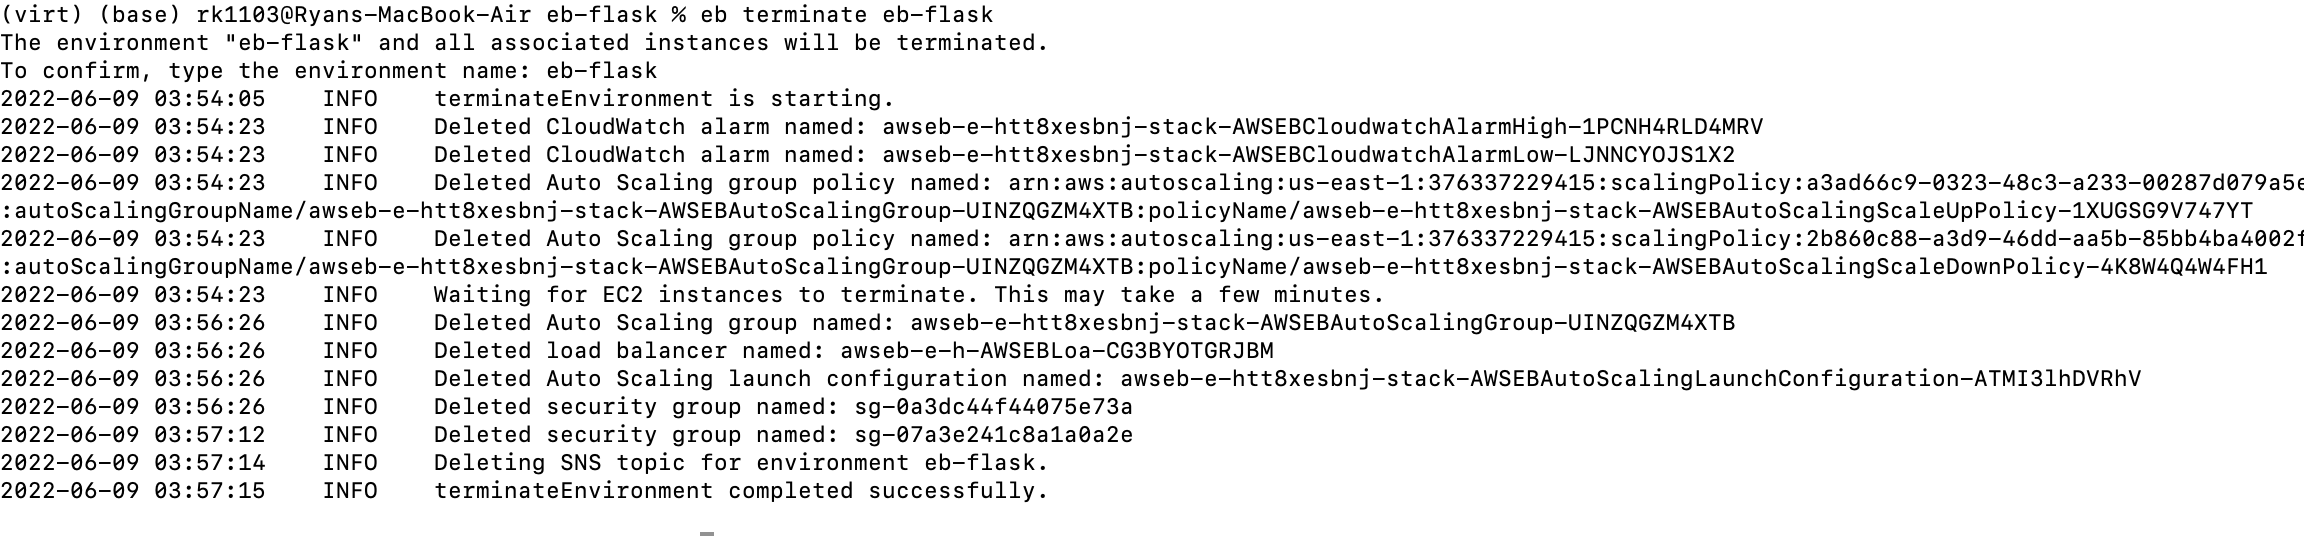
To terminate the application and automatically teardown the resources, first remove the inbound rule in RDS security group which references EB security group. Then run eb terminate eb-flask
Comments powered by Disqus.