
Amazon Fraud Detector is a fully managed service that can identify potentially fraudulent online activities. These can be situations such as the creation of fake accounts or online payment fraud. Amazon Fraud Detector automates the time-consuming and expensive steps to build, train, and deploy an ML model for fraud detection. It customizes each model it creates to your dataset, making the accuracy of models higher than current one-size-fits-all ML solutions. And because you pay only for what you use, you can avoid large upfront expenses.
The example below, uses simulated train and test datasets from Kaggle and can be downloaded from this kaggle page The datasets fraudTest.csv and fraudTrain.csv contain variables for each online account registration event as required for creating an event in AWS Fraud Detector as described here
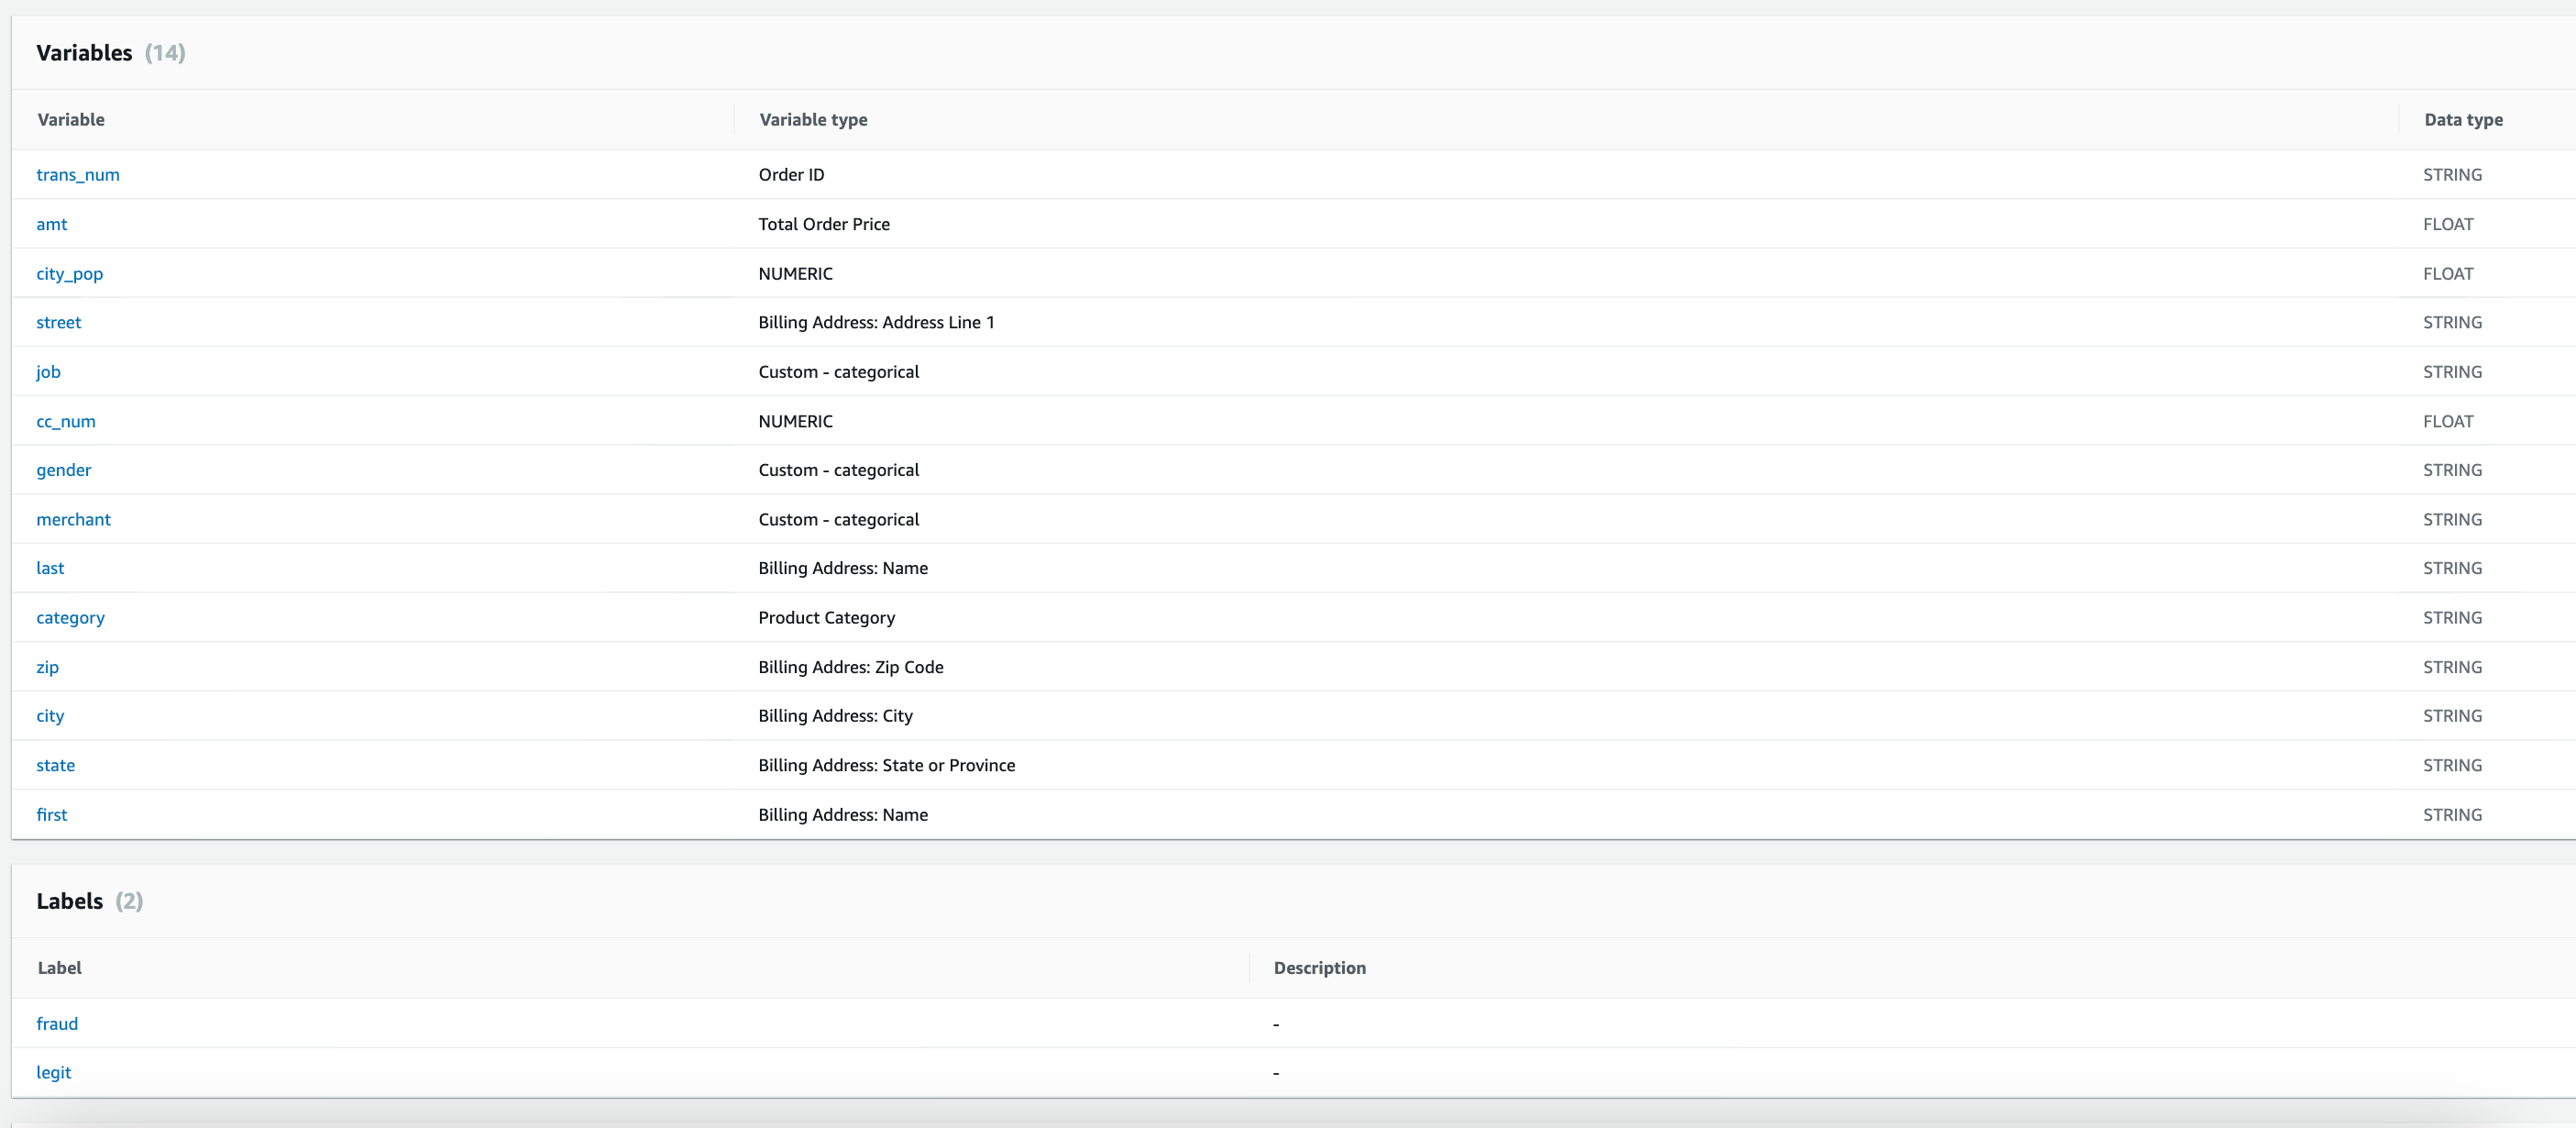
This contains the following variables:
- index - Unique Identifier for each row
- transdatetrans_time - Transaction DateTime
- cc_num - Credit Card Number of Customer
- merchant - Merchant Name
- category - Category of Merchant
- amt - Amount of Transaction
- first - First Name of Credit Card Holder
- last - Last Name of Credit Card Holder
- gender - Gender of Credit Card Holder
- street - Street Address of Credit Card Holder
- city - City of Credit Card Holder
- state - State of Credit Card Holder
- zip - Zip of Credit Card Holder
- lat - Latitude Location of Credit Card Holder
- long - Longitude Location of Credit Card Holder
- city_pop - Credit Card Holder’s City Population
- job - Job of Credit Card Holder
- dob - Date of Birth of Credit Card Holder
- trans_num - Transaction Number
- unix_time - UNIX Time of transaction
- merch_lat - Latitude Location of Merchant
- merch_long - Longitude Location of Merchant
- is_fraud - Fraud Flag <— Target Class
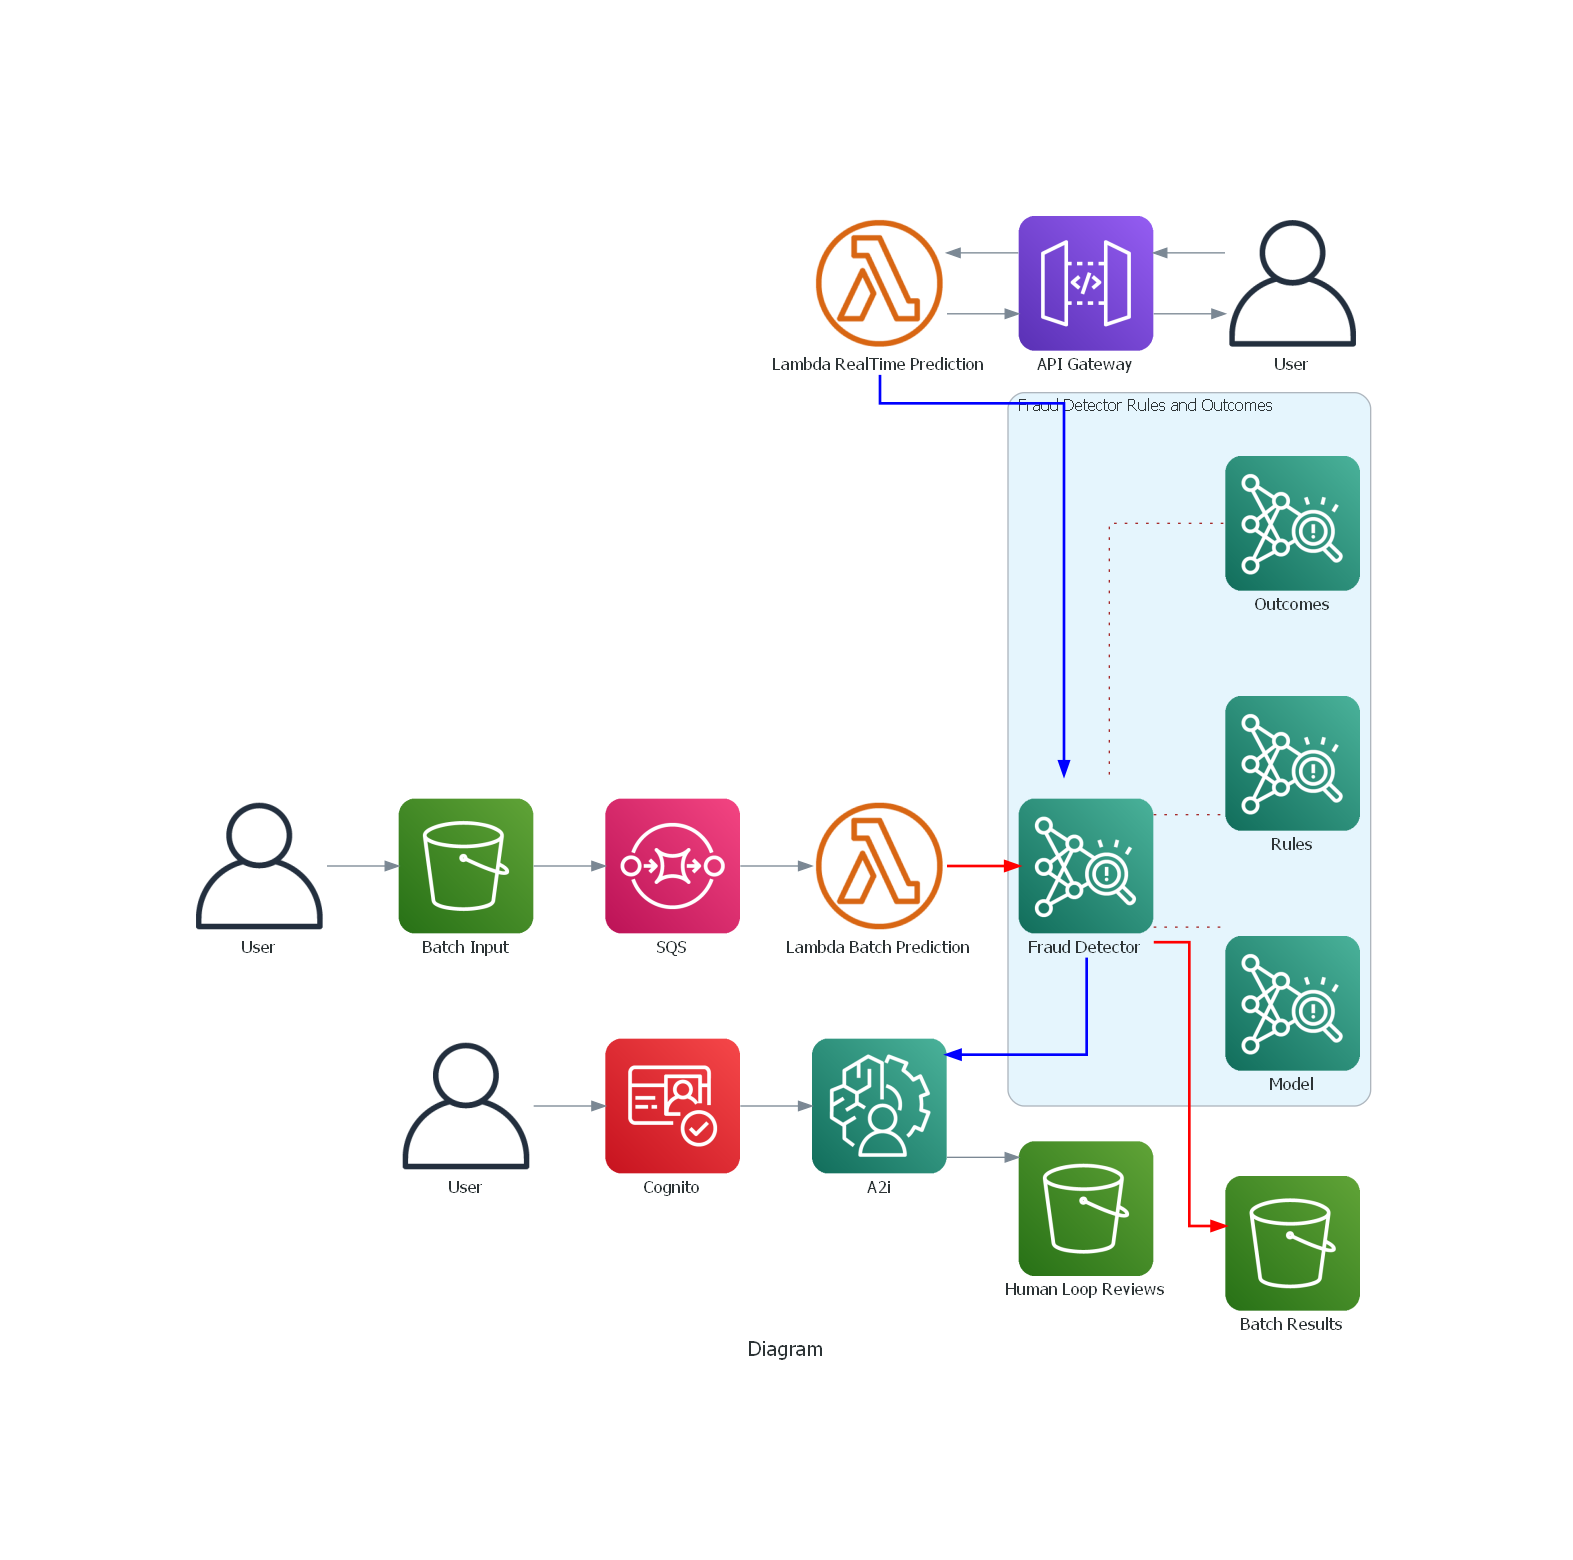
We will create a workflow to read data from S3, perform ETL job, train a Fraud Detector model which will be deployed and used to generate predictions for a sample of batch data as well as realtime predictions via a custom API.
The code for the following exercise can be found here and configuring virtual environment with dependencies here
CloudFormation Templates
Cloudformation templates for creating glue development endpoint (/glue-dev-endpoint.yaml) or the glue and fraud event resources (fraud_detector.yaml) are stored in cloudformation folder More details on cloudformation can be found here, which contains links to the appropriate AWS docs. The stacks can be created by running the bash script below and passing in either ‘endpoint’ or ‘detector’ argument to create a glue dve endpoint stack or frauddetectorglue stack
1
 sh projects/fraud/bash_scripts/create-resources.sh endpoint
The FraudDetectorGlue stack creates the detector and associated rules, the variables, labels and outcomes for associating with the event type. It also creates the resources for the ETL jobs e.g. glue, crawler, lambda functions, sqs, eventbridge etc. We can check that these are as they should be from the console.
Upload raw data and glue script to S3
Run the following command specifying the local path to fraud test and train raw data to upload and bucket name. This creates a bucket (if it does not already exists) and then proceeds to the upload step.
1
2
3
4
5
6
7
$ python s3/transfer_data_s3.py --bucket_name fraud-sample-data --local_dir datasets/fraud-sample-data/dataset1

2022-05-15 01:21:55,390 botocore.credentials INFO:Found credentials in shared credentials file: ~/.aws/credentials
2022-05-15 01:21:55,982 __main__ INFO:Creating new bucket with name:fraud-sample-data
0it [00:00, ?it/s]2022-05-15 01:21:56,733 __main__ INFO:Starting upload ....
0it [00:00, ?it/s]
2022-05-15 01:21:57,163 __main__ INFO:Successfully uploaded all files in datasets/fraud-sample-data/dataset1 to S3  bucket fraud-sample-data
We should have train and test csv files in the same folder as in screenshot below

We also need to upload the glue script to S3 bucket which is referenced in the cloudformation template in the glue job resource. If glue jobs have been run previously, there should be a bucket in S3 of the format - aws-glue-assets-${AWS::AccountId}-${AWS::Region} Inside this bucket there will be a scripts folder where glue references all the scripts generated if glue job etl workflow is created from the console. Upload the glue script fraud-etl-glue.py into the bucket in the scripts folder via console or cli. If this bucket does not exist, then create your own. However, the ScriptLocation property of the GlueJOb resource in the cloudformation template used to create the scripts will need to be modified accordingly so it creates the glue job created can reference the script in the correct location.
Configure S3 event notifications to SQS
We also need to configure S3 to send notifications to SQS when the data from glue job is written to the bucket. The SQS messages will then be polled by lambda to start the training job in AWS Fraud Detector
To do this go to S3 bucket -> properties -> EventNotifications -> Create event notification In the General configuration section, specify descriptive event name for your event notification. We will include a prefix and a suffix to limit the notifications to objects added to a specific folder (glue_transformed/) and the object key should end in the specified characters. (e.g. fraudTrain.csv) In the Event types section, we will only select all object create events. We could additionally just select specific create events like ‘copy’ or ‘put’ but given the large file size (approx 300MB), there is a possibility of s3 copy action from glue script using multipart upload to write the object (so we want to capture this action as well)
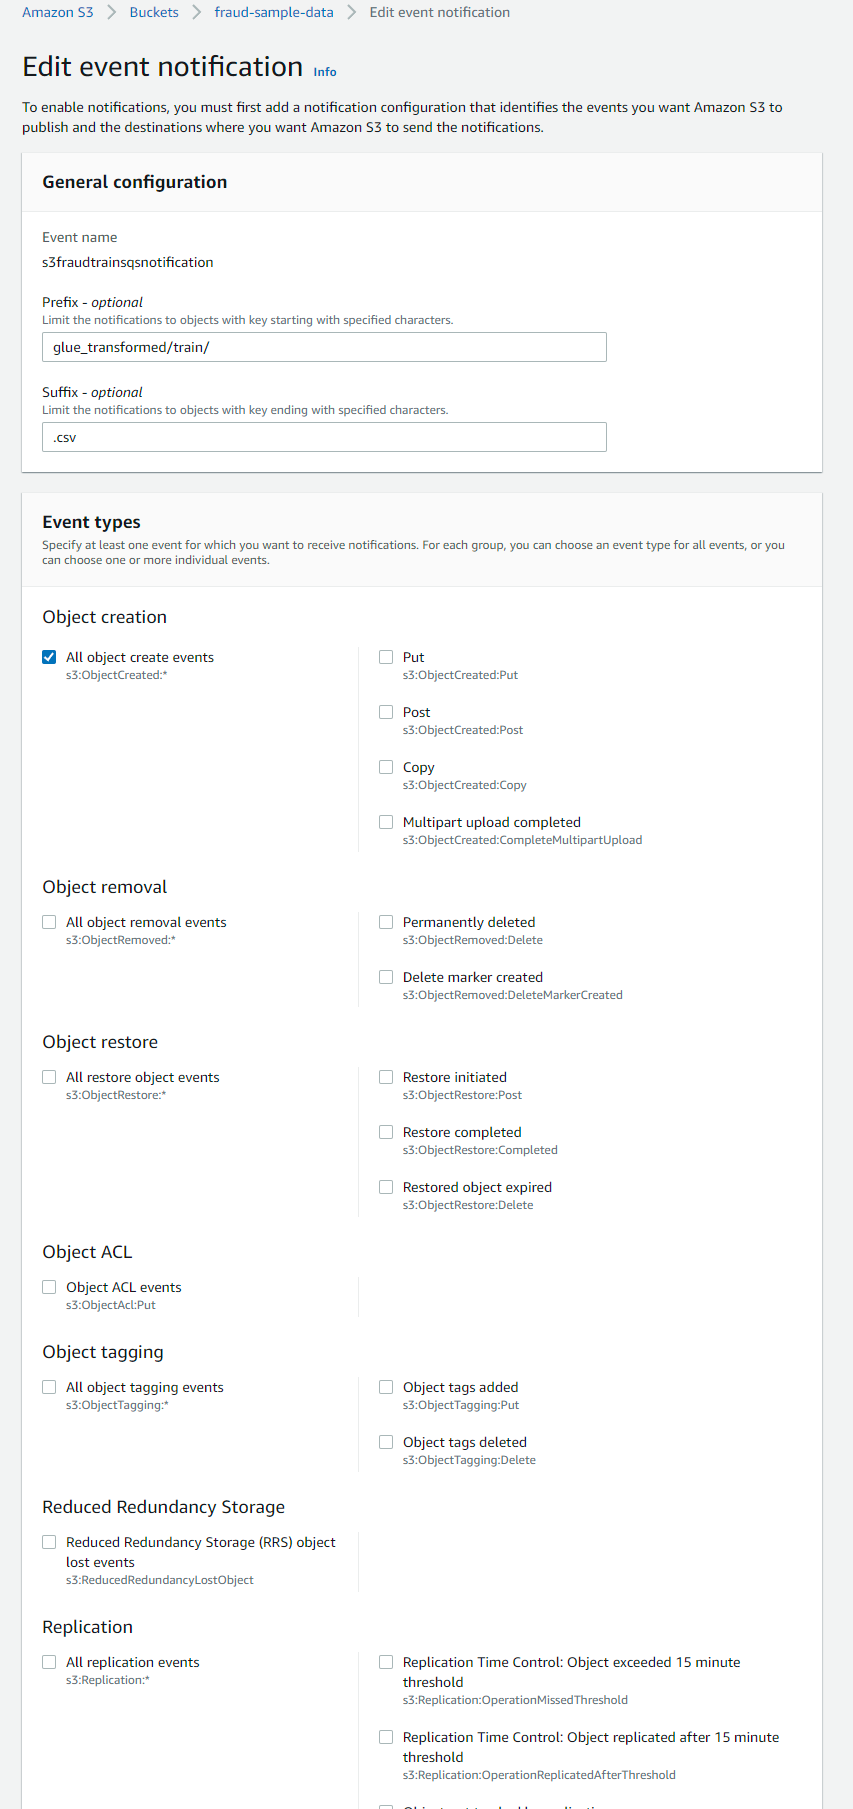
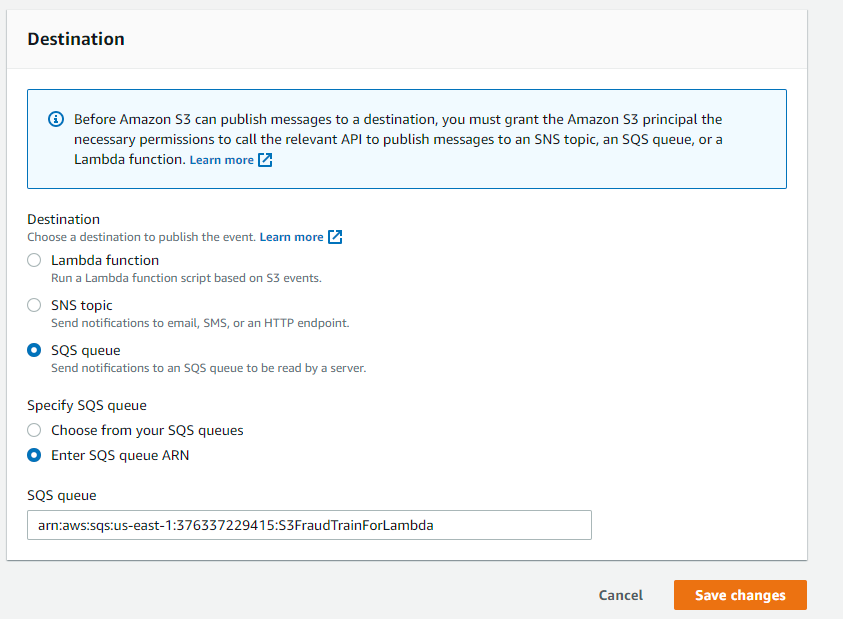
In the Destination section, choose the event notification destination and select the destination type: SQS Queue. Specify the arn of the queue (which can be obtained from the SQS console) Ref
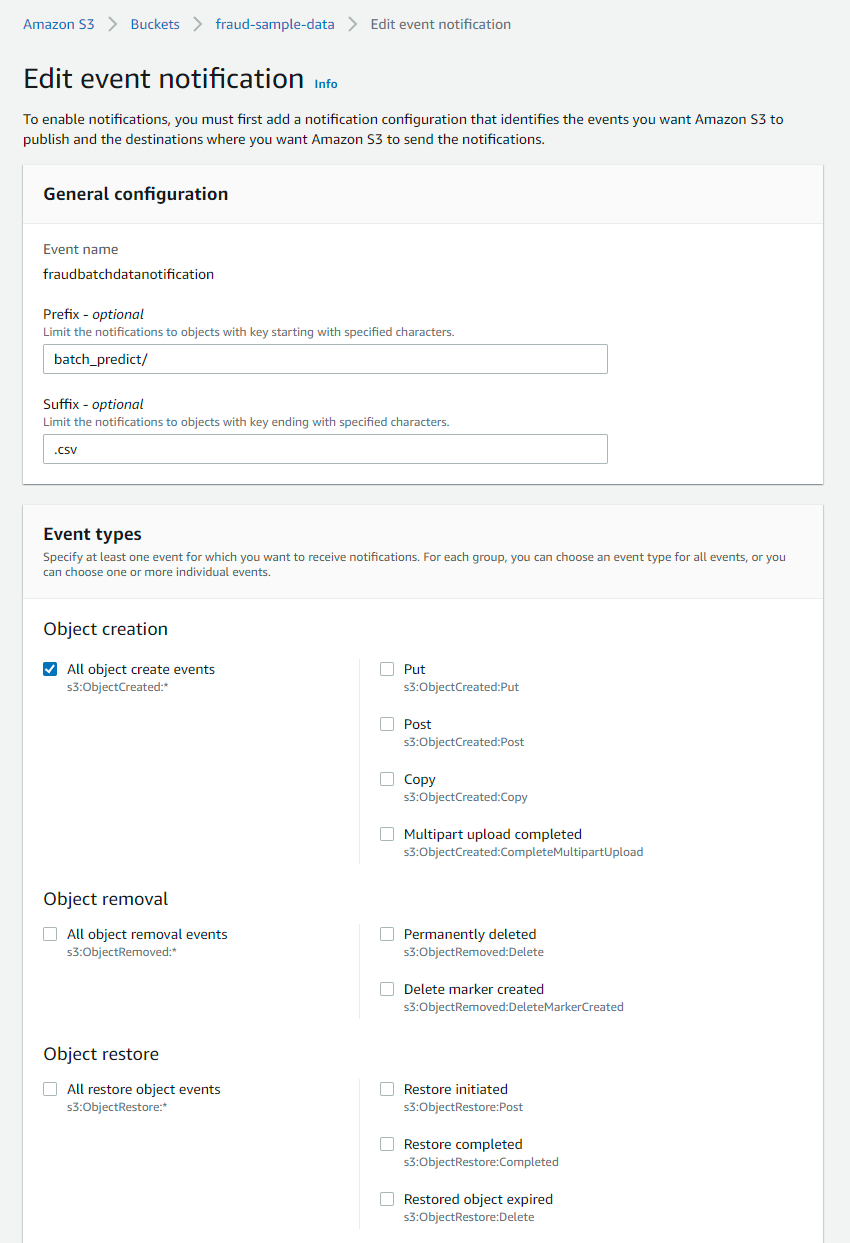
Repeat the same for the next event configuration for the batch predictions to the prediction queue in SQS for lambda to be invoked tom create a batch prediction job. The only change we will make is specifying a different prefix and suffix as we want the notifications to be sent went object is added to the ‘batch_predict’ folder in the bucket having key ‘batch_predict/fraudTest.csv’. So we set the prefix to ‘batch_predict’ and suffix to ‘fraudTest.csv’ or just ‘csv’ (as this is the only object in this folder)
Once we have configured both event notifications for the two SQS queues we should see them in the EventNotifications section in the bucket properties as in screenshot below.

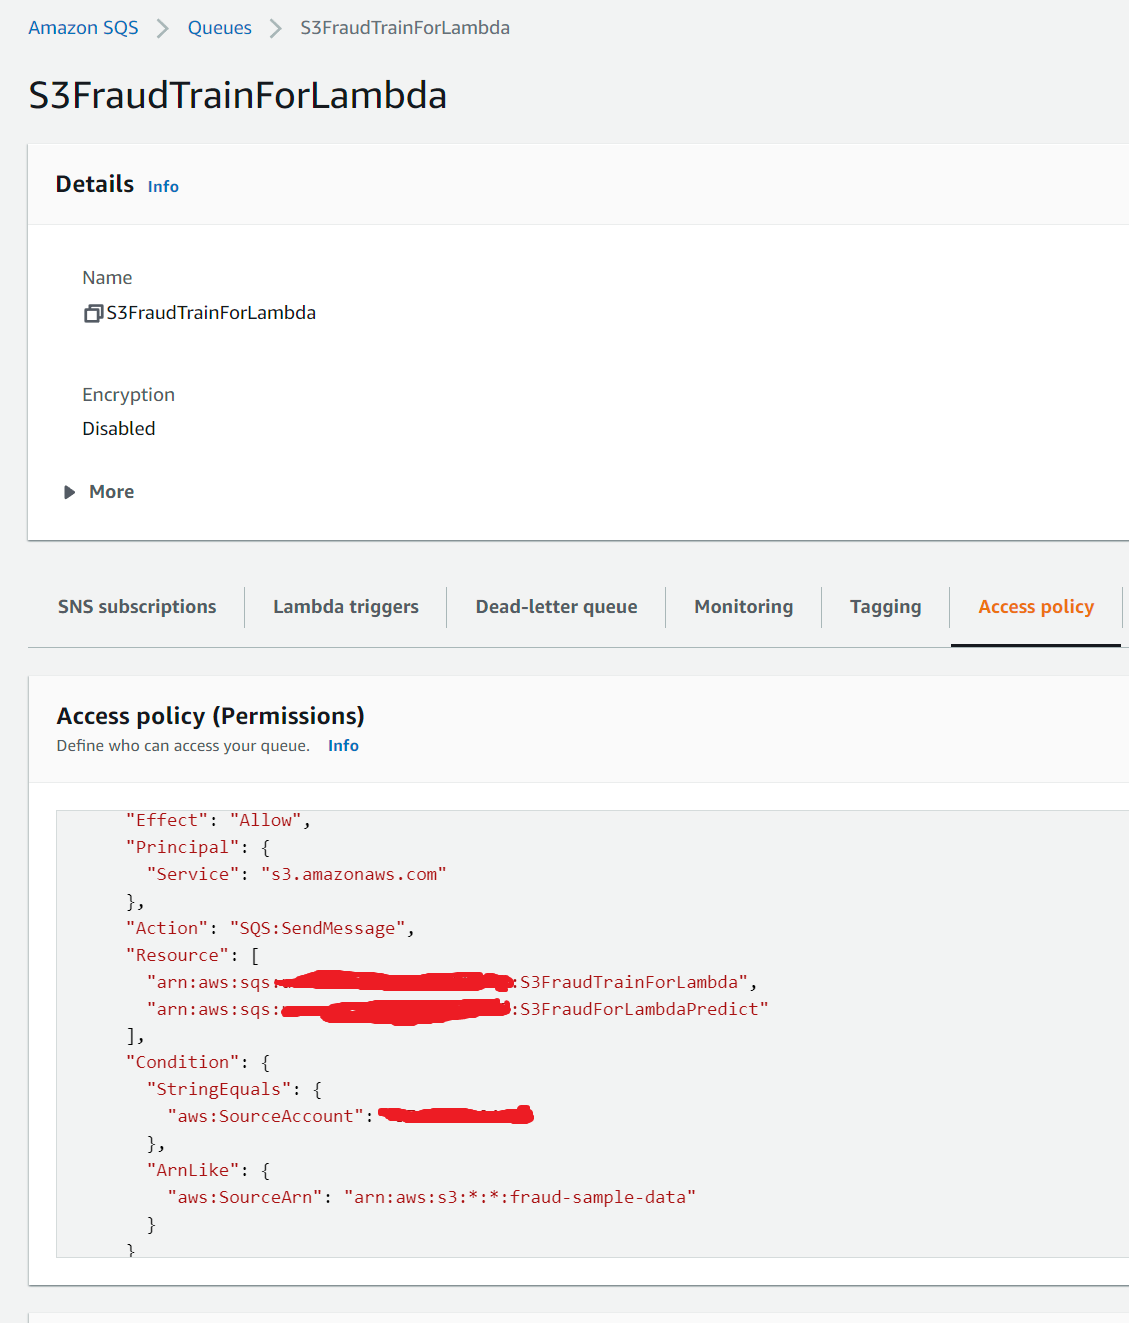
In each SQS queue, we should see an access policy already configured via the cloudformation template which allows grants the Amazon S3 principal the necessary permissions to call the relevant API to publish messages to SQS queue.
ETL
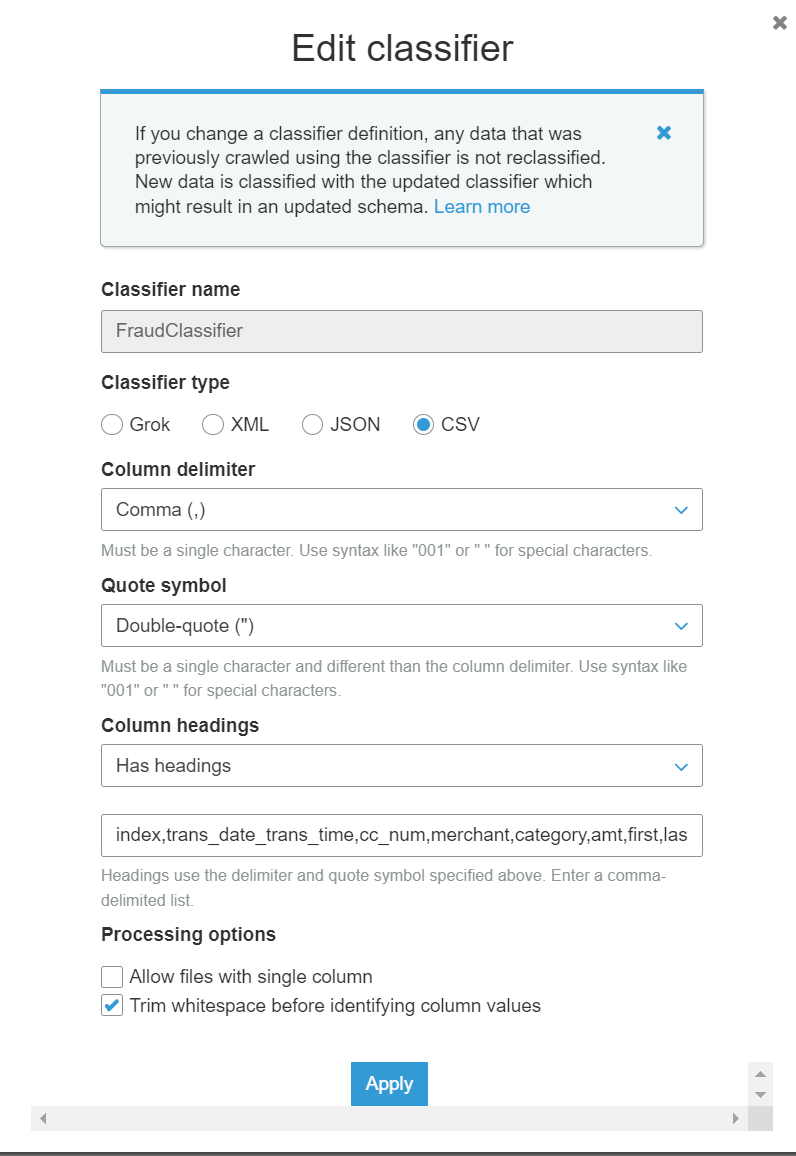
A Glue crawler run by the user crawls the train and test csv files in the S3 bucket and creates a combined table with all the data. The crawler uses a custom classifier, both of which are created automatically via cloudformation. These are configured as below. The S3 path for the crawler is set to s3://fraud-sample-data/input which should include both the train and test csv files
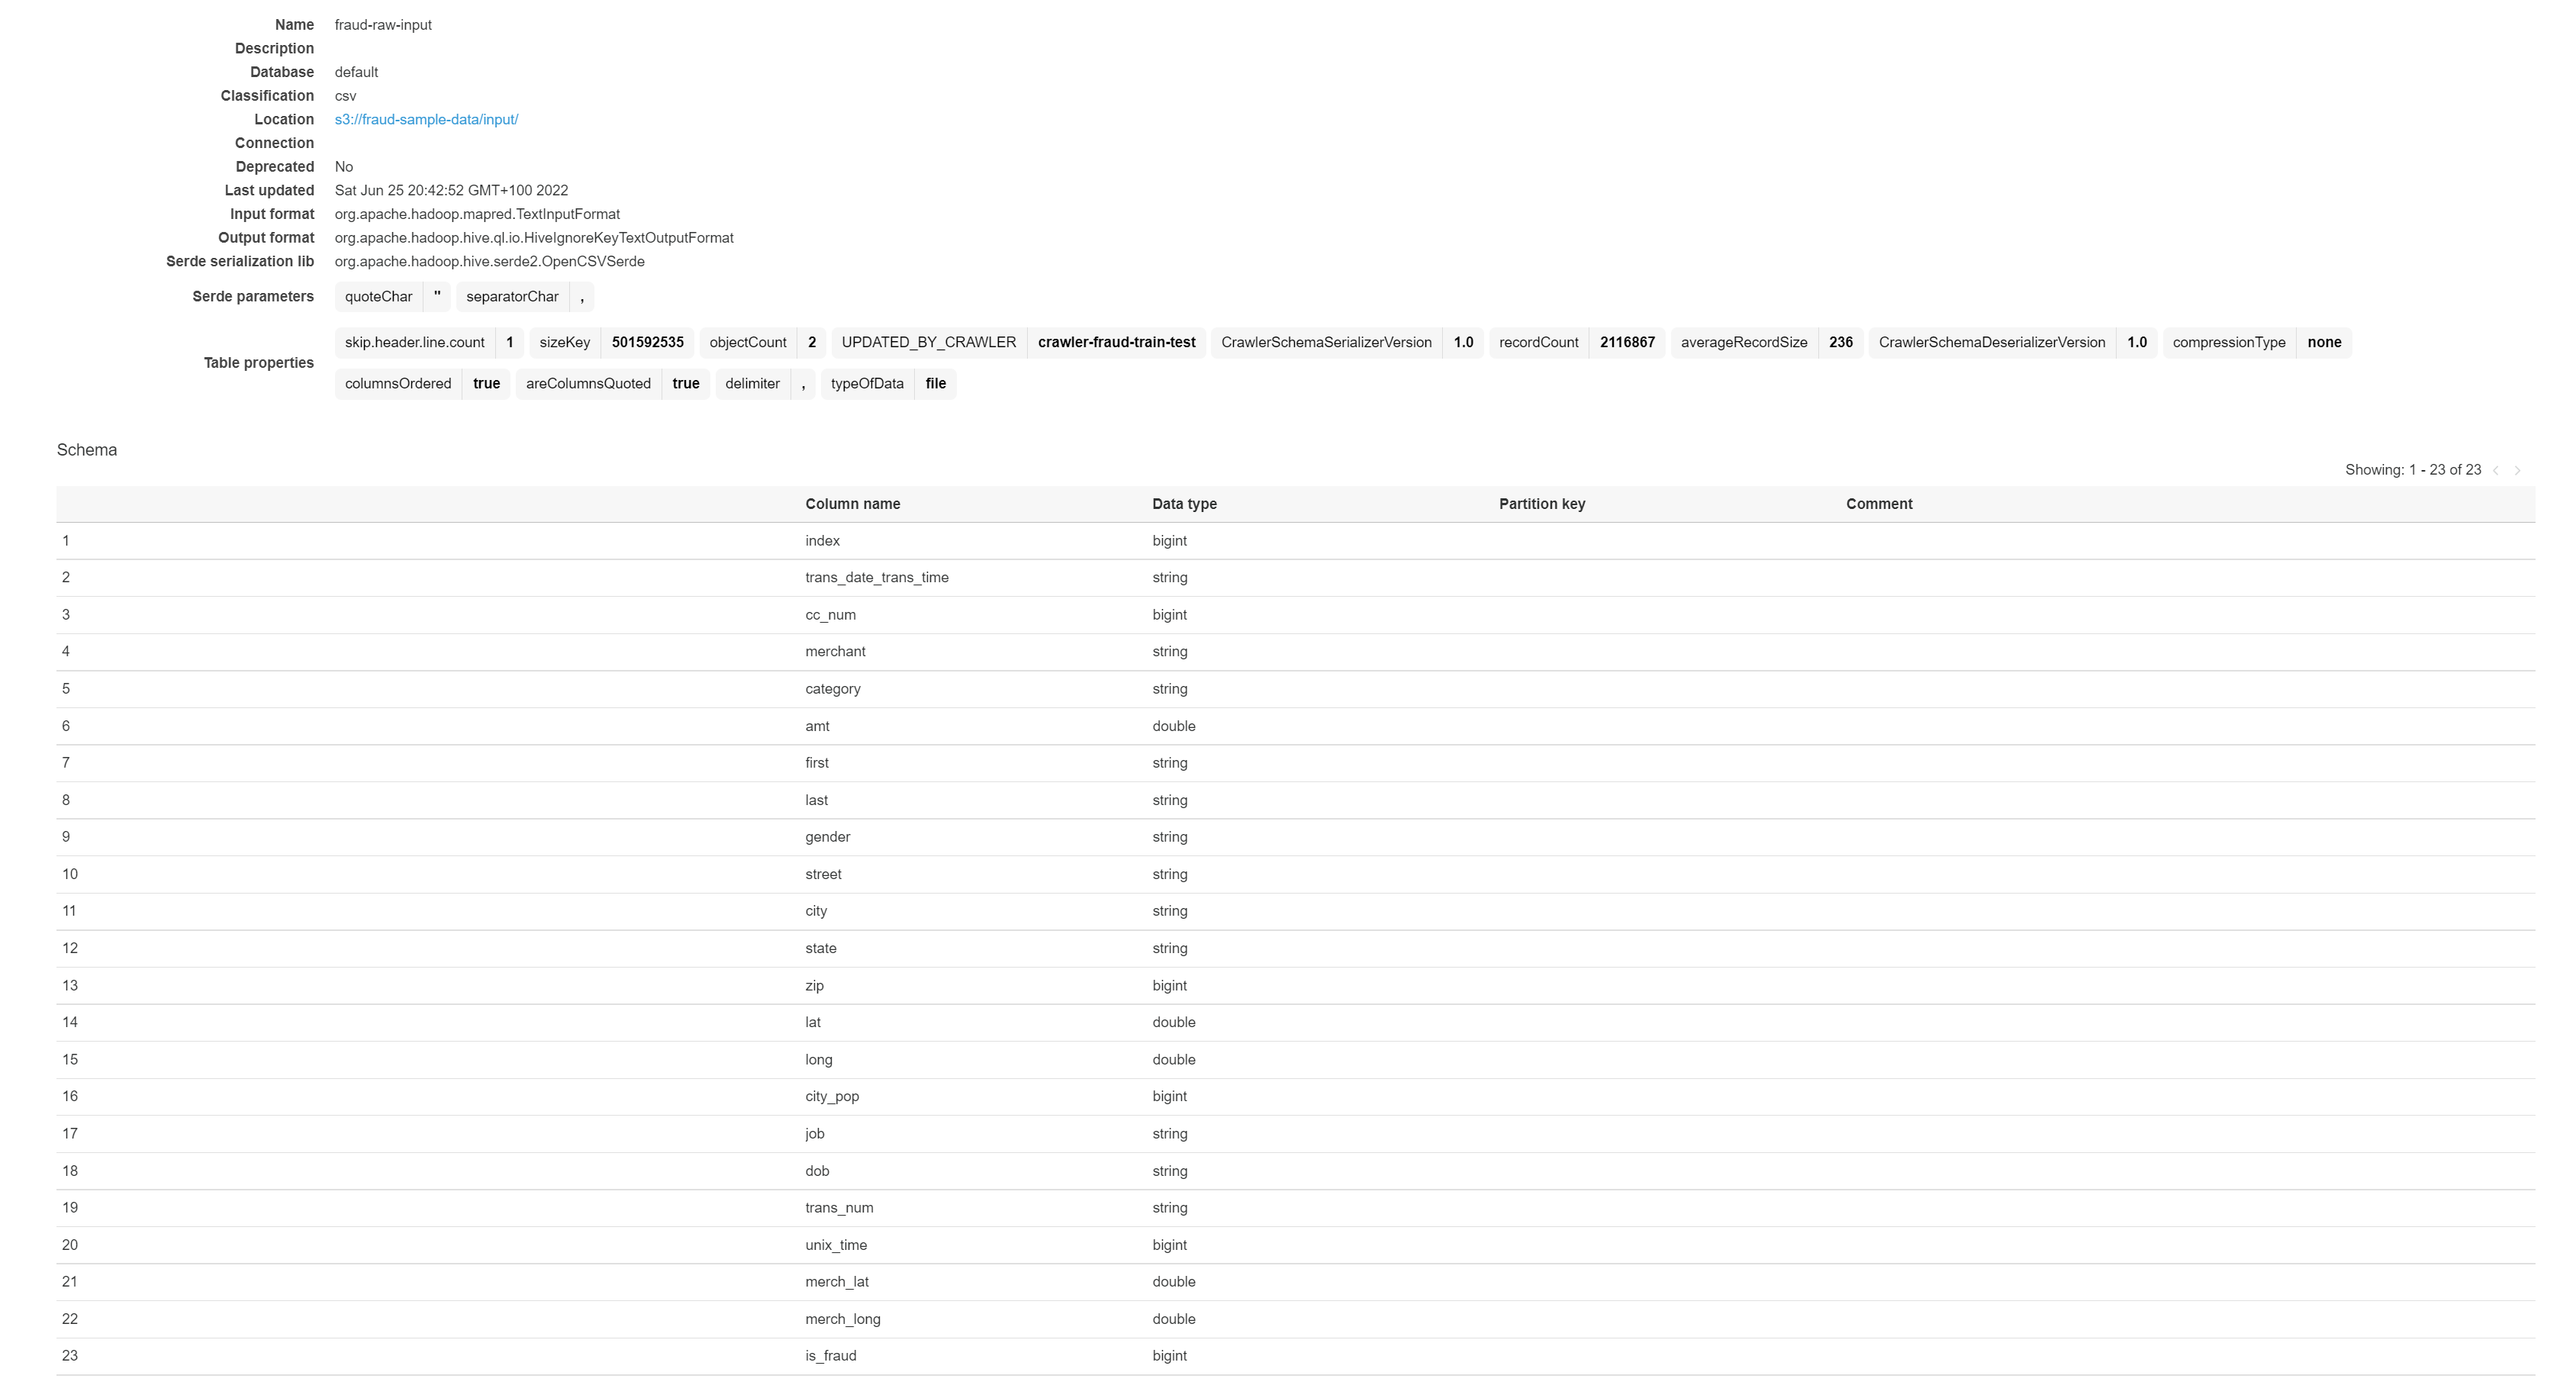
If the crawler runs successfully, you should see a table in glue data catalog. We can confirm that the headers and types have been crawled correctly.
EventBridge rule is configured to the listen to glue crawler state change event (i.e. when crawler status is ‘Succeeded’) as configured in the eventpattern in the screenshot below. This uses the default eventbridge bus
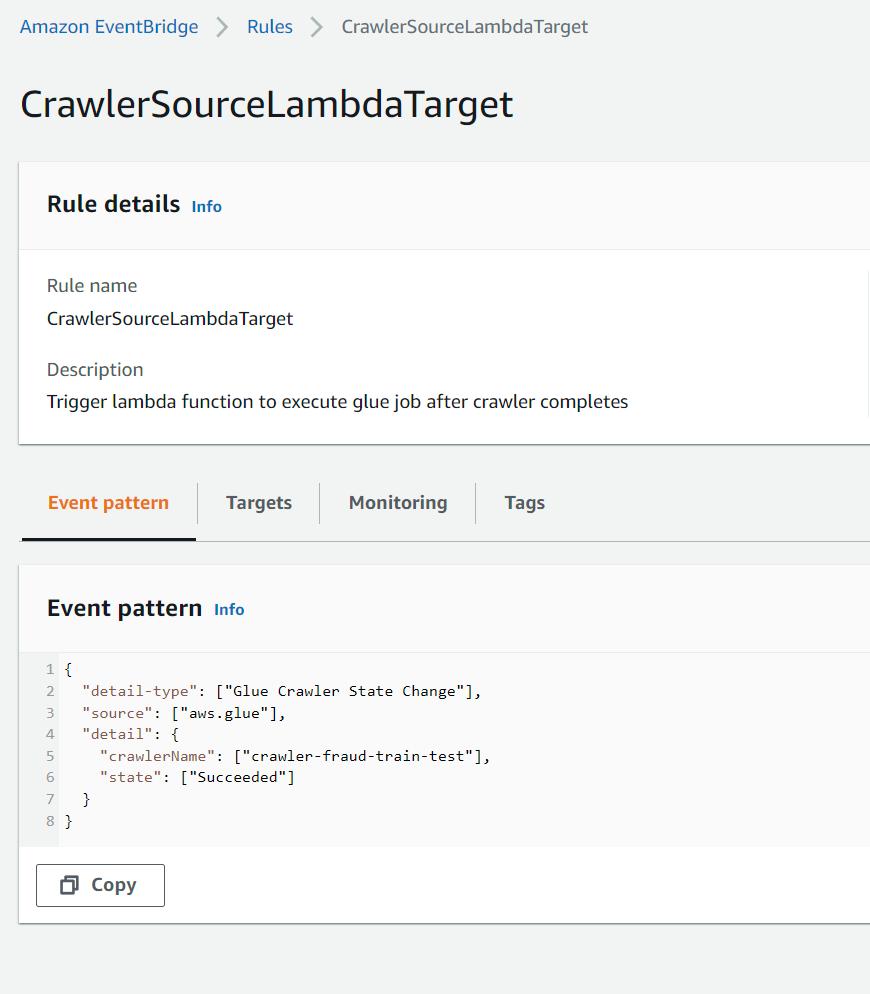
EventBridge target is the lambda function which starts the glue job
The glue job created from cloudformation using the script in S3 path, applies the pyspark and glue transforms and writes the transformed dynamic dataframe back to S3. Using glue we transform the train and test datasets to conform to the AWS Fraud Detector requirements. for example Fraud detector model training requires some mandatory variables in the dataset:
EVENT_LABEL A label that classifies the event as ‘fraud’ or ‘legit’. EVENT_TIMESTAMP : The timestamp when the event occurred. The timestamp must be in ISO 8601 standard in UTC.
These column names and exact event values are not present in the original raw dataset and need to be updated via glue script. If the glue job is successful then we should see train and test transformed files in each of the below folder locations in the bucket

The transformed data written to S3, will then trigger an S3 event notification (configured in the previous section) to SQS which would then invoke the lambda function synchronously to start the Fraud Detector model training job described in the next section.
Model Training
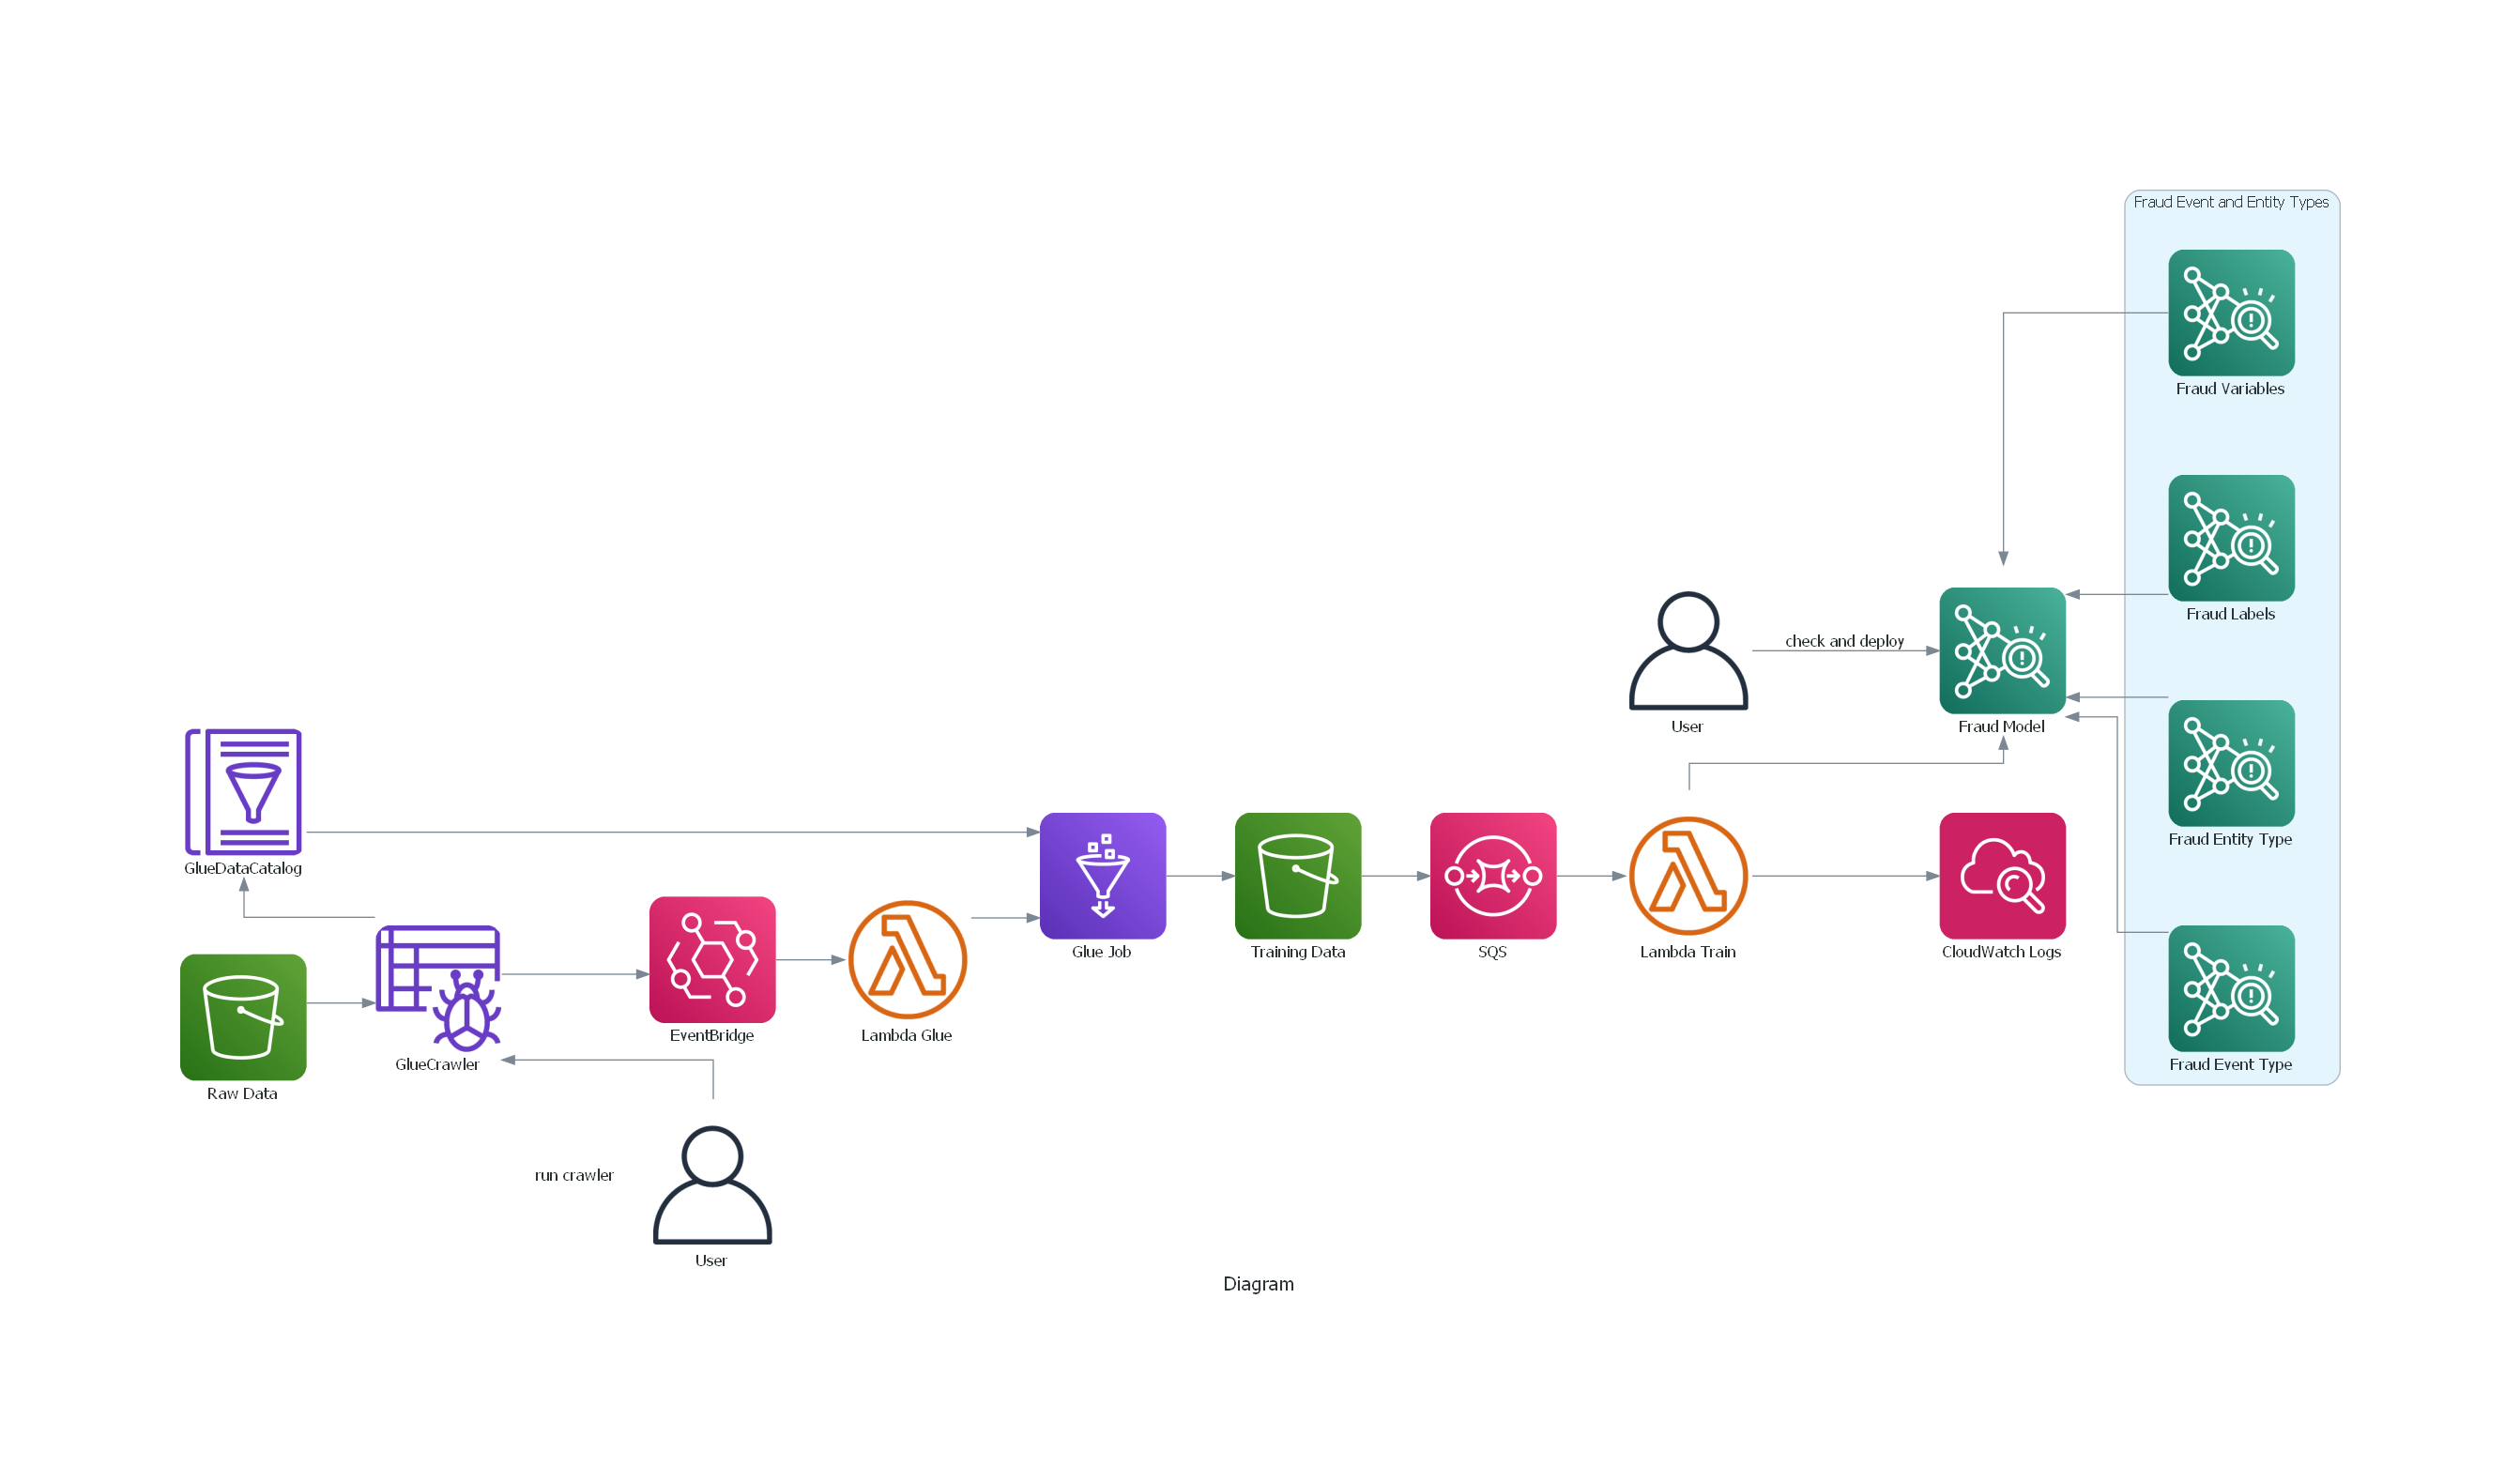
The architecture for model training has been generated using the diagrams package via script in screenshots\aws_diagrams\fraud_train.py These resources are already created and configured via the cloudformation stack and some of these described in the previous sections.
The lambda function invoked from S3 event messages received from SQS, will instantiate a model via the CreateModel operation, which acts as a container for your model versions. If this already exists, then it will directly progress to the next step which is the CreateModelVersion operation. This starts the training process, which results in a specific version of the model. Please refer to the AWS docs for more details https://docs.aws.amazon.com/frauddetector/latest/ug/building-a-model.html The script fetches the variables for the training job from S3 path which contains the csv file with the training data.

Note: The event metadata columns e.g. EVENT_TIMESTAMP and EVENT_LABEL need to be ordered together. The csv files transformed from the glue script reorder the columns so that all the event variables are at the start and the last two columns were event metadata i.e. EVENT_TIMESTAMP, EVENT_LABEL at the end of the other event variables. Otherwise, the following exception is seen
1
botocore.errorfactory.ResourceNotFoundException: An error occurred (ResourceNotFoundException) when calling the CreateModelVersion operation: VariableIds: [EVENT_TIMESTAMP] do not exist.
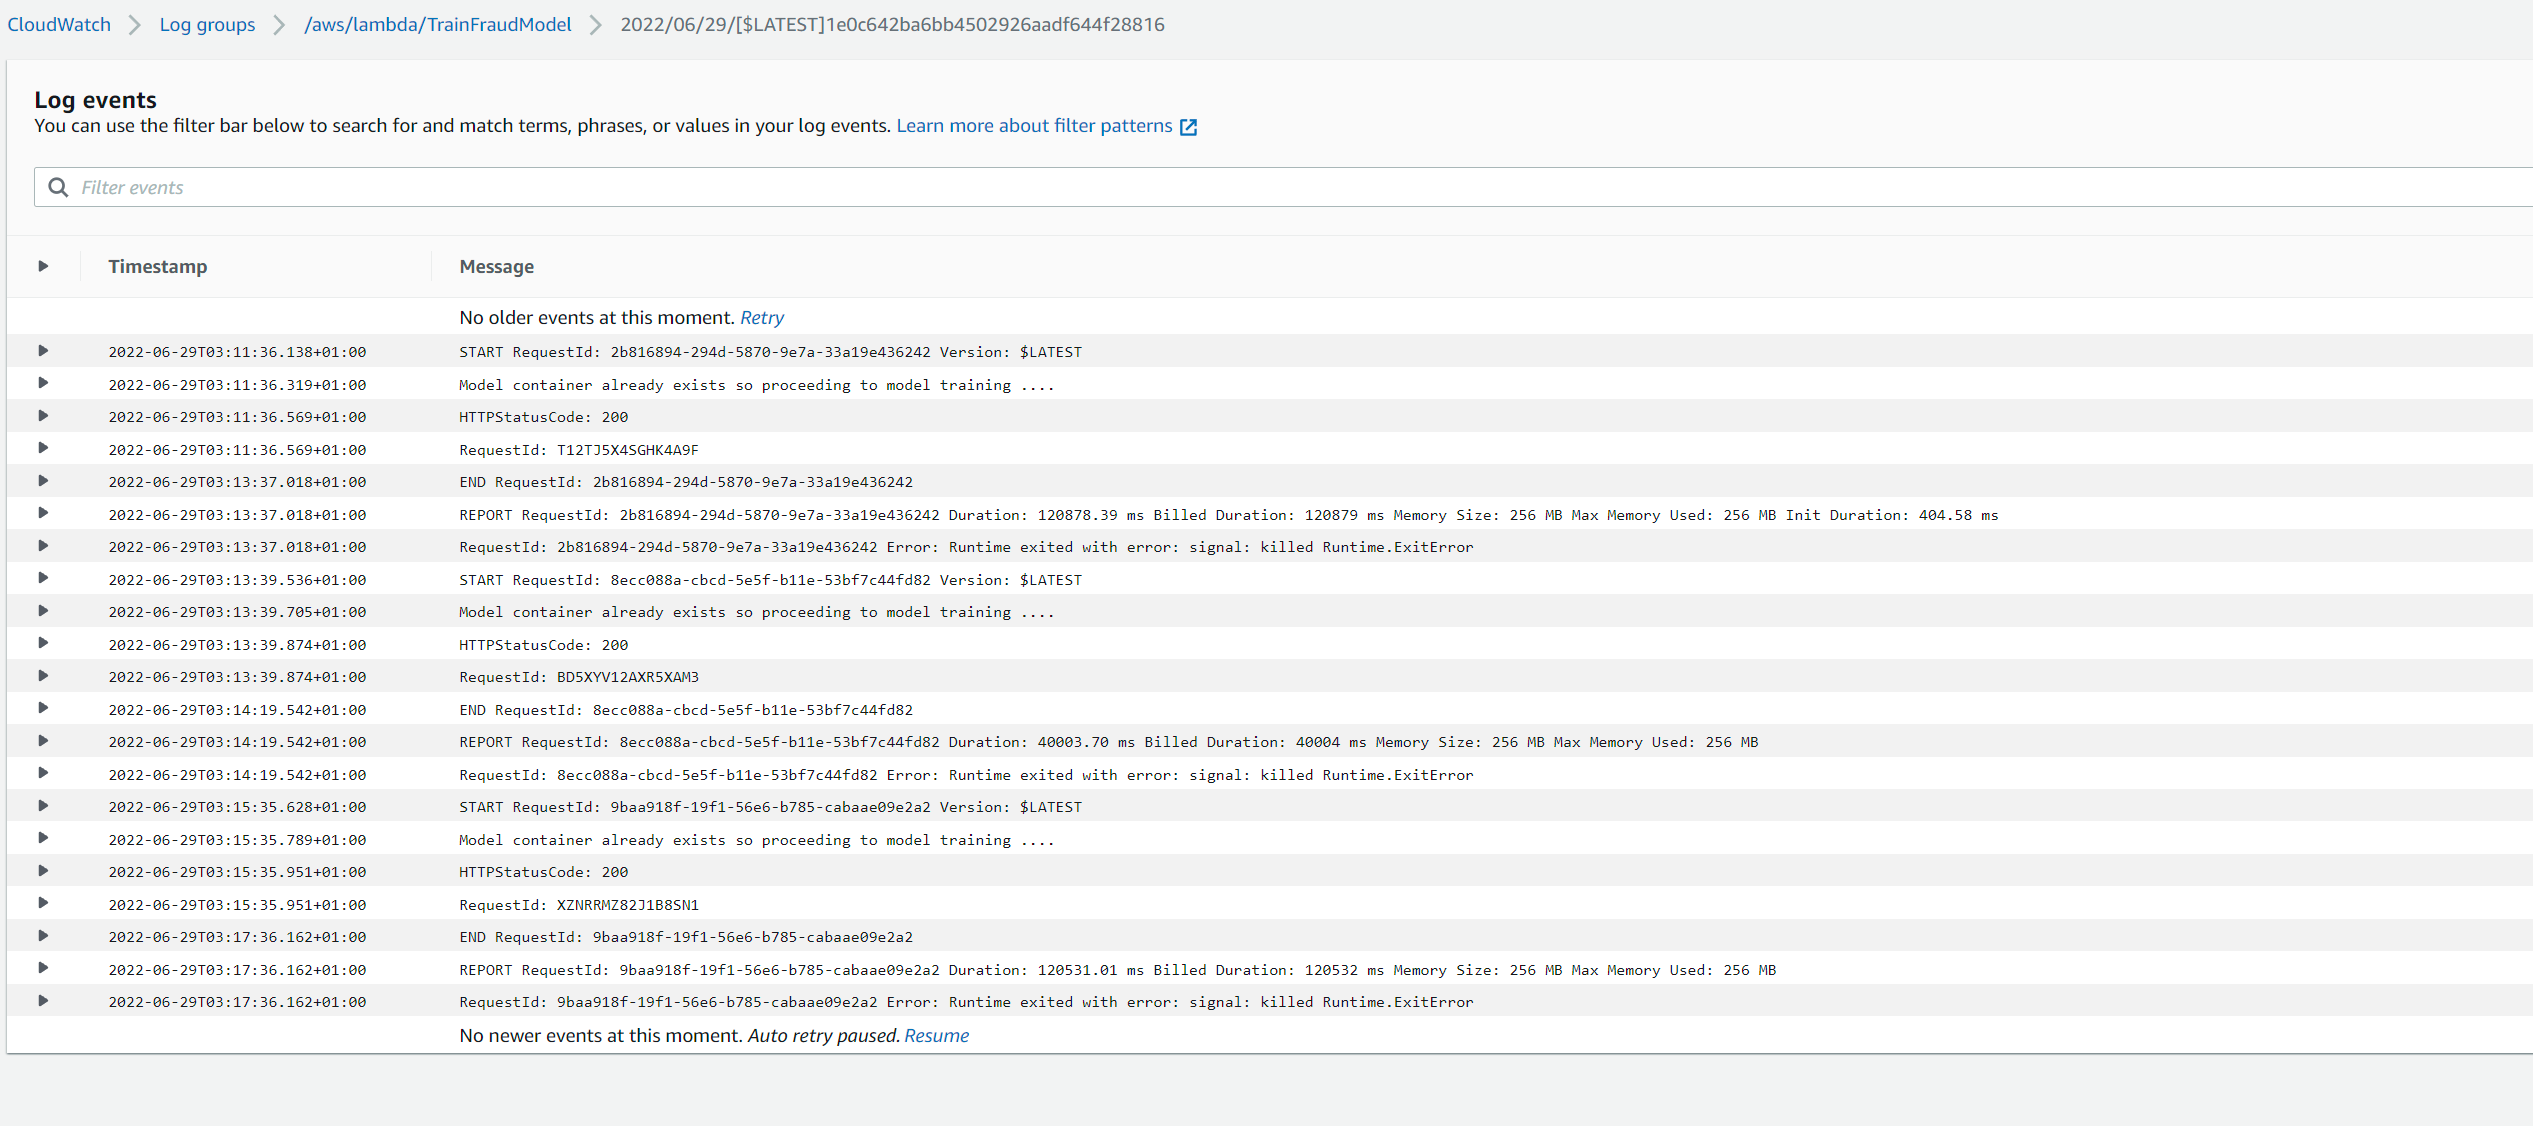
The lambda function is also configured to have a large enough memory capacity (1024 MB), given the training file size (approx 300MB). If the default value (128MB) is used, then we will see a memory error as the max lambda memory capacity is exceeded when the data is loaded in from S3.
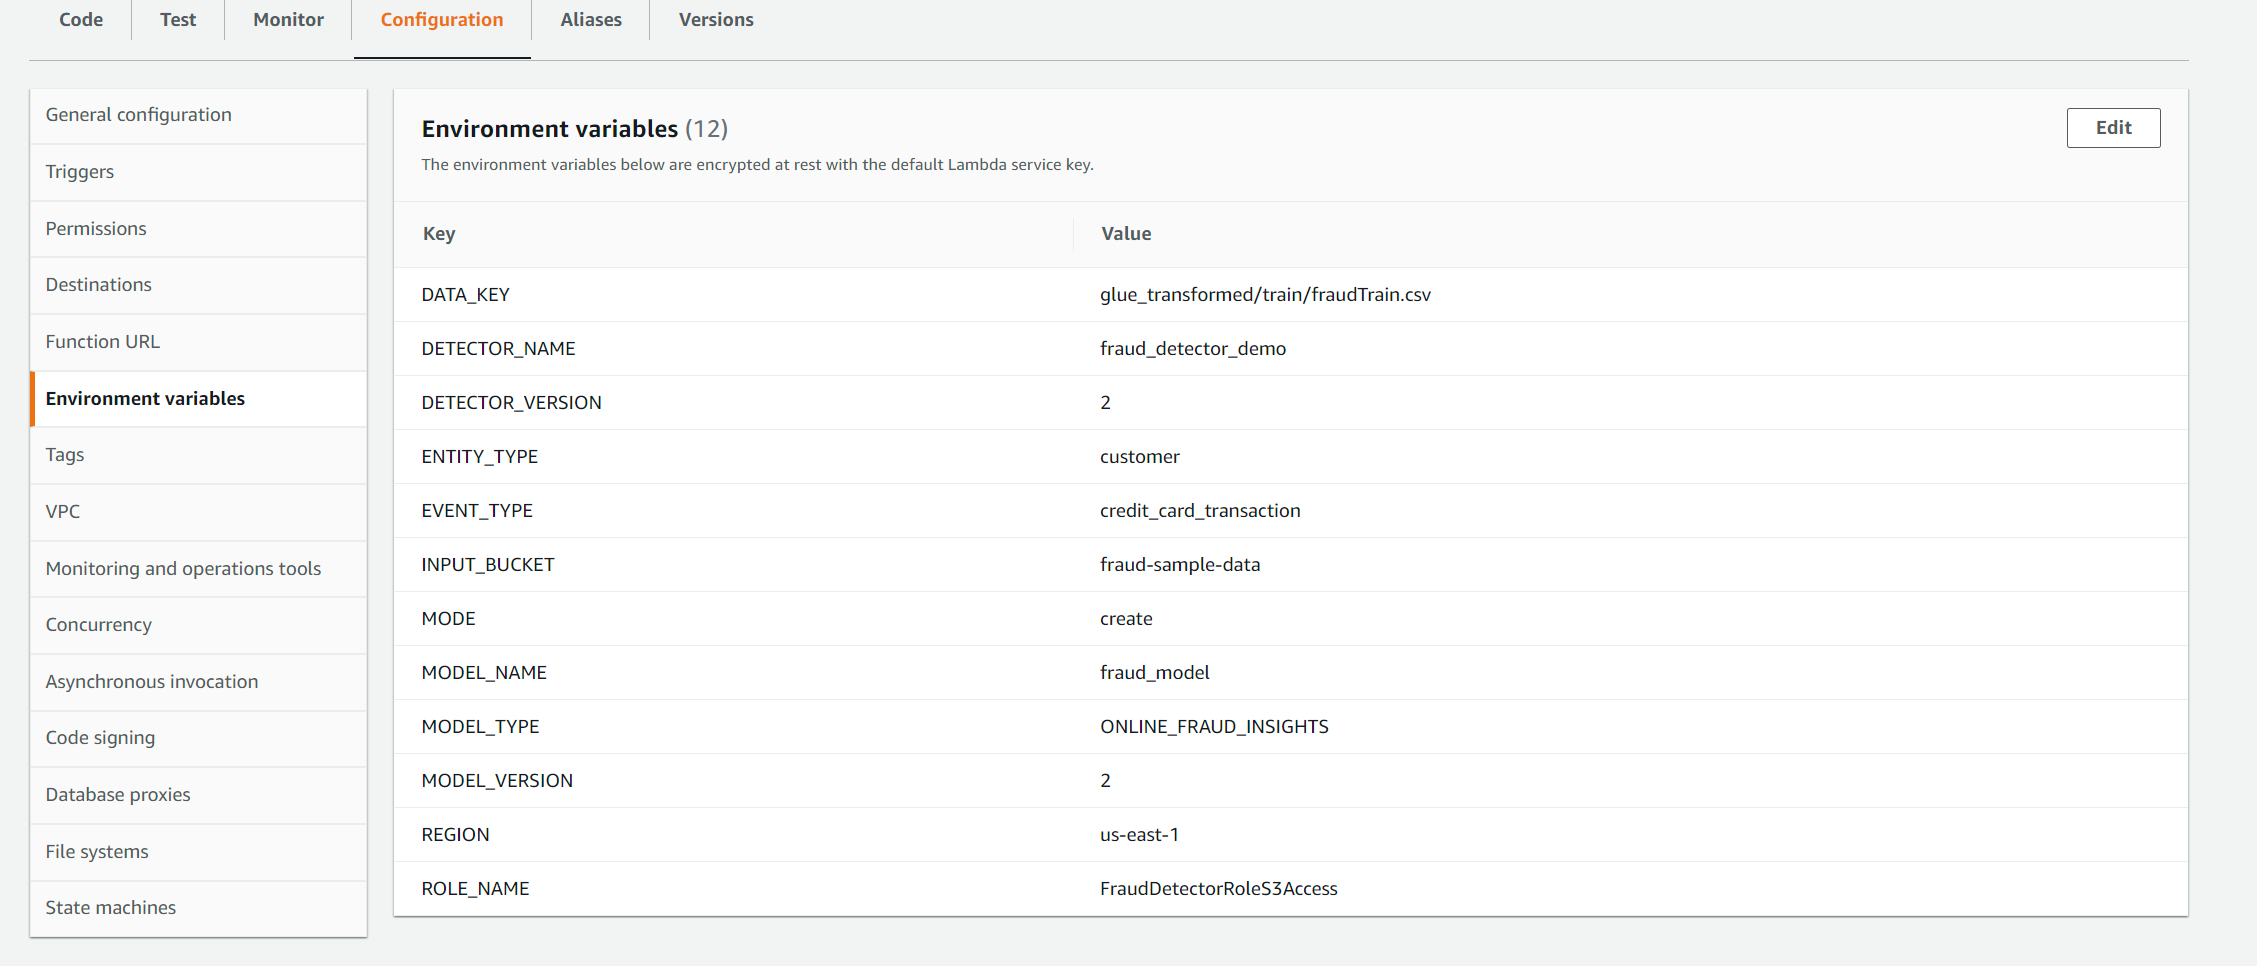
By default, the environment variables in lambda MODE and MODEL_VERSION are set as ‘create’ and ‘1.0’ when creating via the cloudformation stack. This makes the script, create a new model with the specified version. This is a major version change and we will need to specify a version which does not already exist. Usually this would be an increment value from the existing version (e.g. if 1.0 already exists, then a major version bump would be 2.0) The MODE variable also accepts an update value which can be set if we need to update an existing model version incrementally e.g. from 1.0 to 1.0.1. This creates a minor version We can update the environment variables either via the cloudformation parameters or from the lambda en vars configuration on console. For example for creating a new model version 2.0, we would update the MODEL_VERSION variable to 2.0 as below and trigger the glue crawler to execute the workflow and train a new model
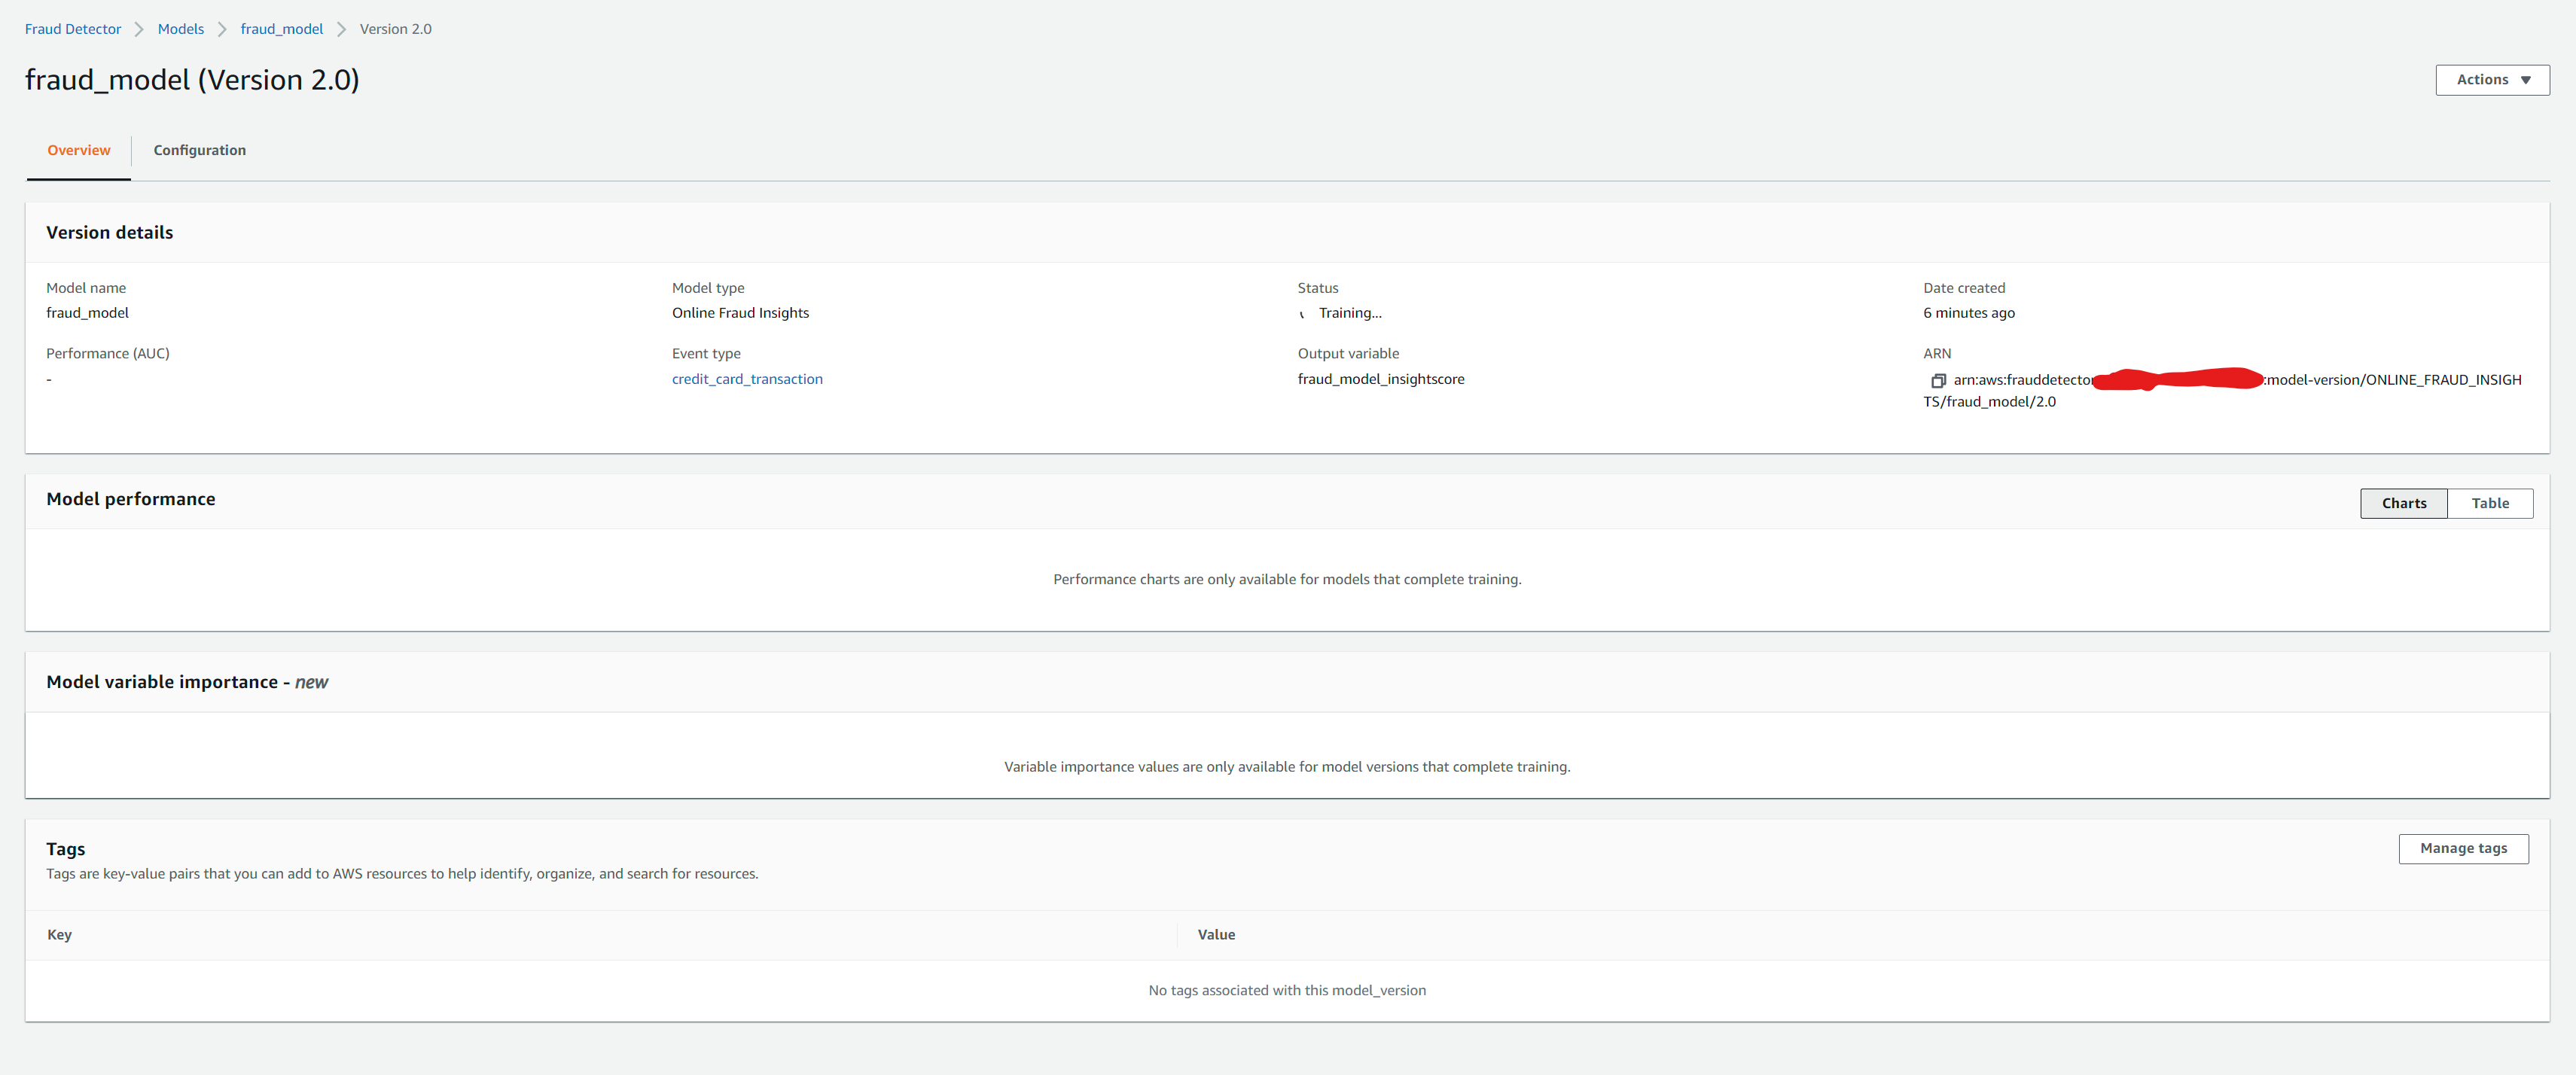
We will then see the model training start in the Fraud Detector console in the ‘Model’ tab
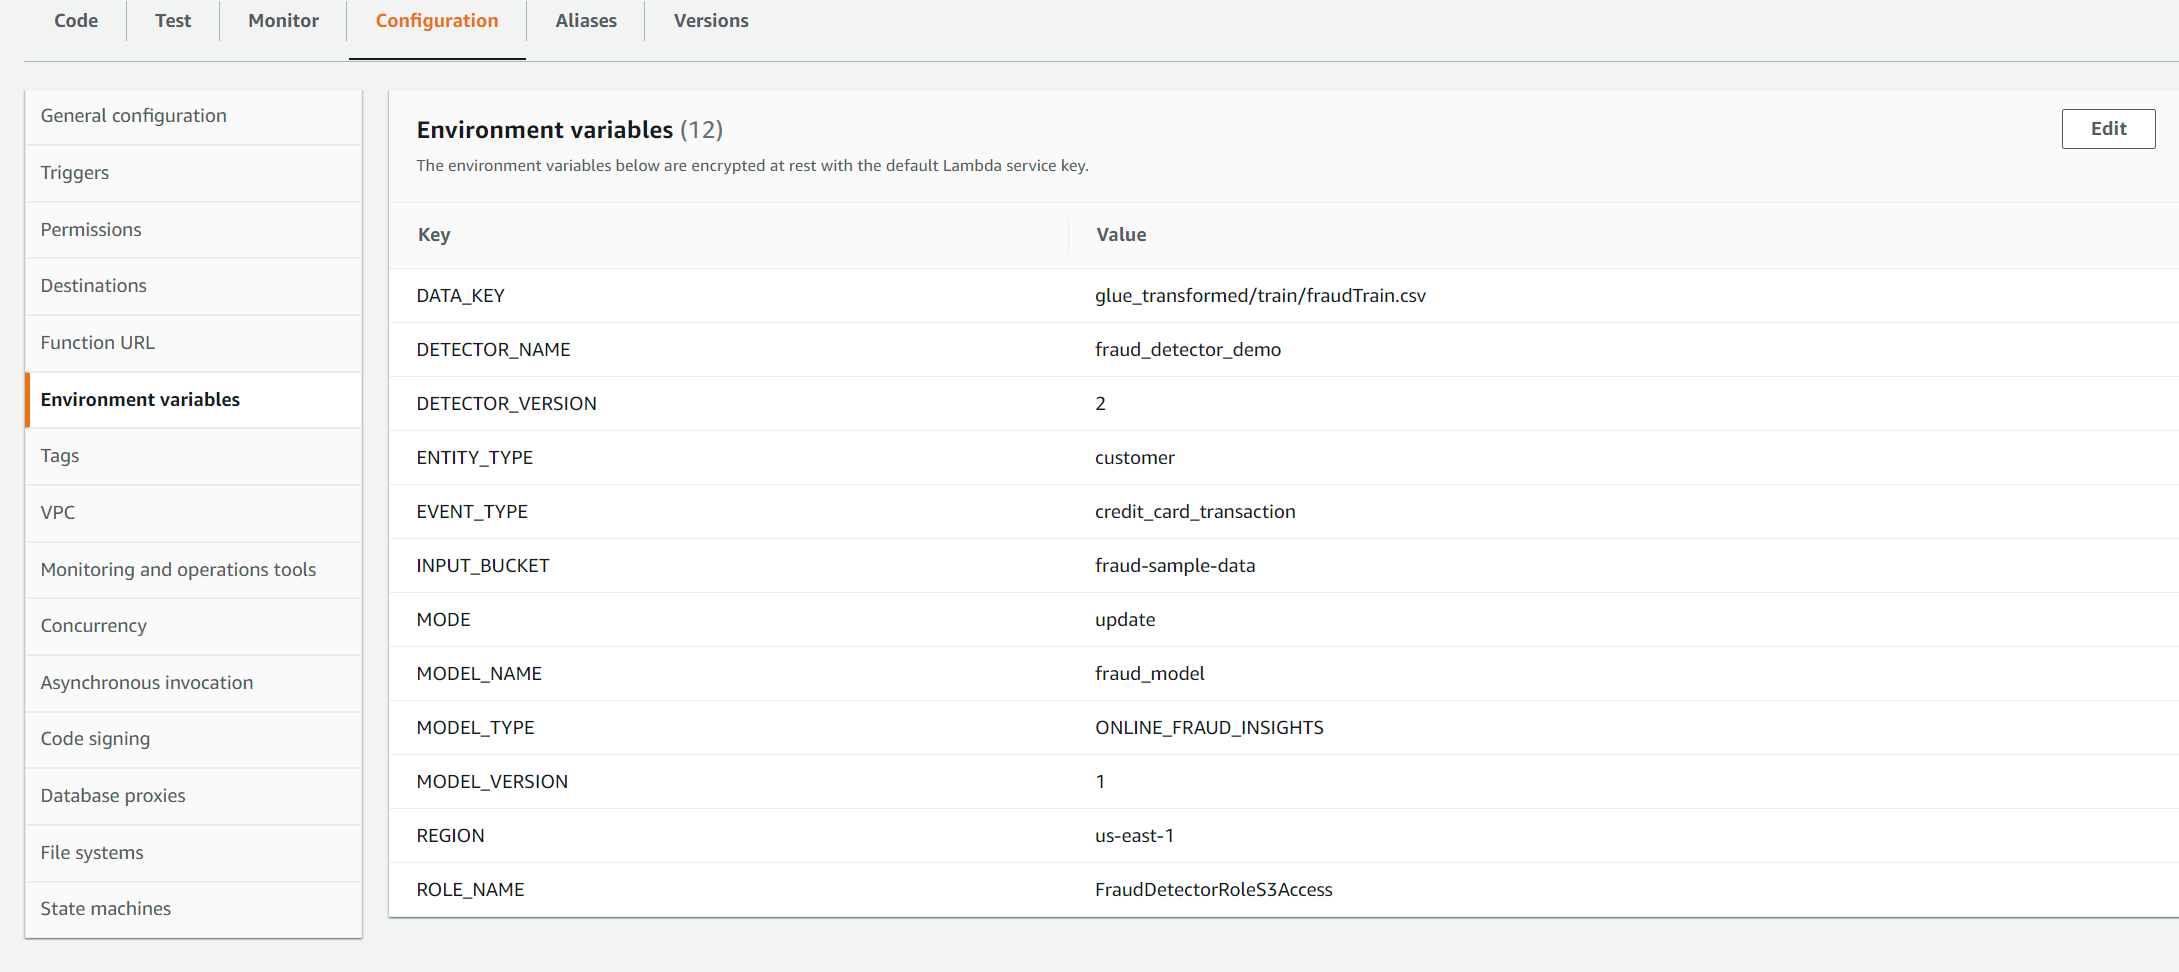
To update an existing model version, we set the MODE variable to update and MODEL_VERSION to the major version which needs updating. In this example below we leave it as 1.0 as we already have an active 1.0 major version which we want to update to 1.0.1
Once the workflow is complete, we can then see the minor version 1.0.1 training job start.

We cannot train two models for the same major version at once.So if minor version training was already in progress and if we executed the workflow again to update the major version again, we would normally see the following exception
1
botocore.errorfactory.ValidationException: An error occurred (ValidationException) when calling the CreateModelVersion operation: Simultaneous training for the same major version not allowed
However, the script catches it and prints out the message Model Version already training in the logs and will exit without raising another exception.
Once the model training for 1.0.1 completes, and if want to re-train again, we can trigger the workflow with MODE as update and it should automatically start a minor version 1.0.2 as it knows that 1.0.1 already exists
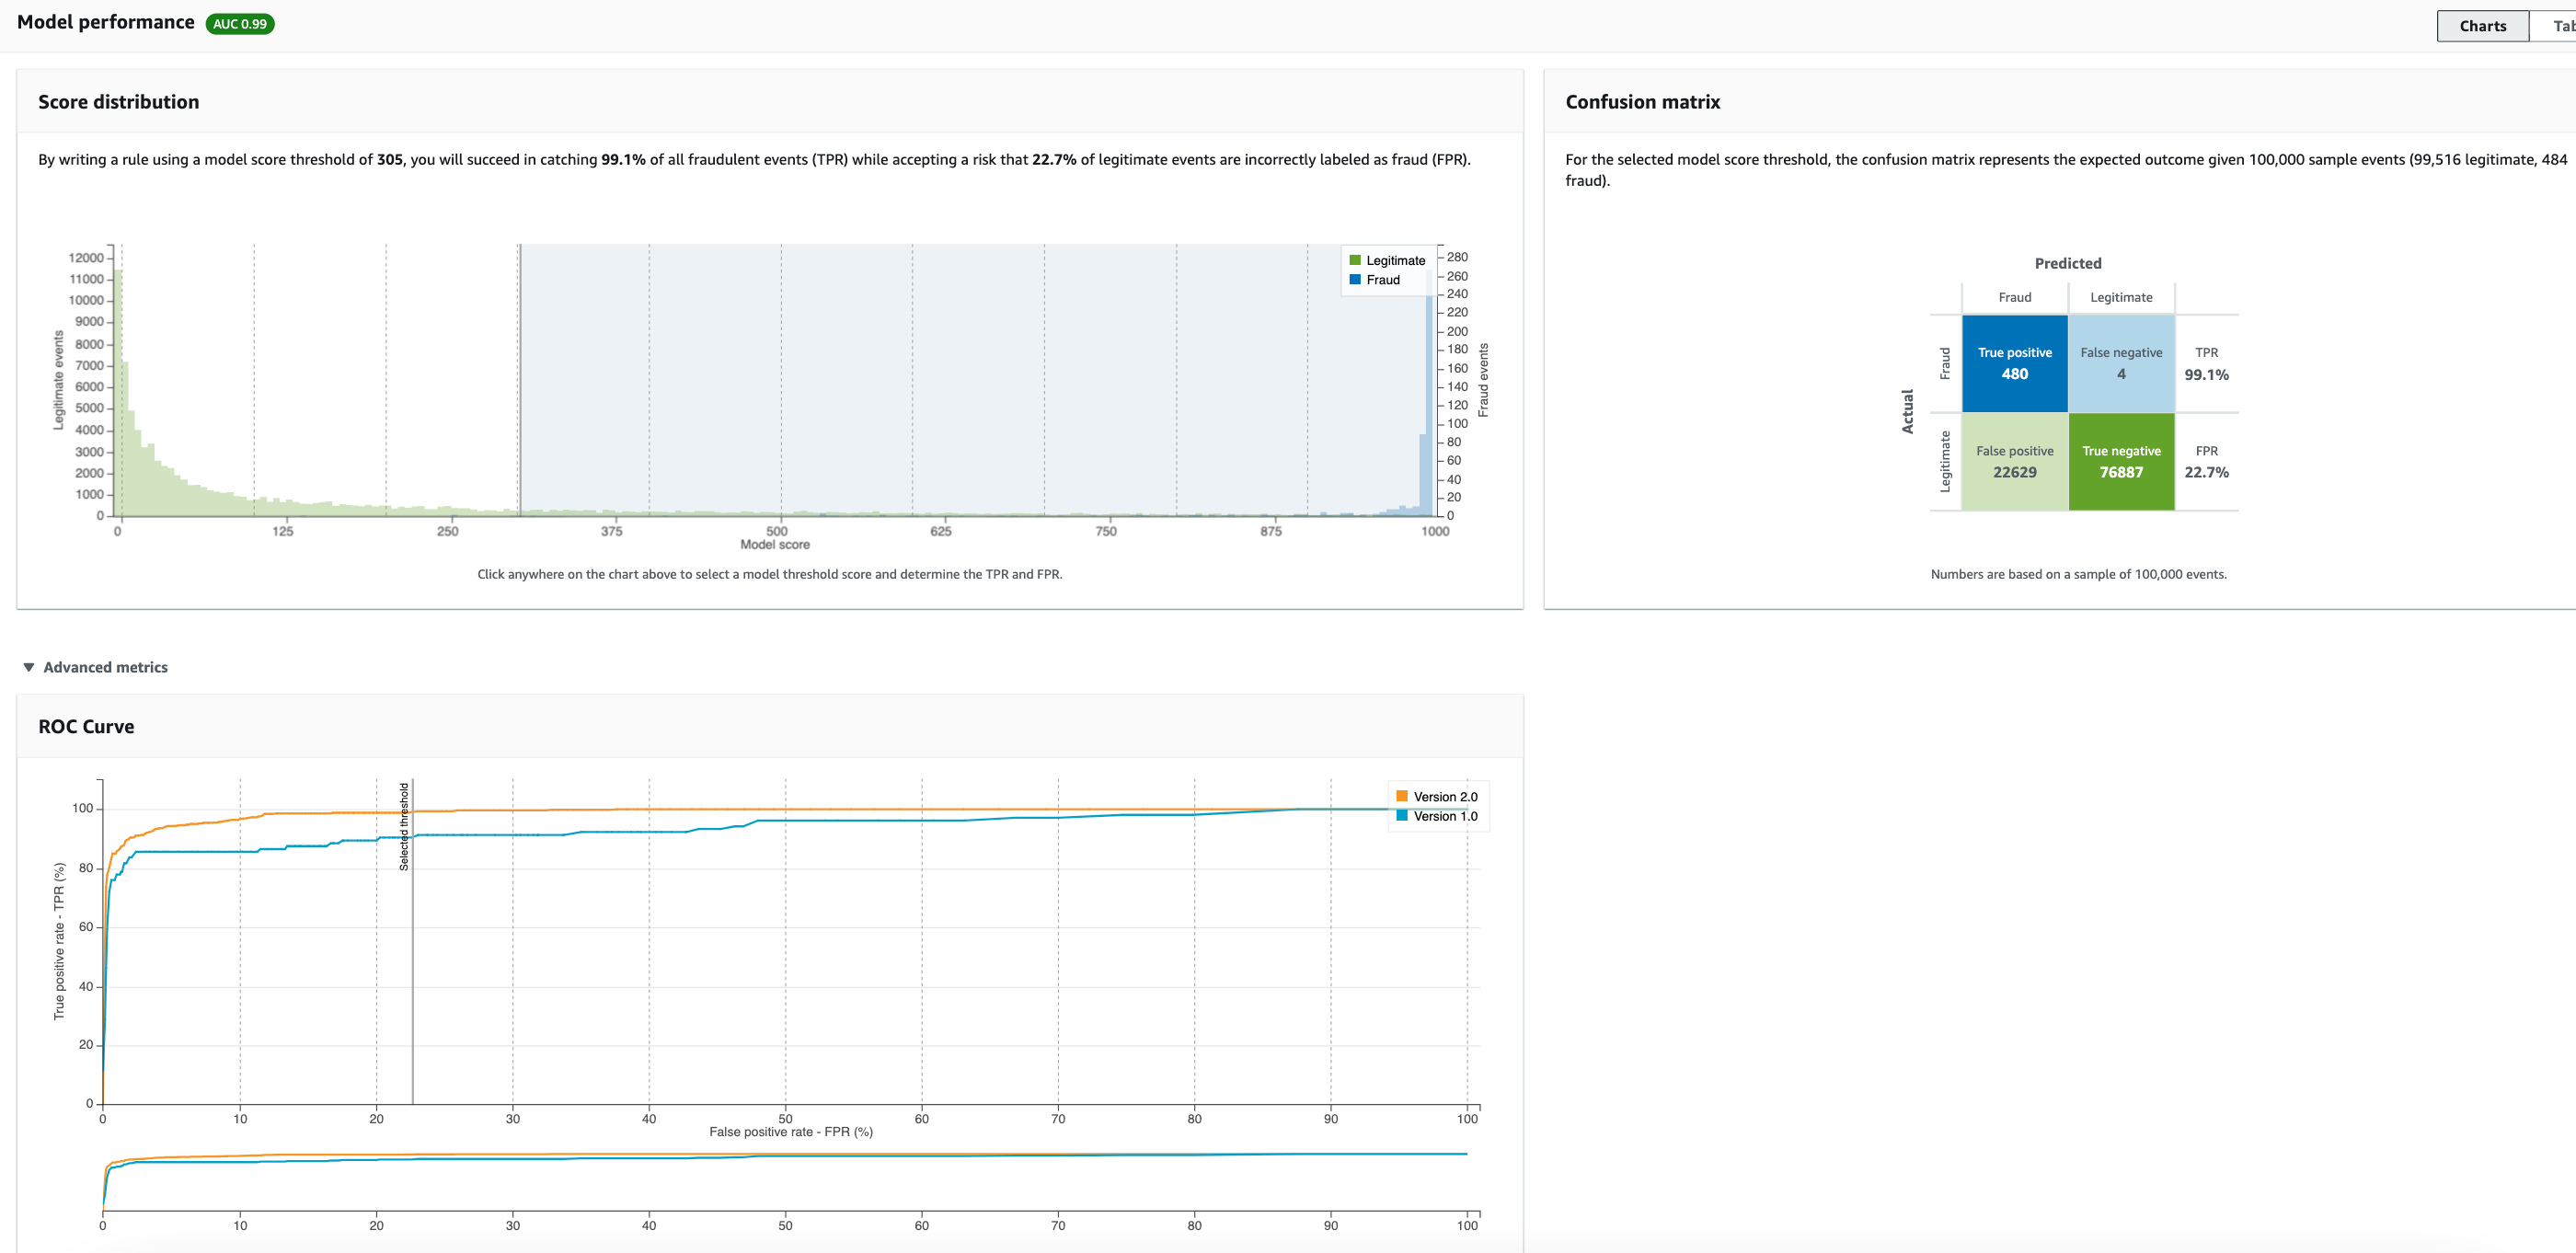
Model Performance
From the console, we can compare different model version performances
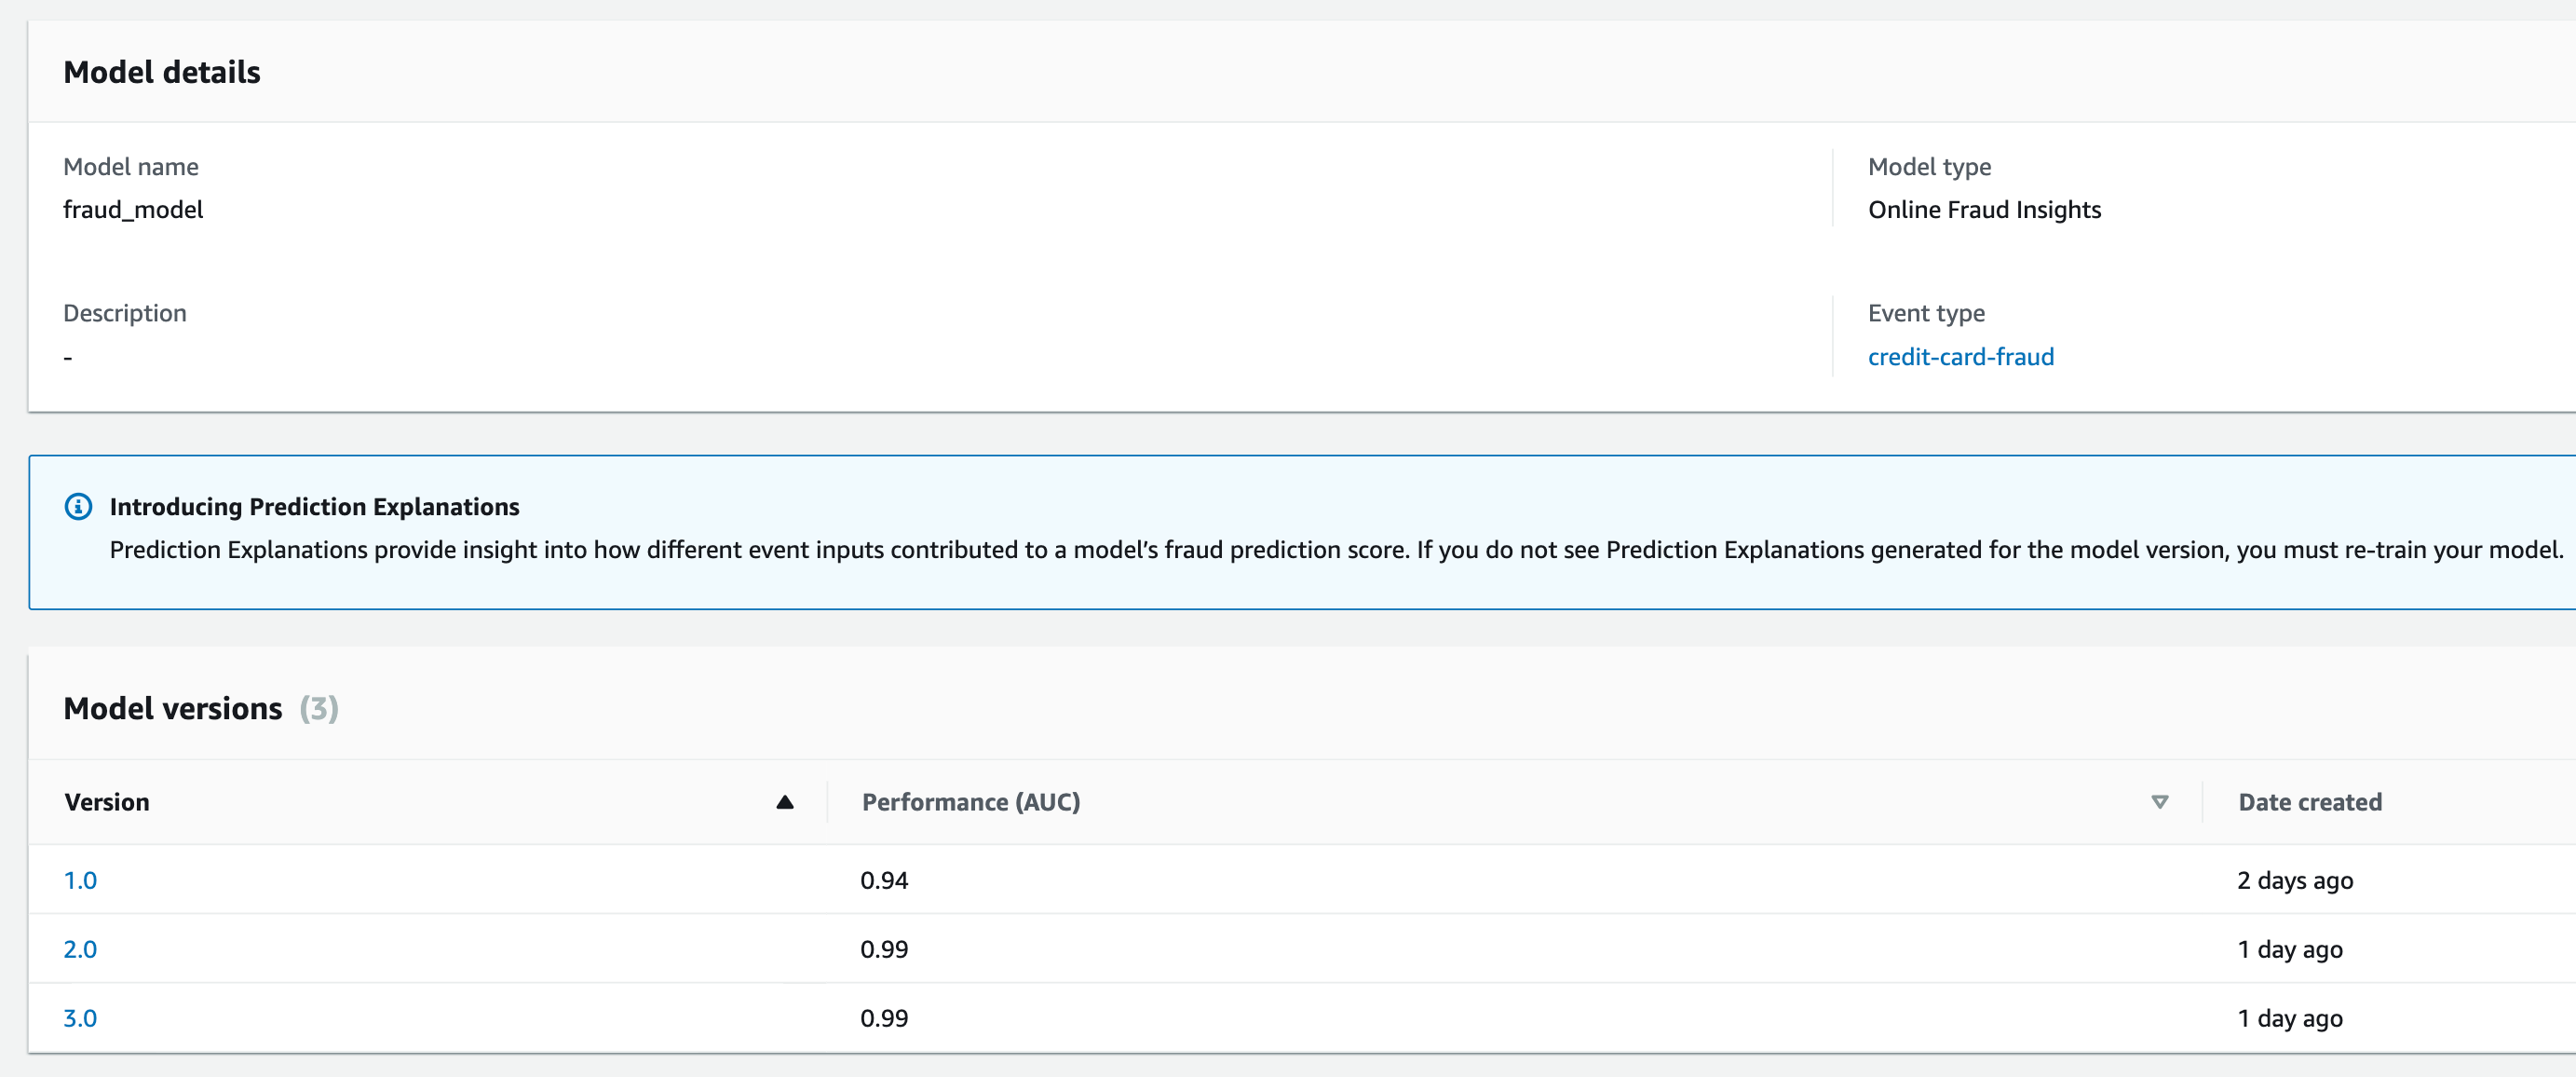
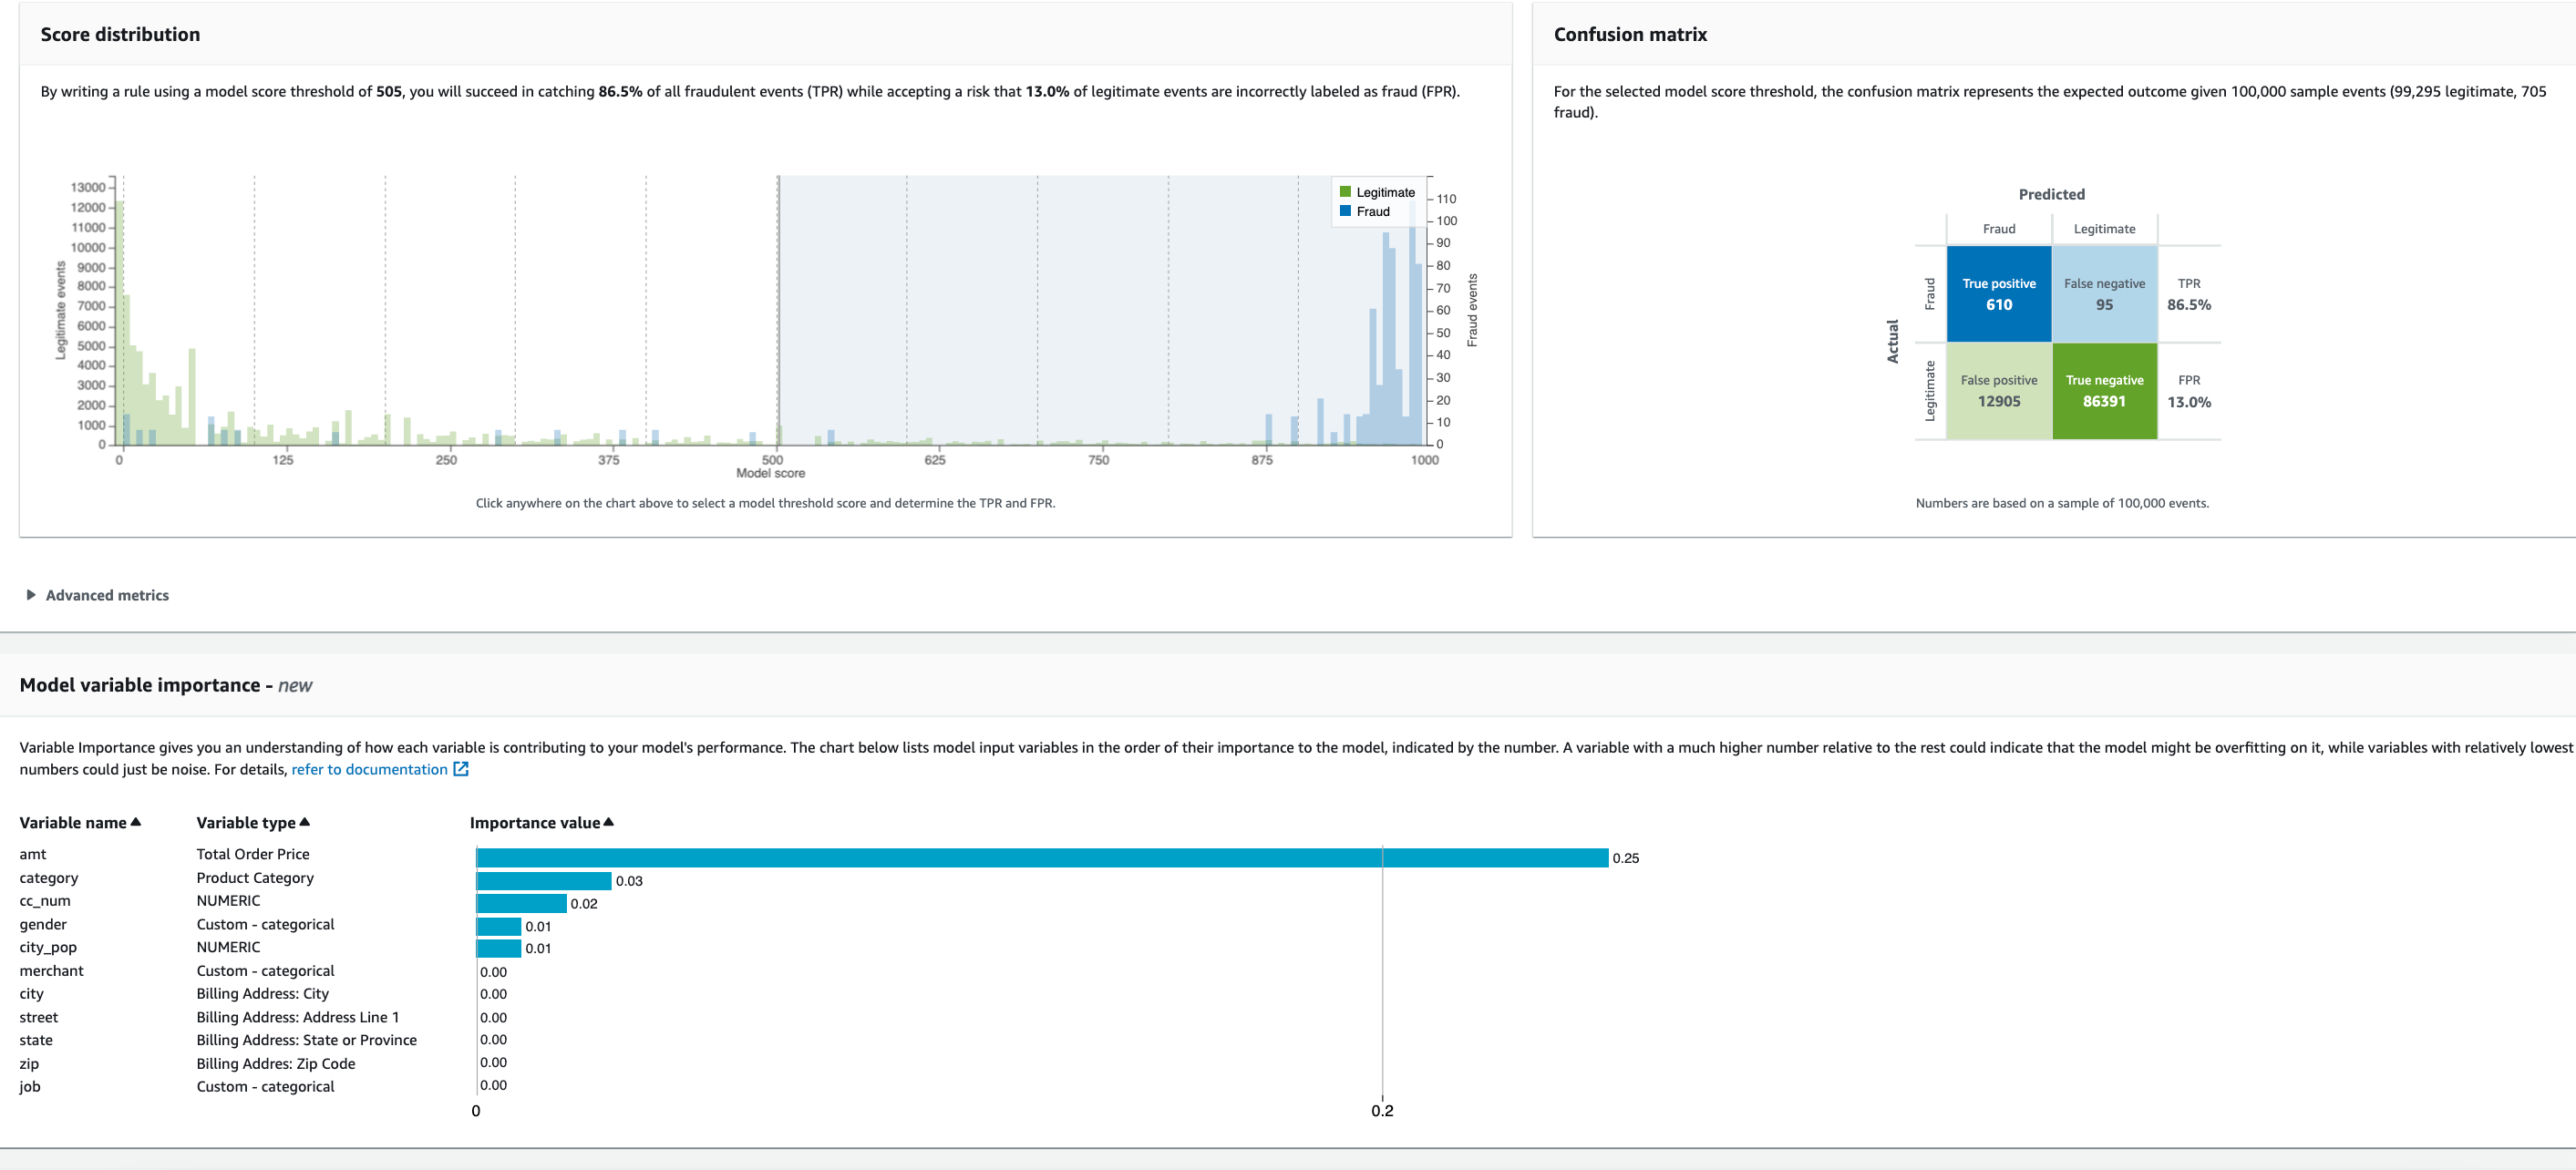
and also click on each model version and inspect the score distribution, confusion matrix and model variable importance. For example in model version 1, the AUC score is 0.94 and the model variable importance plot which gives an understanding of how each variable is contributing to your model’s performance. The chart below lists model input variables in the order of their importance to the model, indicated by the number. A variable with a much higher number relative to the rest could indicate that the model might be overfitting on it, while variables with relatively lowest numbers could just be noise. https://docs.aws.amazon.com/frauddetector/latest/ug/model-variable-importance.html Here it shows the model may be overfitting to the amt variable as it has such a high score relative to the others and most of the rest are contributing noise in this sample dataset. This could be because the model is overfitting to a particular fraud pattern (e.g. all fraud events being related to high amt values) or because that there is a label leakage if the variable depends on the fraud labels. This version only uses 2 months of data (dec 2019 -Jan 2021) so in the next iteration we can include more data and see if it makes a difference
We train a new model (version 2), with over a year of data from 2019 to mid 2020. This increases training time but we can see there has been an improvement to the AUC score (0.99) as well as the variable importance plot
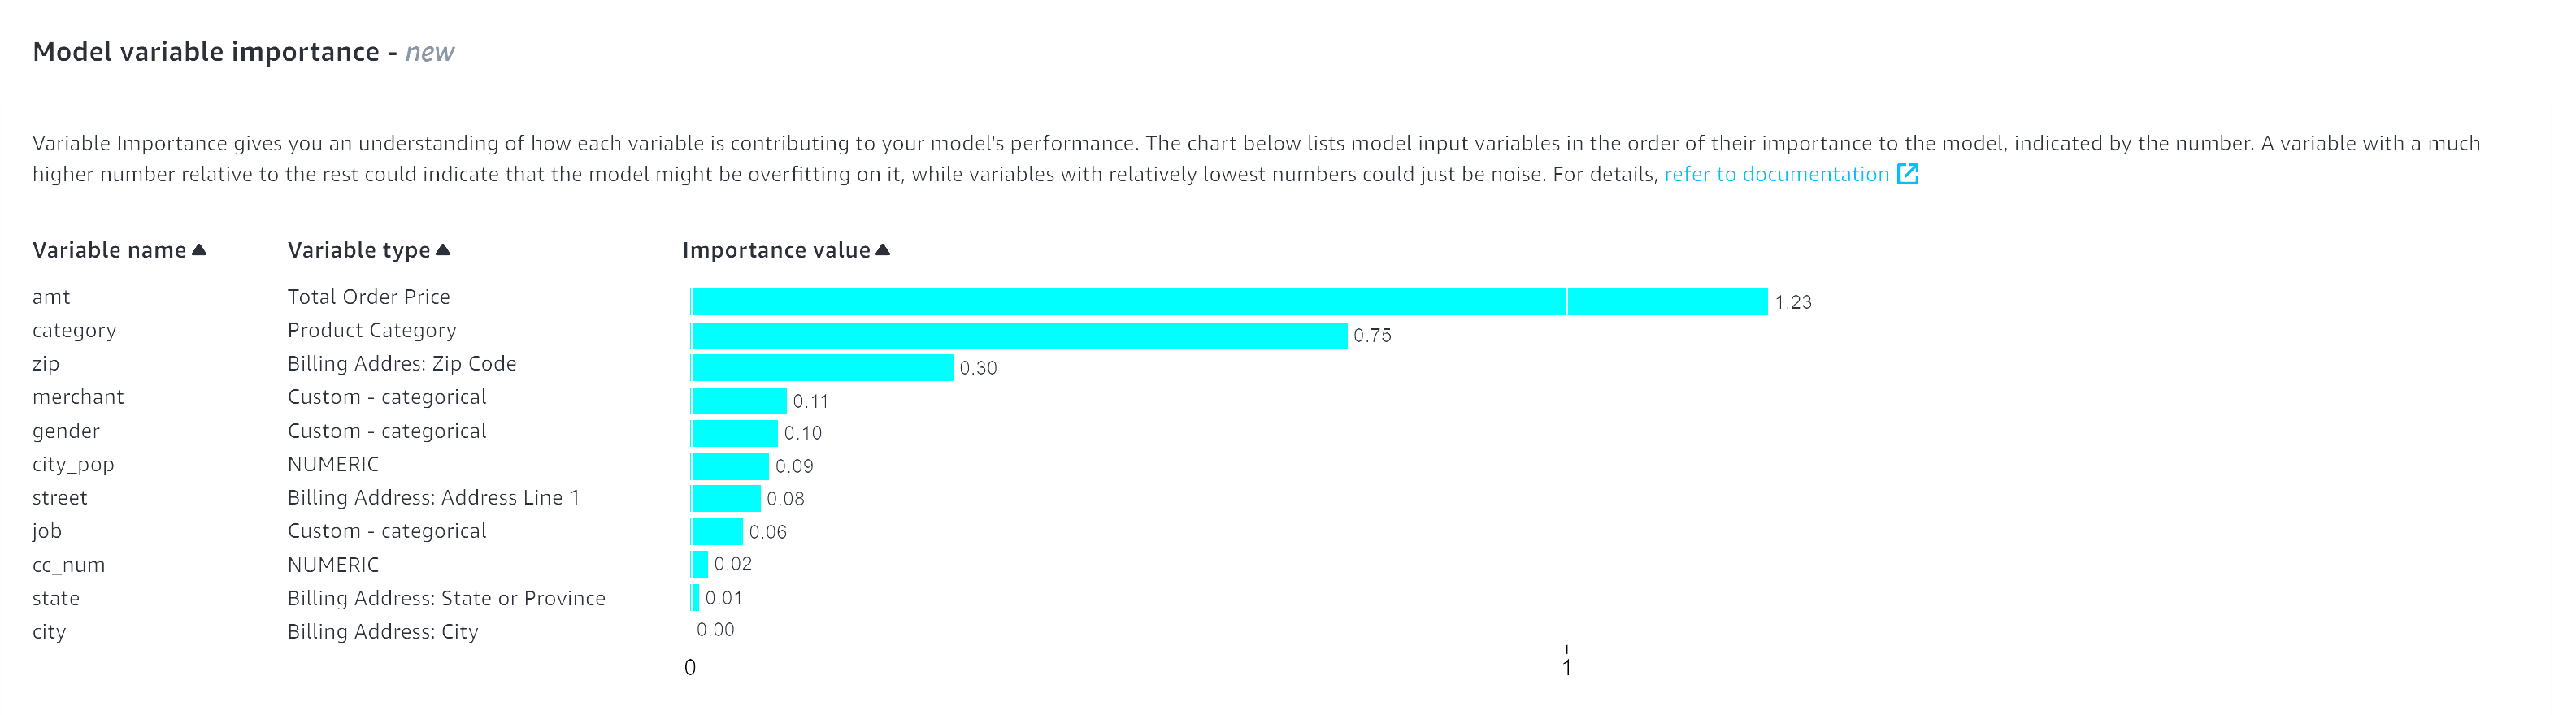
However, we should still look and see if we can reduce overfitting. In subsequent iterations we could also decide to remove the amt variable and see how the model performs or add some extra variables to diversify the dataset.
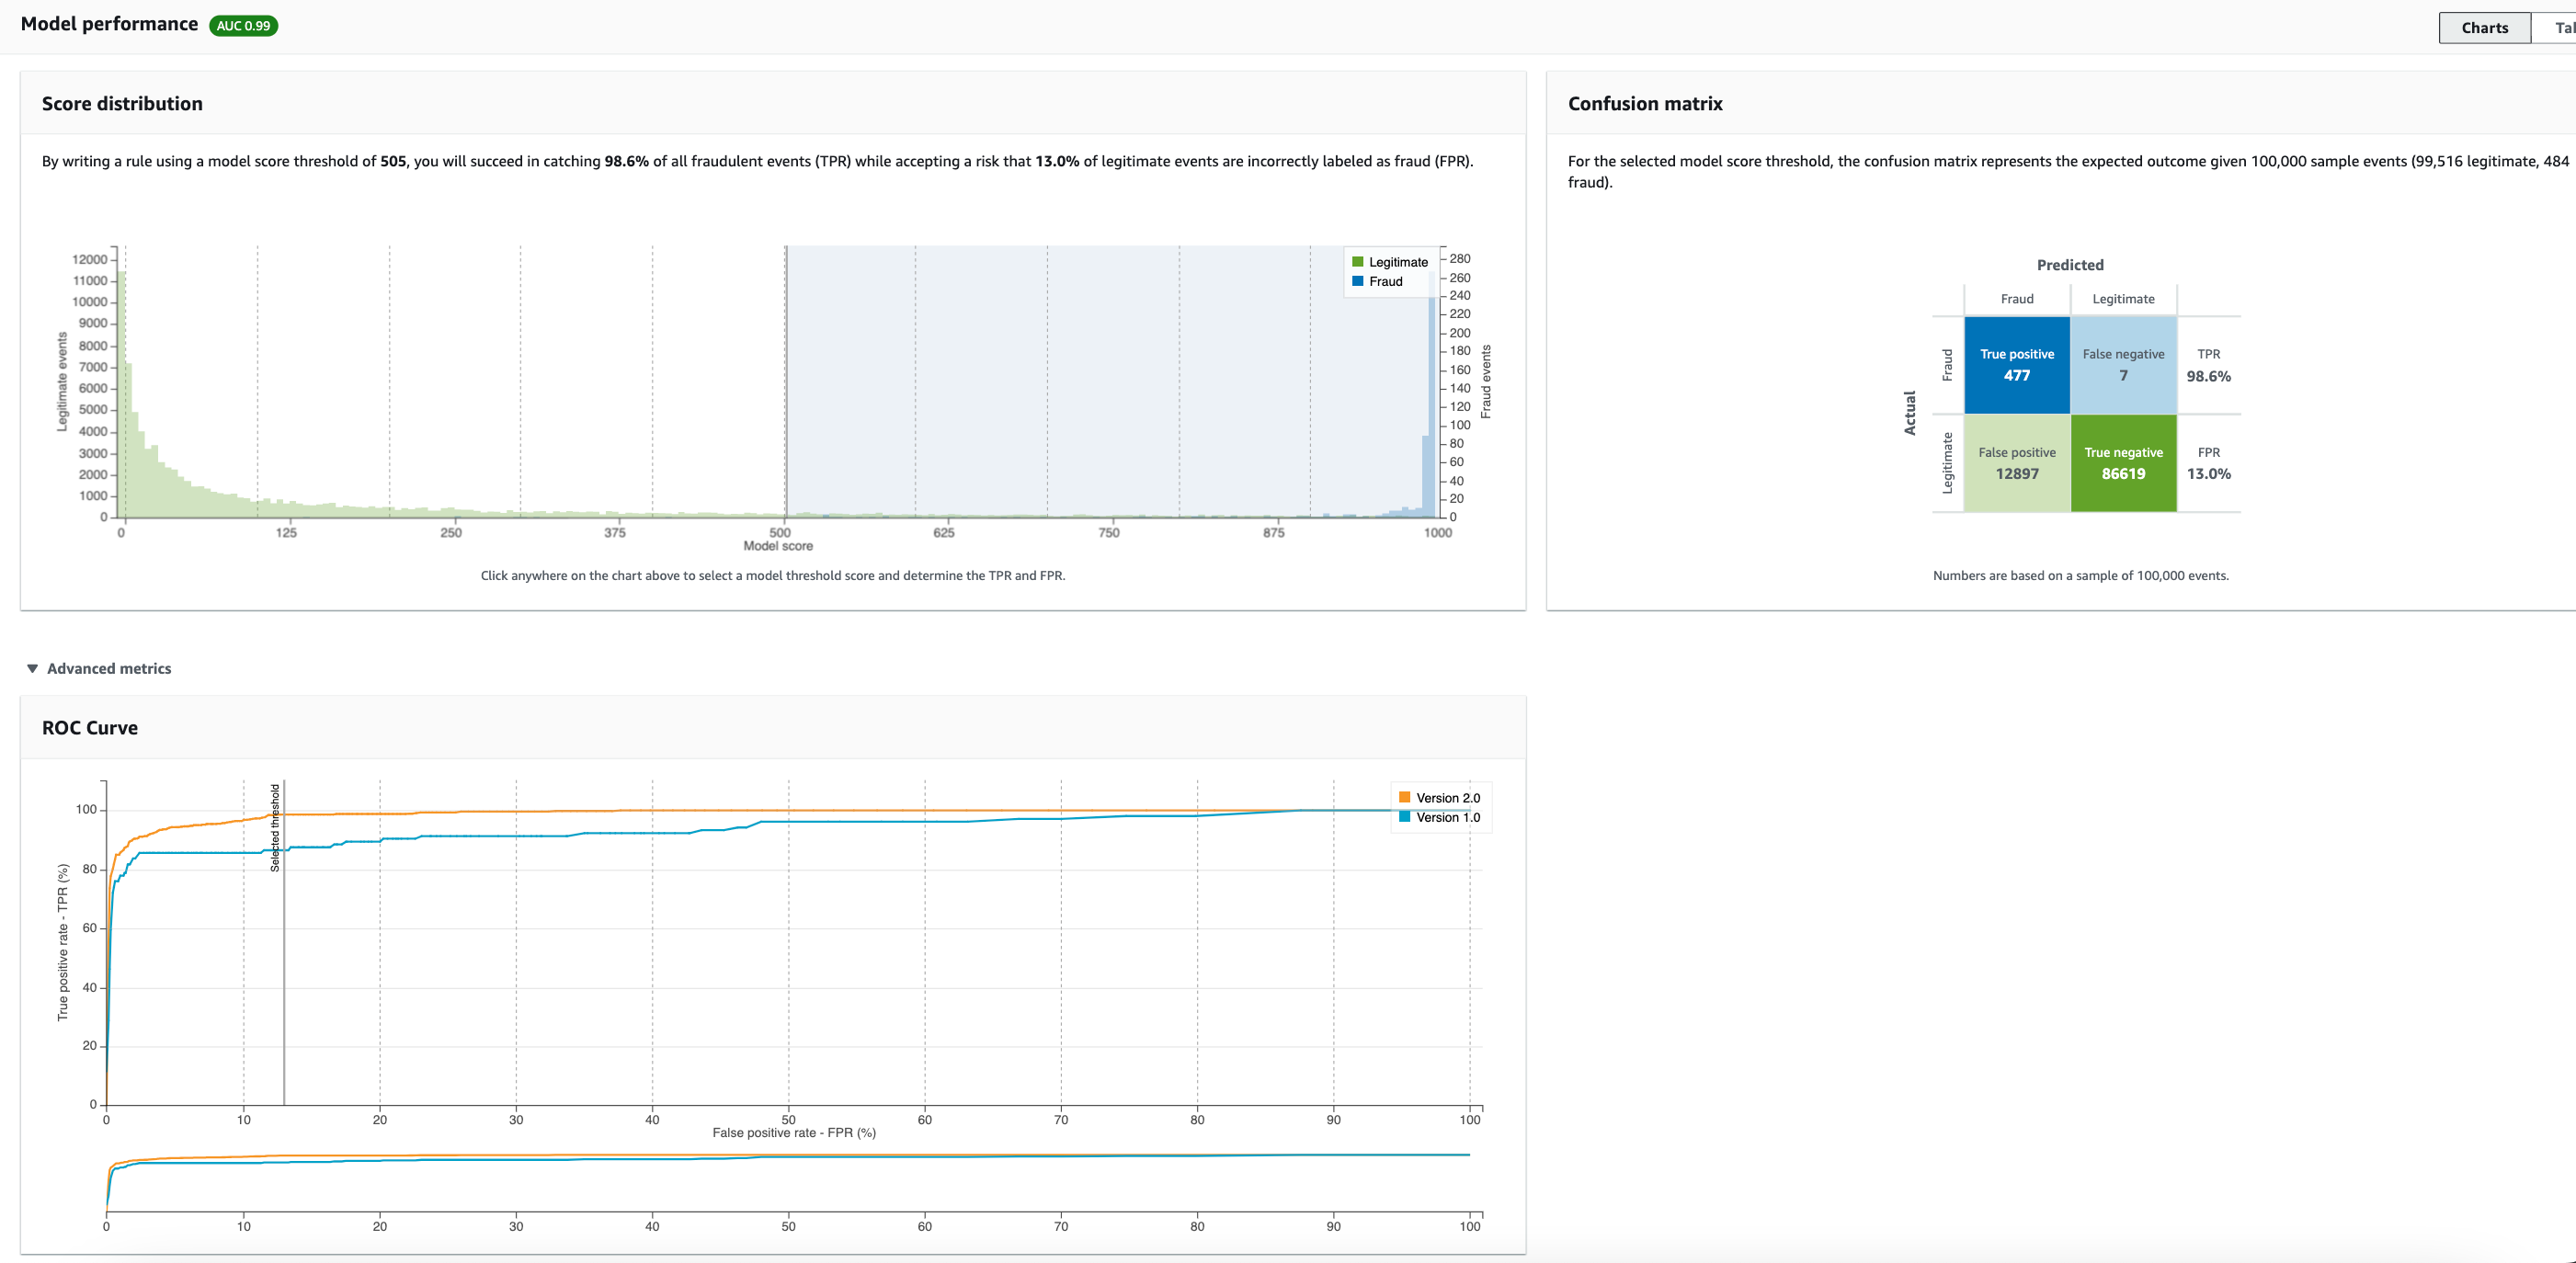
We can also check the model performance metrics. This is generated from the 15% of data that Fraud Detector uses for validation after training is completed https://docs.aws.amazon.com/frauddetector/latest/ug/training-performance-metrics.html This includes the following charts:
- Score distribution chart to review the distribution of model scores for your fraud and legitimate events. Ideally, you will have a clear separation between the fraud and legitimate events. This indicates the model can accurately identify which events are fraudulent and which are legitimate.
- Confusion matrix which summarizes the model accuracy for a given score threshold by comparing model predictions versus actual results. Depending on your selected model score threshold, you can see the simulated impact based on a sample of 100,000 events. https://docs.aws.amazon.com/frauddetector/latest/ug/training-performance-metrics.html The distribution of fraud and legitimate events simulates the fraud rate in your businesses.
- You can use this information to find the right balance between true positive rate and false positive rate.
- ROC chart which plots the true positive rate as a function of false positive rate over all possible model score thresholds. The ROC curve can help you fine-tune the tradeoff between true positive rate and false positive rate.
In the screenshots below, I have selected a model thresholds of 500 and 305 in score distribution chart . You can see how adjusting the model score threshold impacts the TPR and FPR. The ROC, confusion matrix are updated as the model threshold is adjusted on the score distribution chart.
To start model training in local mode, run the following script stored in projects/fraud/training.py. This calls the FraudDetector api directly after dong the necessary data processing from data in S3 (i.e. it avoids the use of Glue Crawler and Glue used in the architecture above). This is useful for quick troubleshooting.
1
2
3
4
$ python projects/fraud/training.py
Starting model training with variables ['cc_num', 'merchant', 'category', 'amt', 'first', 'last', 'gender', 'street', 'city', 'state', 'zip', 'city_pop', 'job', 'trans_num']....
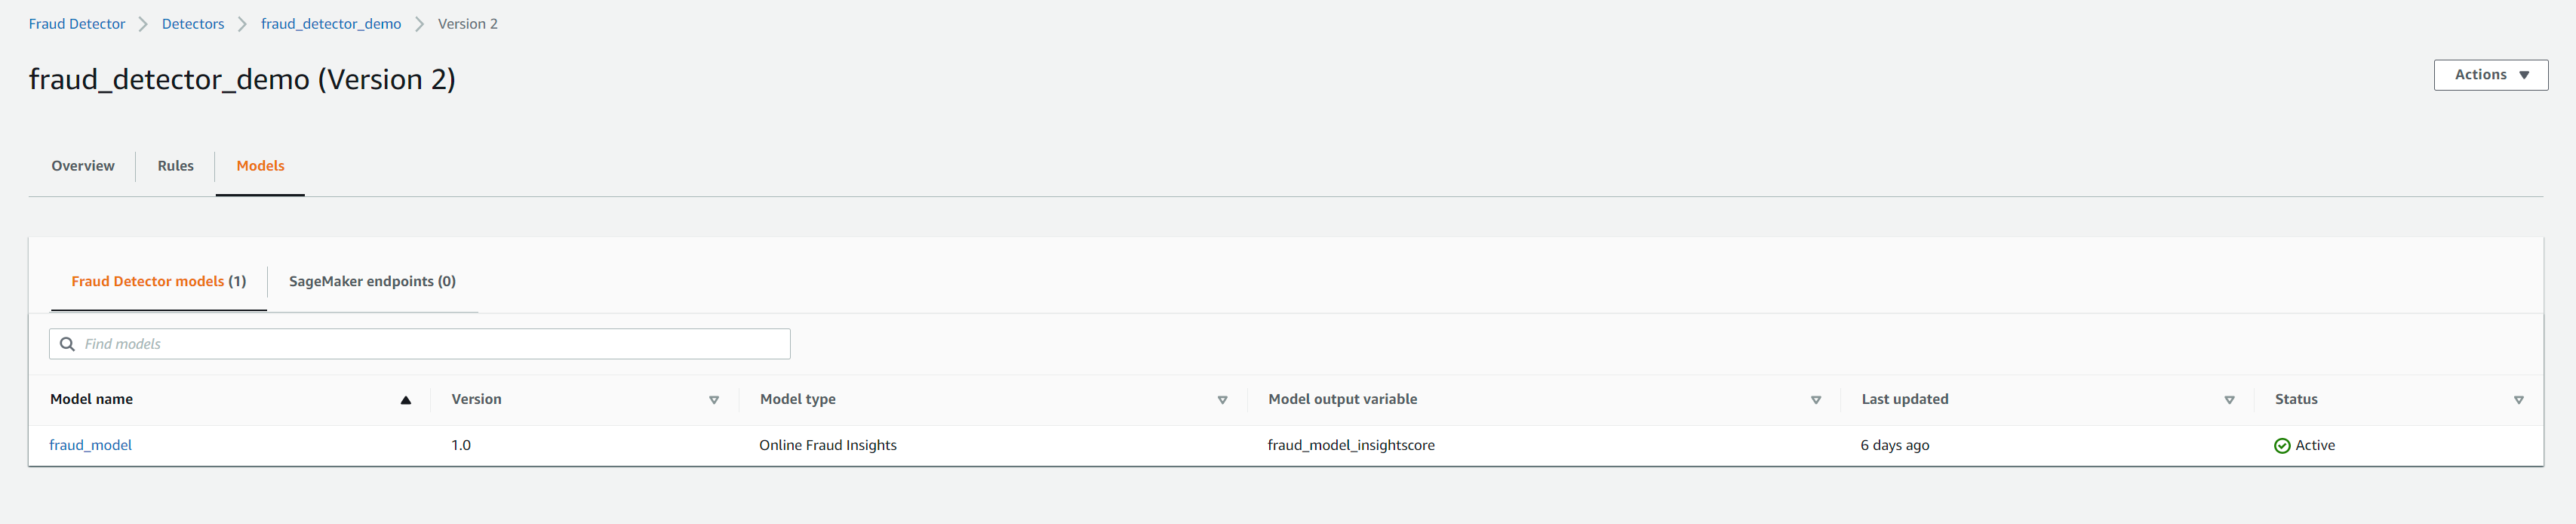
{'modelId': 'fraud_model', 'modelType': 'ONLINE_FRAUD_INSIGHTS', 'modelVersionNumber': '1.0', 'status': 'TRAINING_IN_PROGRESS', 'ResponseMetadata': {'RequestId': 'a1fac915-282d-4dc6-93a5-4331e579f64a', 'HTTPStatusCode': 200, 'HTTPHeaders': {'date': 'Sat, 25 Jun 2022 03:18:01 GMT', 'content-type': 'application/x-amz-json-1.1', 'content-length': '120', 'connection': 'keep-alive', 'x-amzn-requestid': 'a1fac915-282d-4dc6-93a5-4331e579f64a'}, 'RetryAttempts': 0}}
Deploying model
If we are happy with the model trained, we need to make it active by deploying it Scroll to the top of the Version details page and choose Actions, Deploy model version. On the Deploy model version p prompt that appears, choose Deploy version.
- Variables
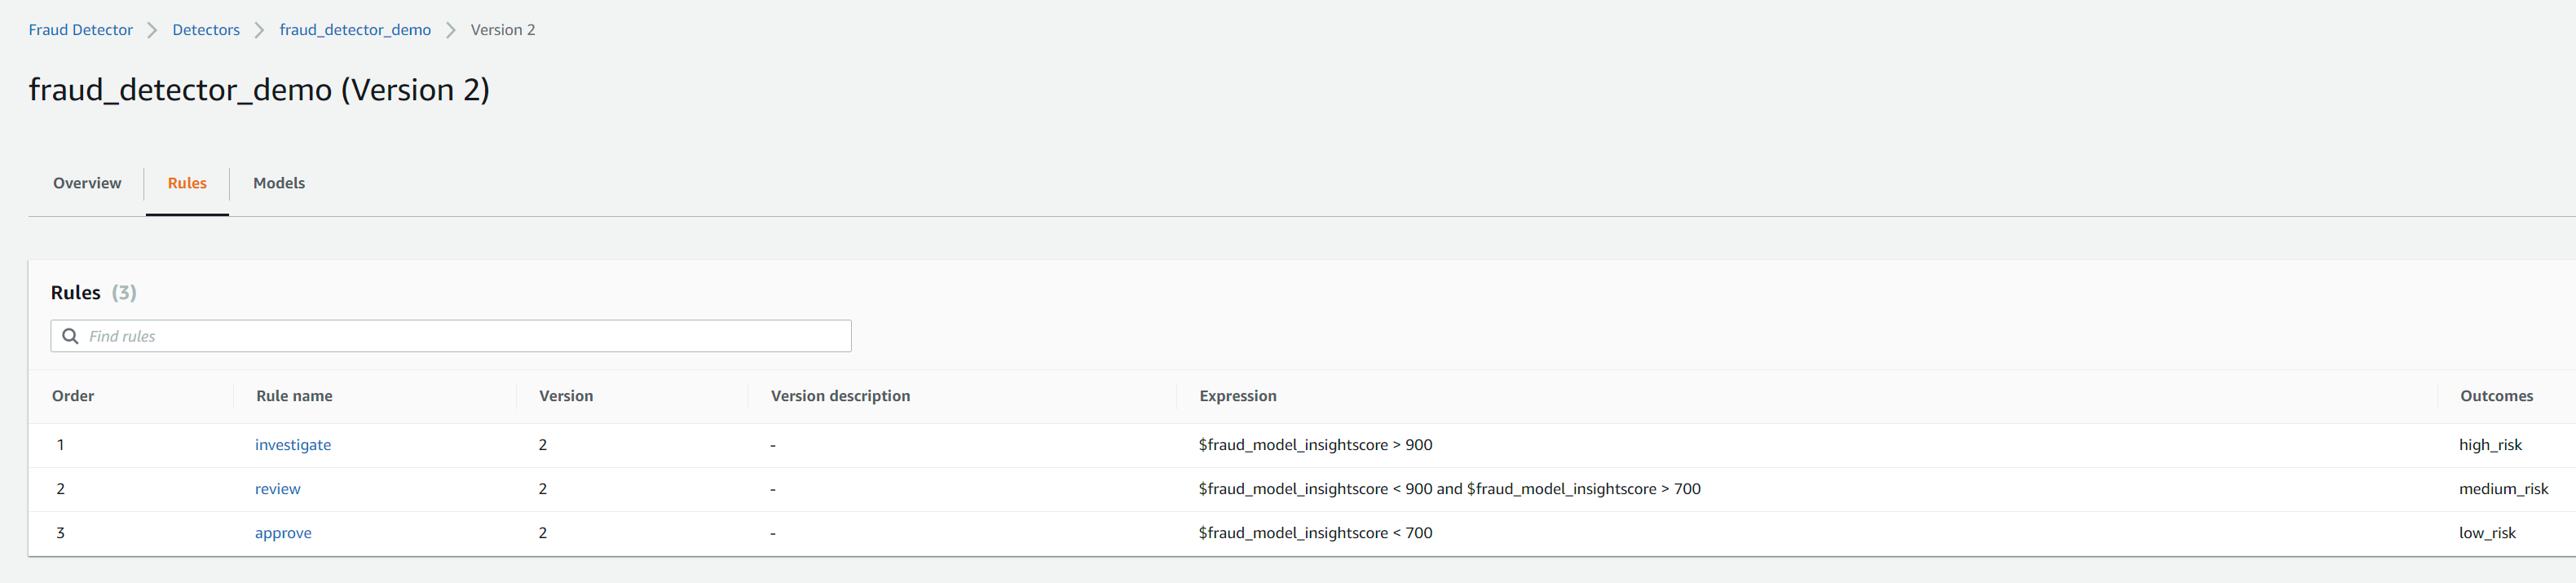
The Version details shows a Status of Deploying. When the model is ready, the Status changes to Active. Once model has finished deploying and status changed to active, we will need to associate the model with Fraud Detector for predictions. However, we will also need to update the rule expressions as the default Fraud Detector version 1 created from cloudformation uses the variable ‘amt’ in the rule expression as seen in the screenshot below.
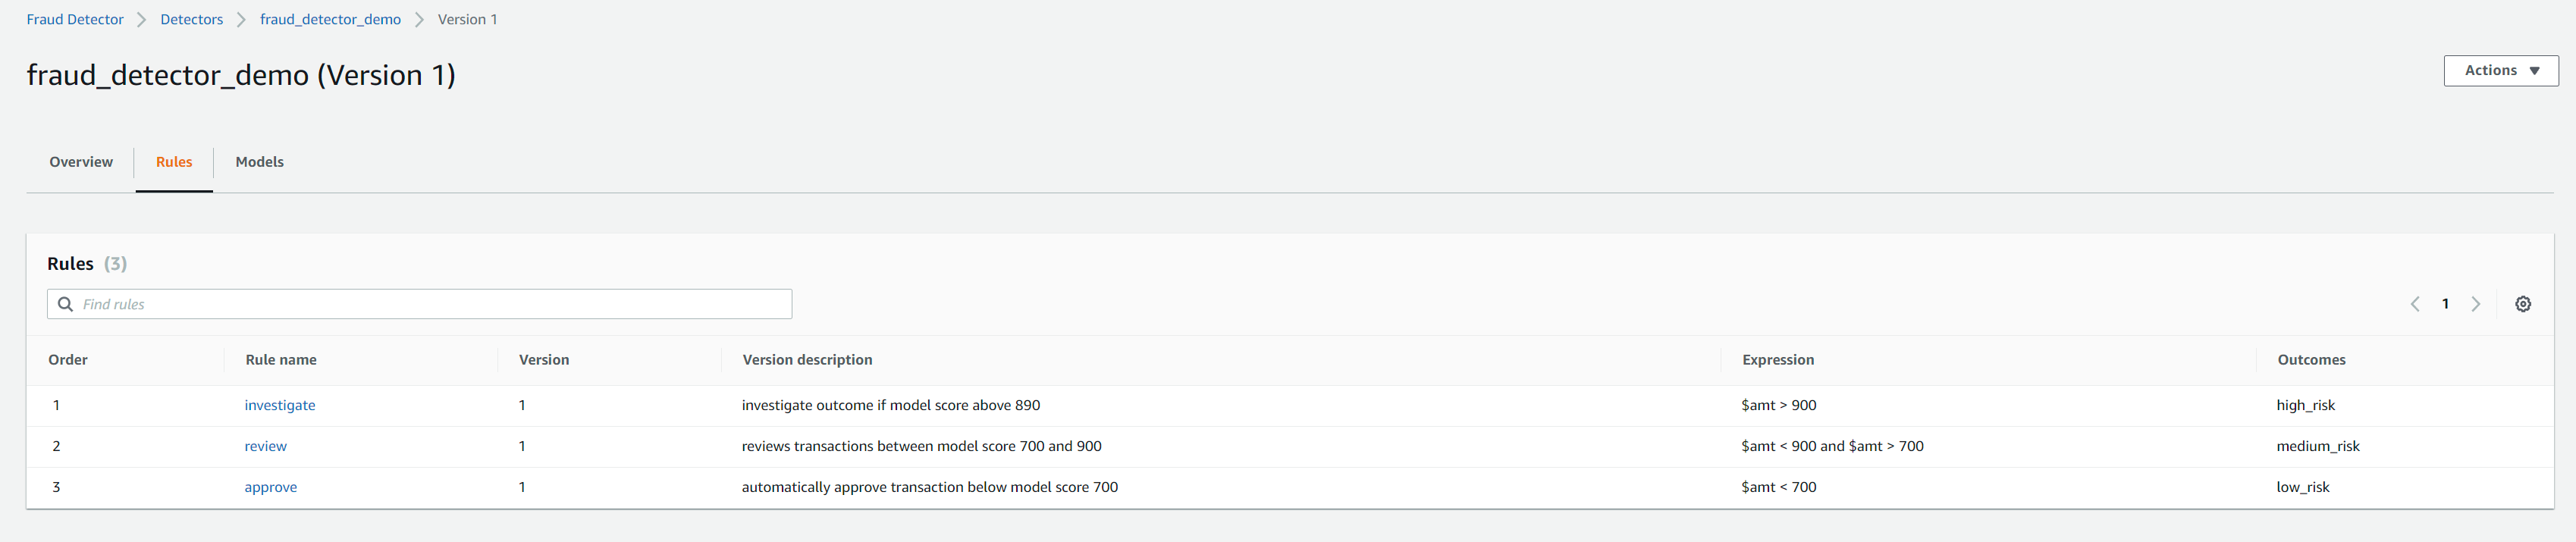
We need to change this to model insight score which is a new variable created after model training has completed. This variable is not available when the cloudformation stack is created as the model has not been trained yet so we needed to have a placeholder existing variable so the rule expression is valid to avoid the stack for throwing an error
We can run the following script to update the detector rules and associate the new model with it. This will carry out two steps.
Firstly, it will update the existing rule version with the correct expression based on the number passed to the –update_rule argument. It will create a new rule version (incremented from the original, eg 2 if the original is 1). Then it will create a new detector version and associate the model version (–model_version arg) and the rules_version (–rules_version arg) which should be set to be the increment of the existing rule version. This will automatically increment the detector version to 2.0 as the existing version is 1.0
1
2
3
4
5
6
7
8
9
10
11
12
13
14
15

$ python projects/fraud/deploy.py --update_rule 1 --model_version 1.0 --rules_version 2
26-06-2022 04:50:34 : INFO : deploy : main : 121 : Updating rule version 1
26-06-2022 04:50:34 : INFO : deploy : update_detector_rules : 71 : Updating Investigate rule ....
{'detectorId': 'fraud_detector_demo', 'ruleId': 'investigate', 'ruleVersion': '2'}

26-06-2022 04:50:35 : INFO : deploy : update_detector_rules : 80 : Updating review rule ....
{'detectorId': 'fraud_detector_demo', 'ruleId': 'review', 'ruleVersion': '2'}

26-06-2022 04:50:35 : INFO : deploy : update_detector_rules : 89 : Updating approve rule ....
{'detectorId': 'fraud_detector_demo', 'ruleId': 'approve', 'ruleVersion': '2'}

26-06-2022 04:50:35 : INFO : deploy : main : 123 : Deploying trained model version 1.0 to new detector version
{'detectorId': 'fraud_detector_demo', 'detectorVersionId': '2', 'status': 'DRAFT', 'ResponseMetadata': {'RequestId': 'da37d973-2c43-4c56-93e5-f9b9bd132bb3', 'HTTPStatusCode': 200, 'HTTPHeaders': {'date': 'Sun, 26 Jun 2022 03:50:36 GMT', 'content-type': 'application/x-amz-json-1.1', 'content-length': '77', 'connection': 'keep-alive', 'x-amzn-requestid': 'da37d973-2c43-4c56-93e5-f9b9bd132bb3'}, 'RetryAttempts': 0}}
The screenshots below show the model associated with the new version and the correct rules expressions which use the fraud_model_insightscore variable
Setting up API gateway
- Open the API Gateway console, and then choose your API.
- Select CreateAPI and select the type as RestAPI
- Protocol: REST, Create New API and choose a name and optional description
- Select the API resource just created and select Create Method from the Resource Actions. Select Get
- In the Get-Setup, select Integration Type: lambda function and lambda function name ‘PredictFraudModel’. Click save.
- In the Method Execution pane, choose Method Request.
- In settings, set Request Validator: ‘Validate query string parameters and headers’. Leave Authorization as ‘None’.
- Expand the URL Query String Parameters dropdown, then choose Add query string.
- Enter the following variables one by one as a separate name field. Mark all as required except for ‘flow_definition’ variable
1
 amt, category, cc_num, city, city_pop, event_timestamp, first, flow_definition, gender, job, last, merchant, state, street, trans_num, zip
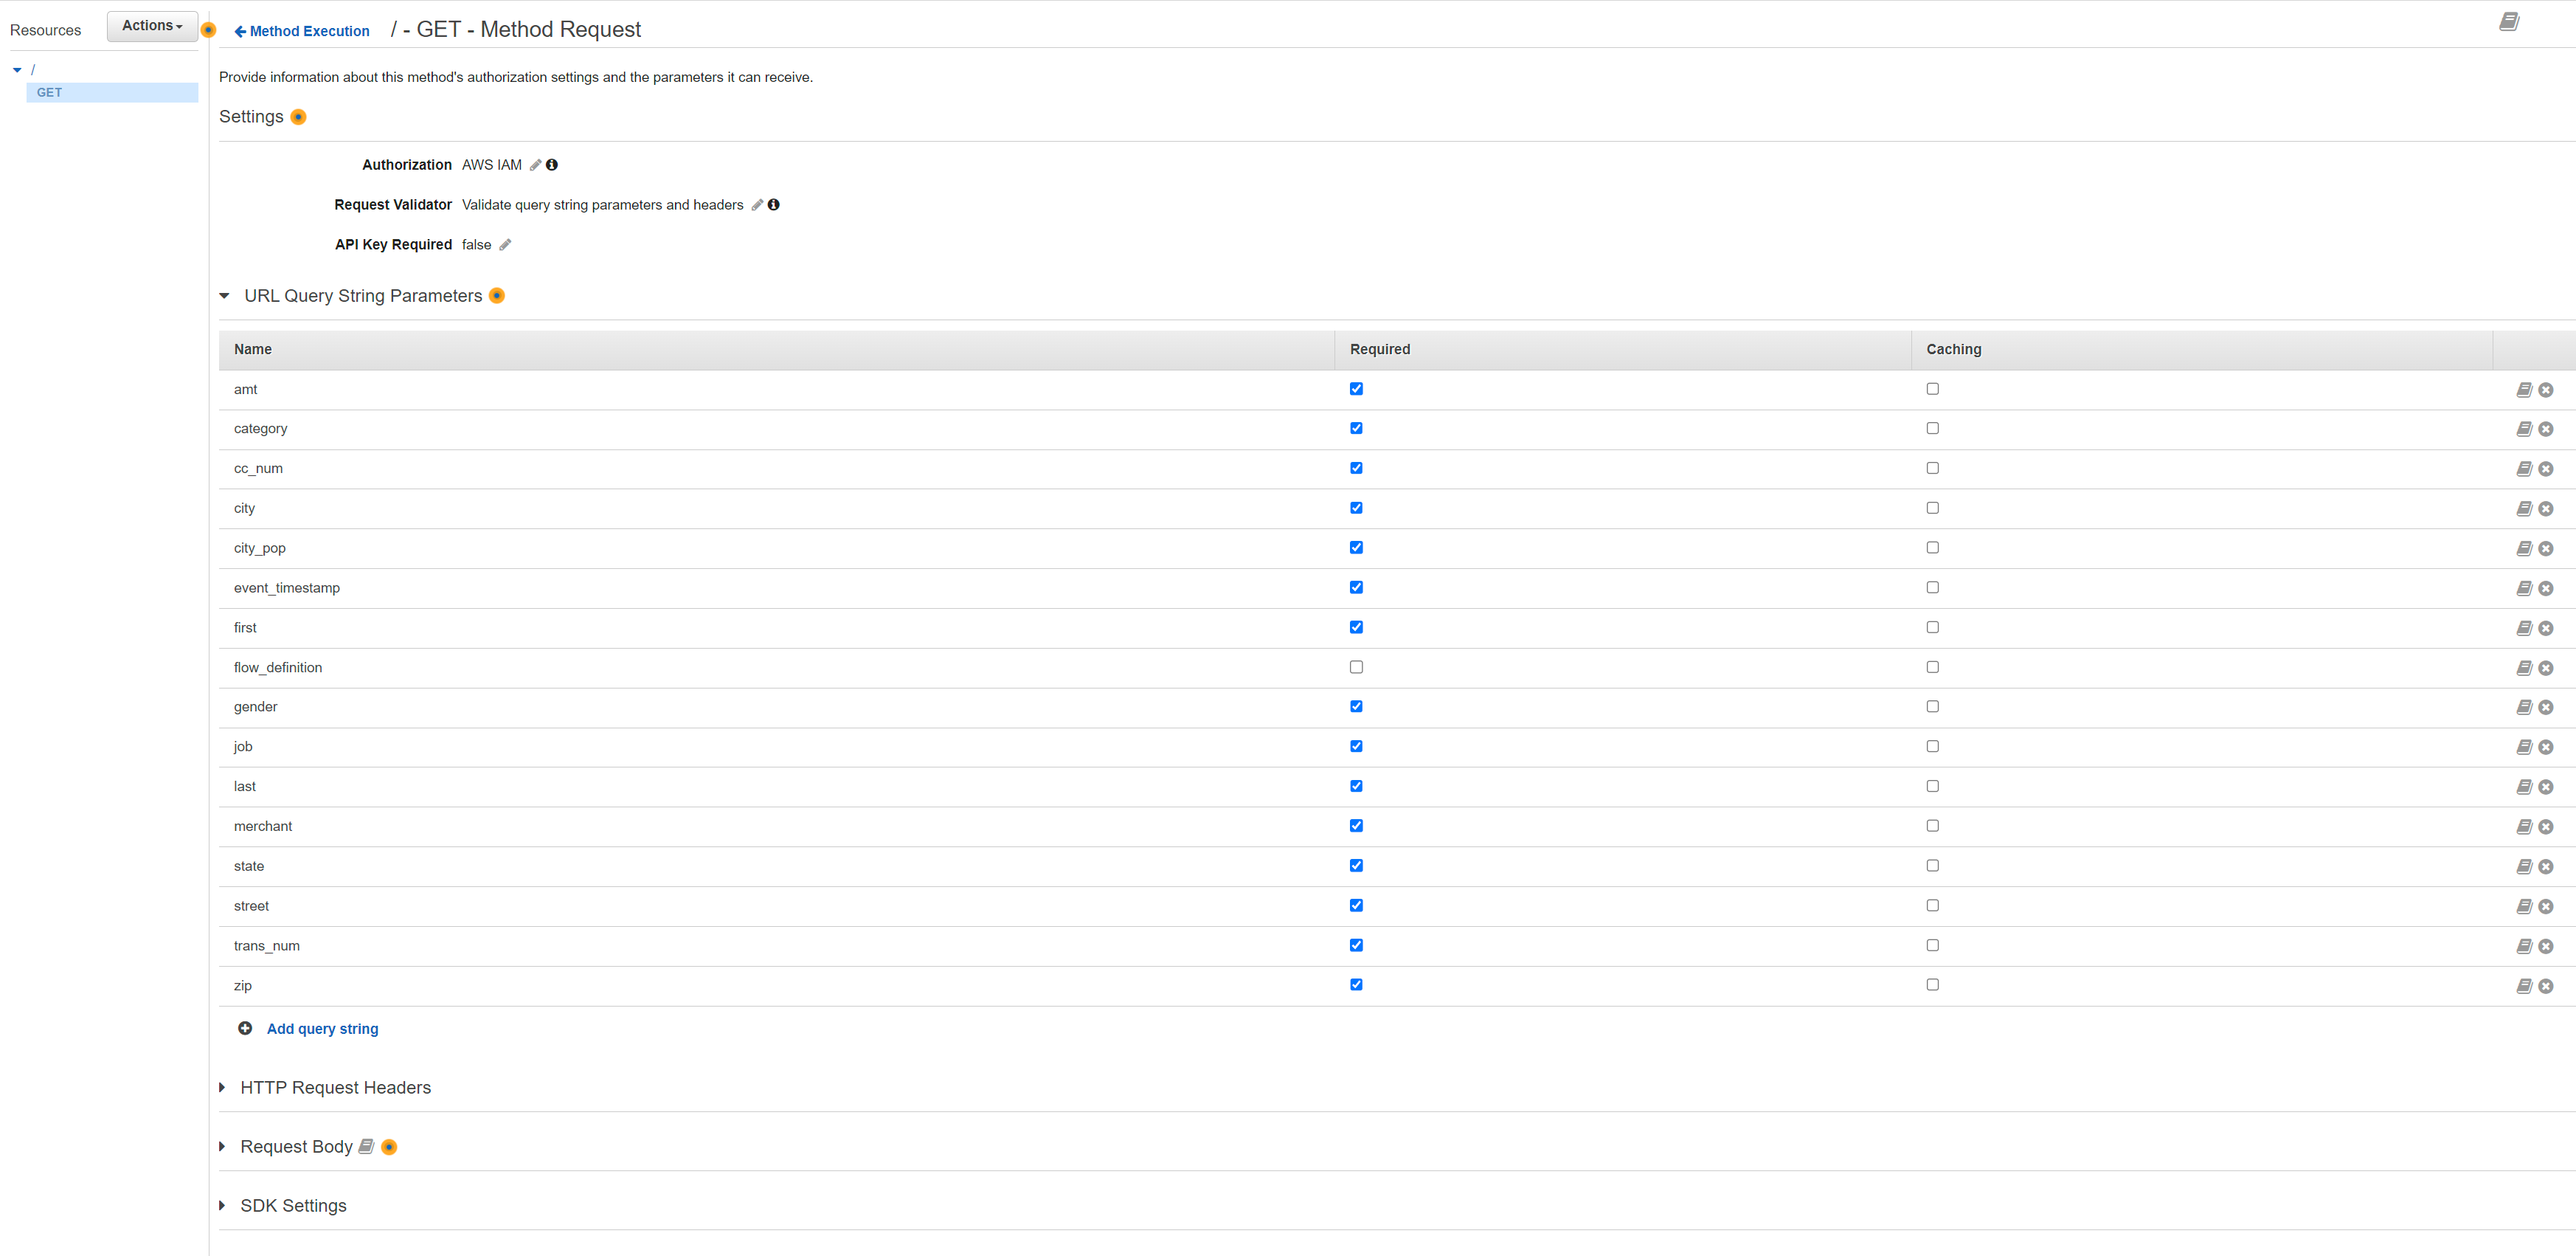
- Go back to the Method Execution pane.It should look like below.
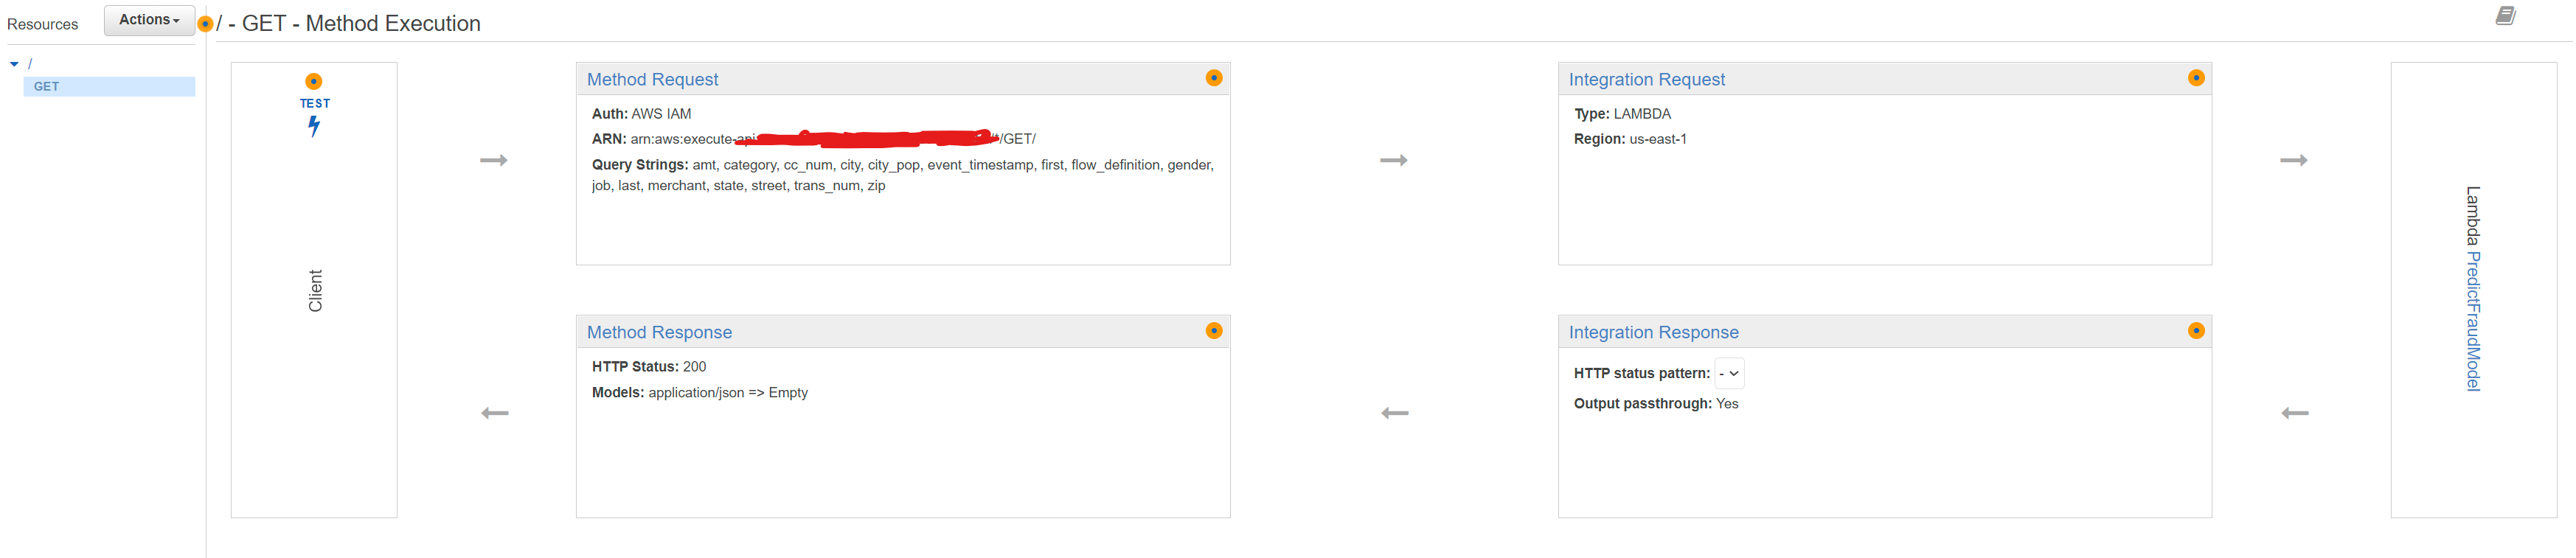
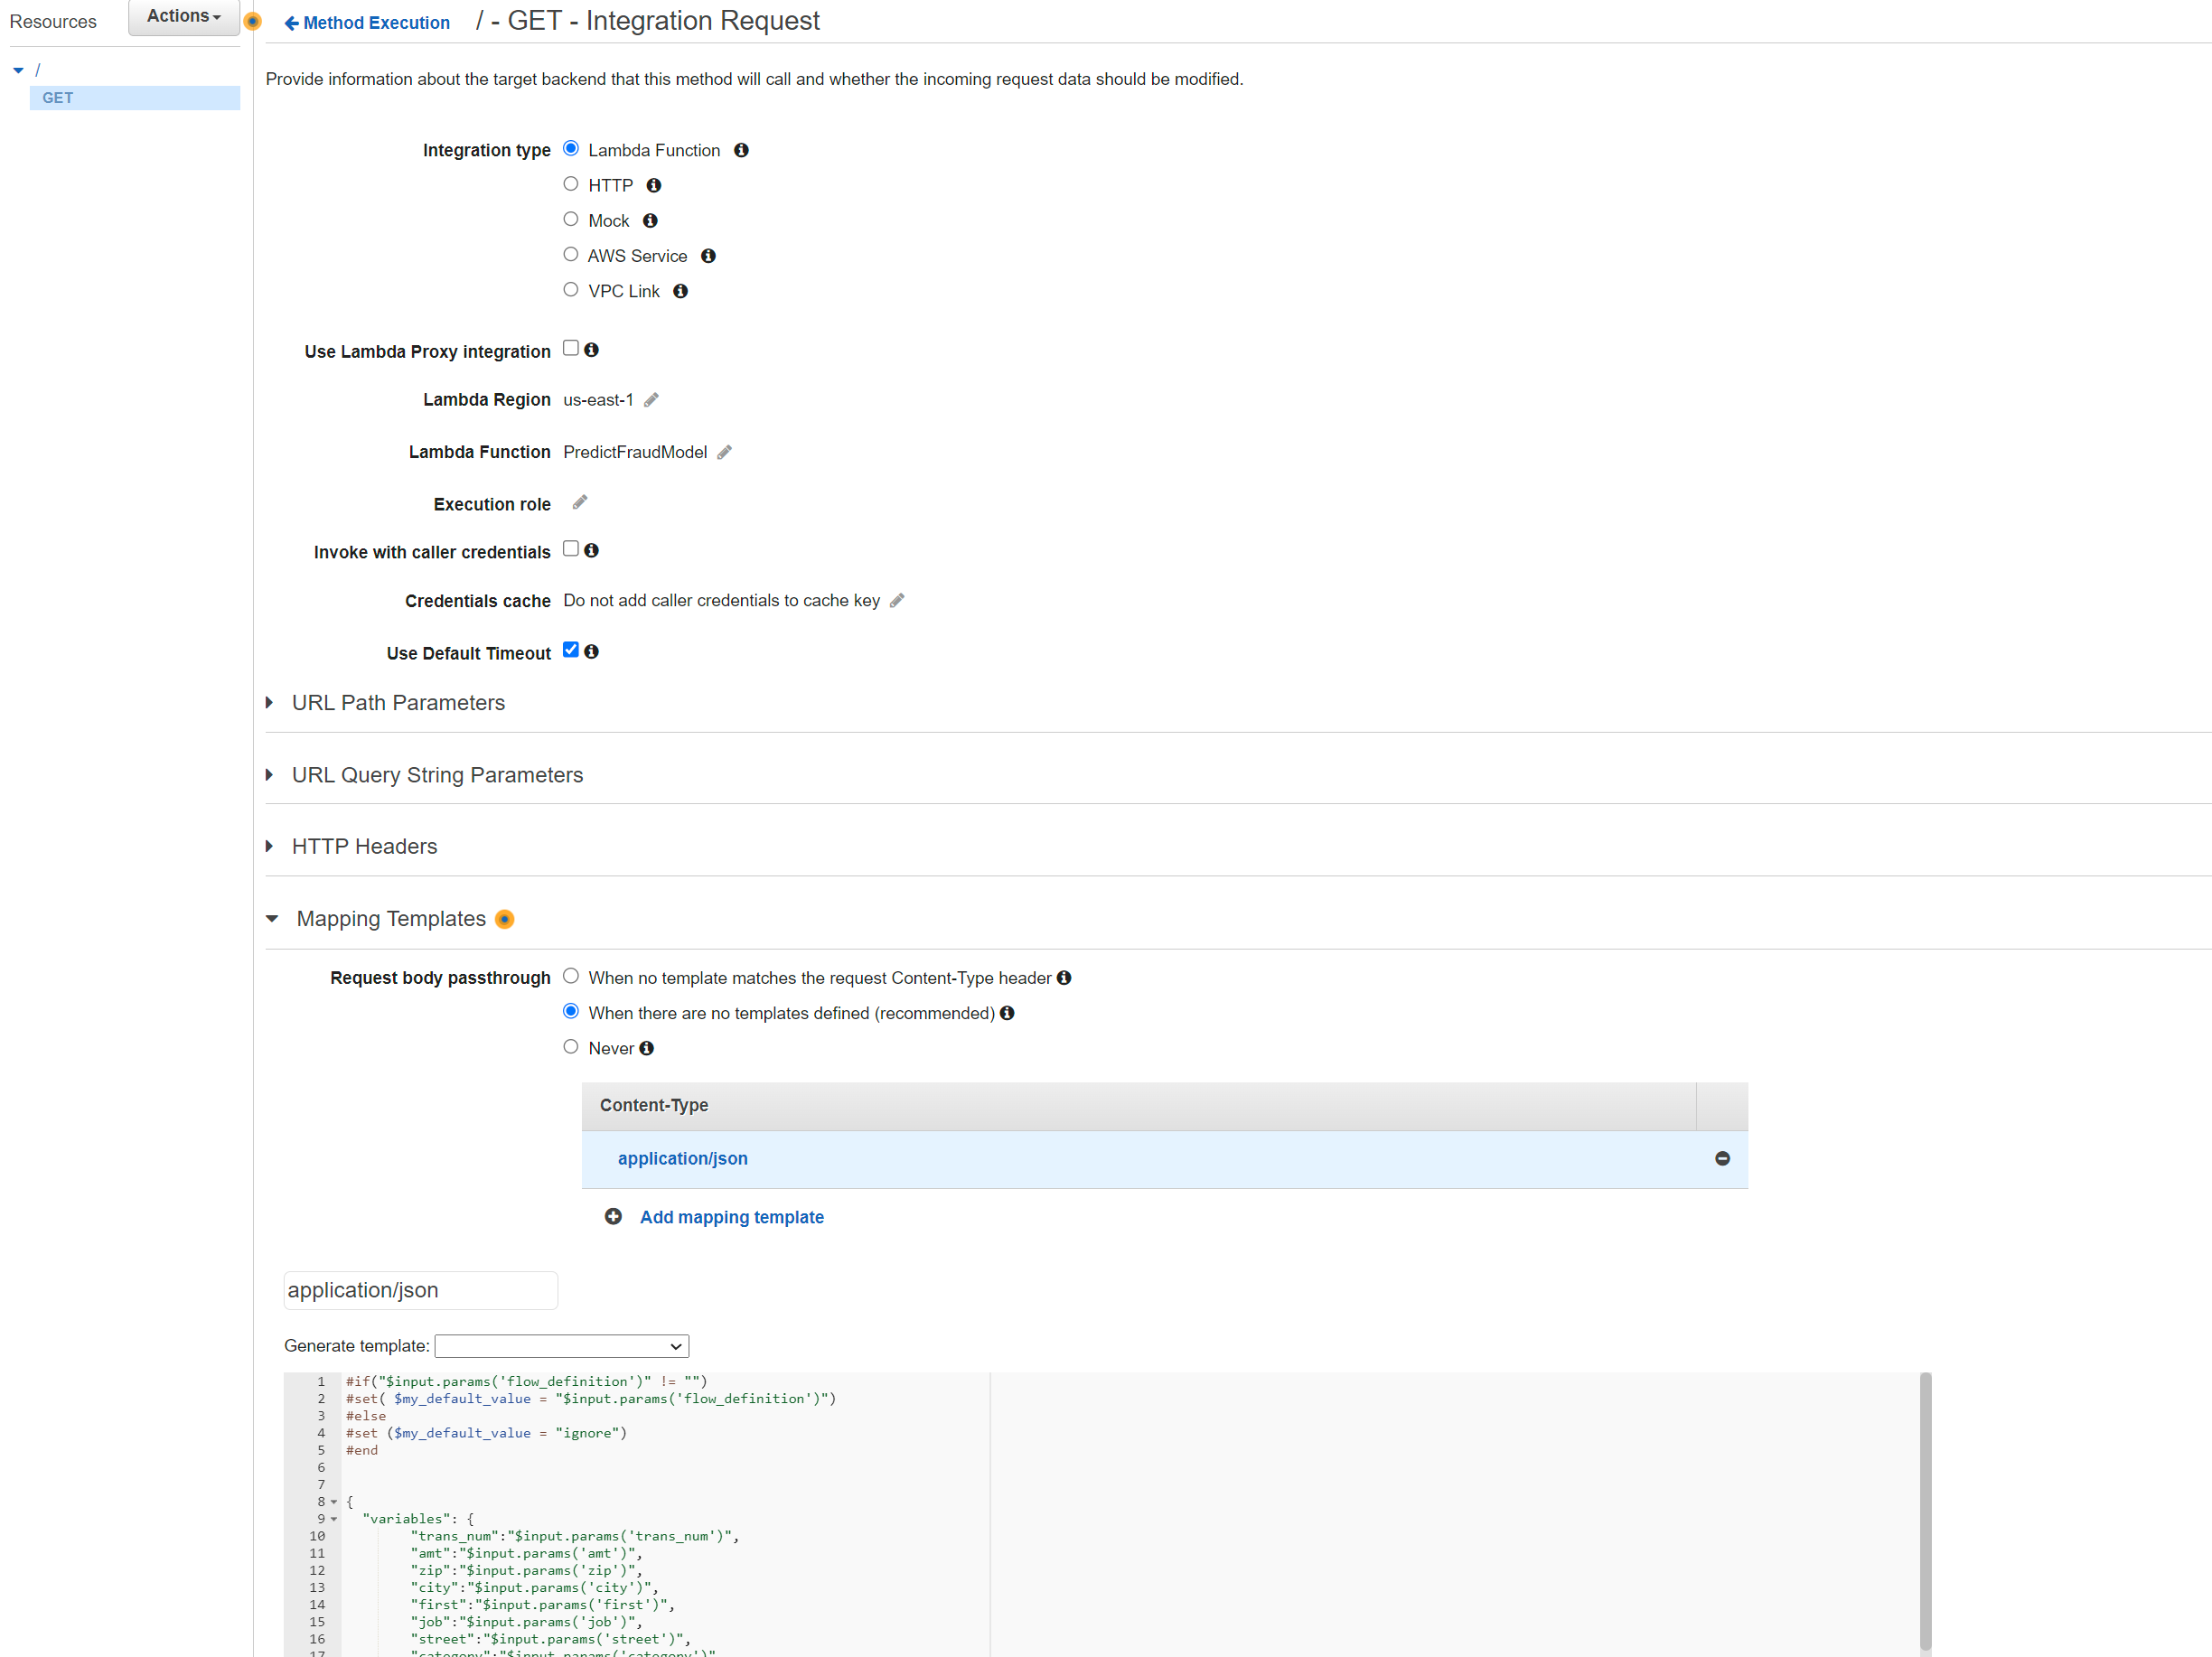
- Choose Integration Request.
- Choose the Mapping Templates dropdown and then choose Add mapping template.
- For the Content-Type field, enter application/json and then choose the check mark icon.
- In the pop-up that appears, choose Yes, secure this integration.
- For Request body passthrough, choose When there are no templates defined (recommended).
- In the mapping template editor, copy and replace the existing script with the following code:
1
2
3
4
5
6
7
8
9
10
11
12
13
14
15
16
17
18
19
20
21
22
23
24
25
26
27
#if("$input.params('flow_definition')" != "")
#set( $my_default_value = "$input.params('flow_definition')")
#else
#set ($my_default_value = "ignore")
#end


{
  "variables": {
        "trans_num":"$input.params('trans_num')",
        "amt":"$input.params('amt')",
        "zip":"$input.params('zip')",
        "city":"$input.params('city')",
        "first":"$input.params('first')",
        "job":"$input.params('job')",
        "street":"$input.params('street')",
        "category":"$input.params('category')",
        "city_pop":"$input.params('city_pop')",
        "gender":"$input.params('gender')",
        "cc_num":"$input.params('cc_num')",
        "last":"$input.params('last')",
        "state":"$input.params('state')",
        "merchant":"$input.params('merchant')"
  },
  "EVENT_TIMESTAMP":"$input.params('event_timestamp')",
  "flow_definition":"$my_default_value"
}
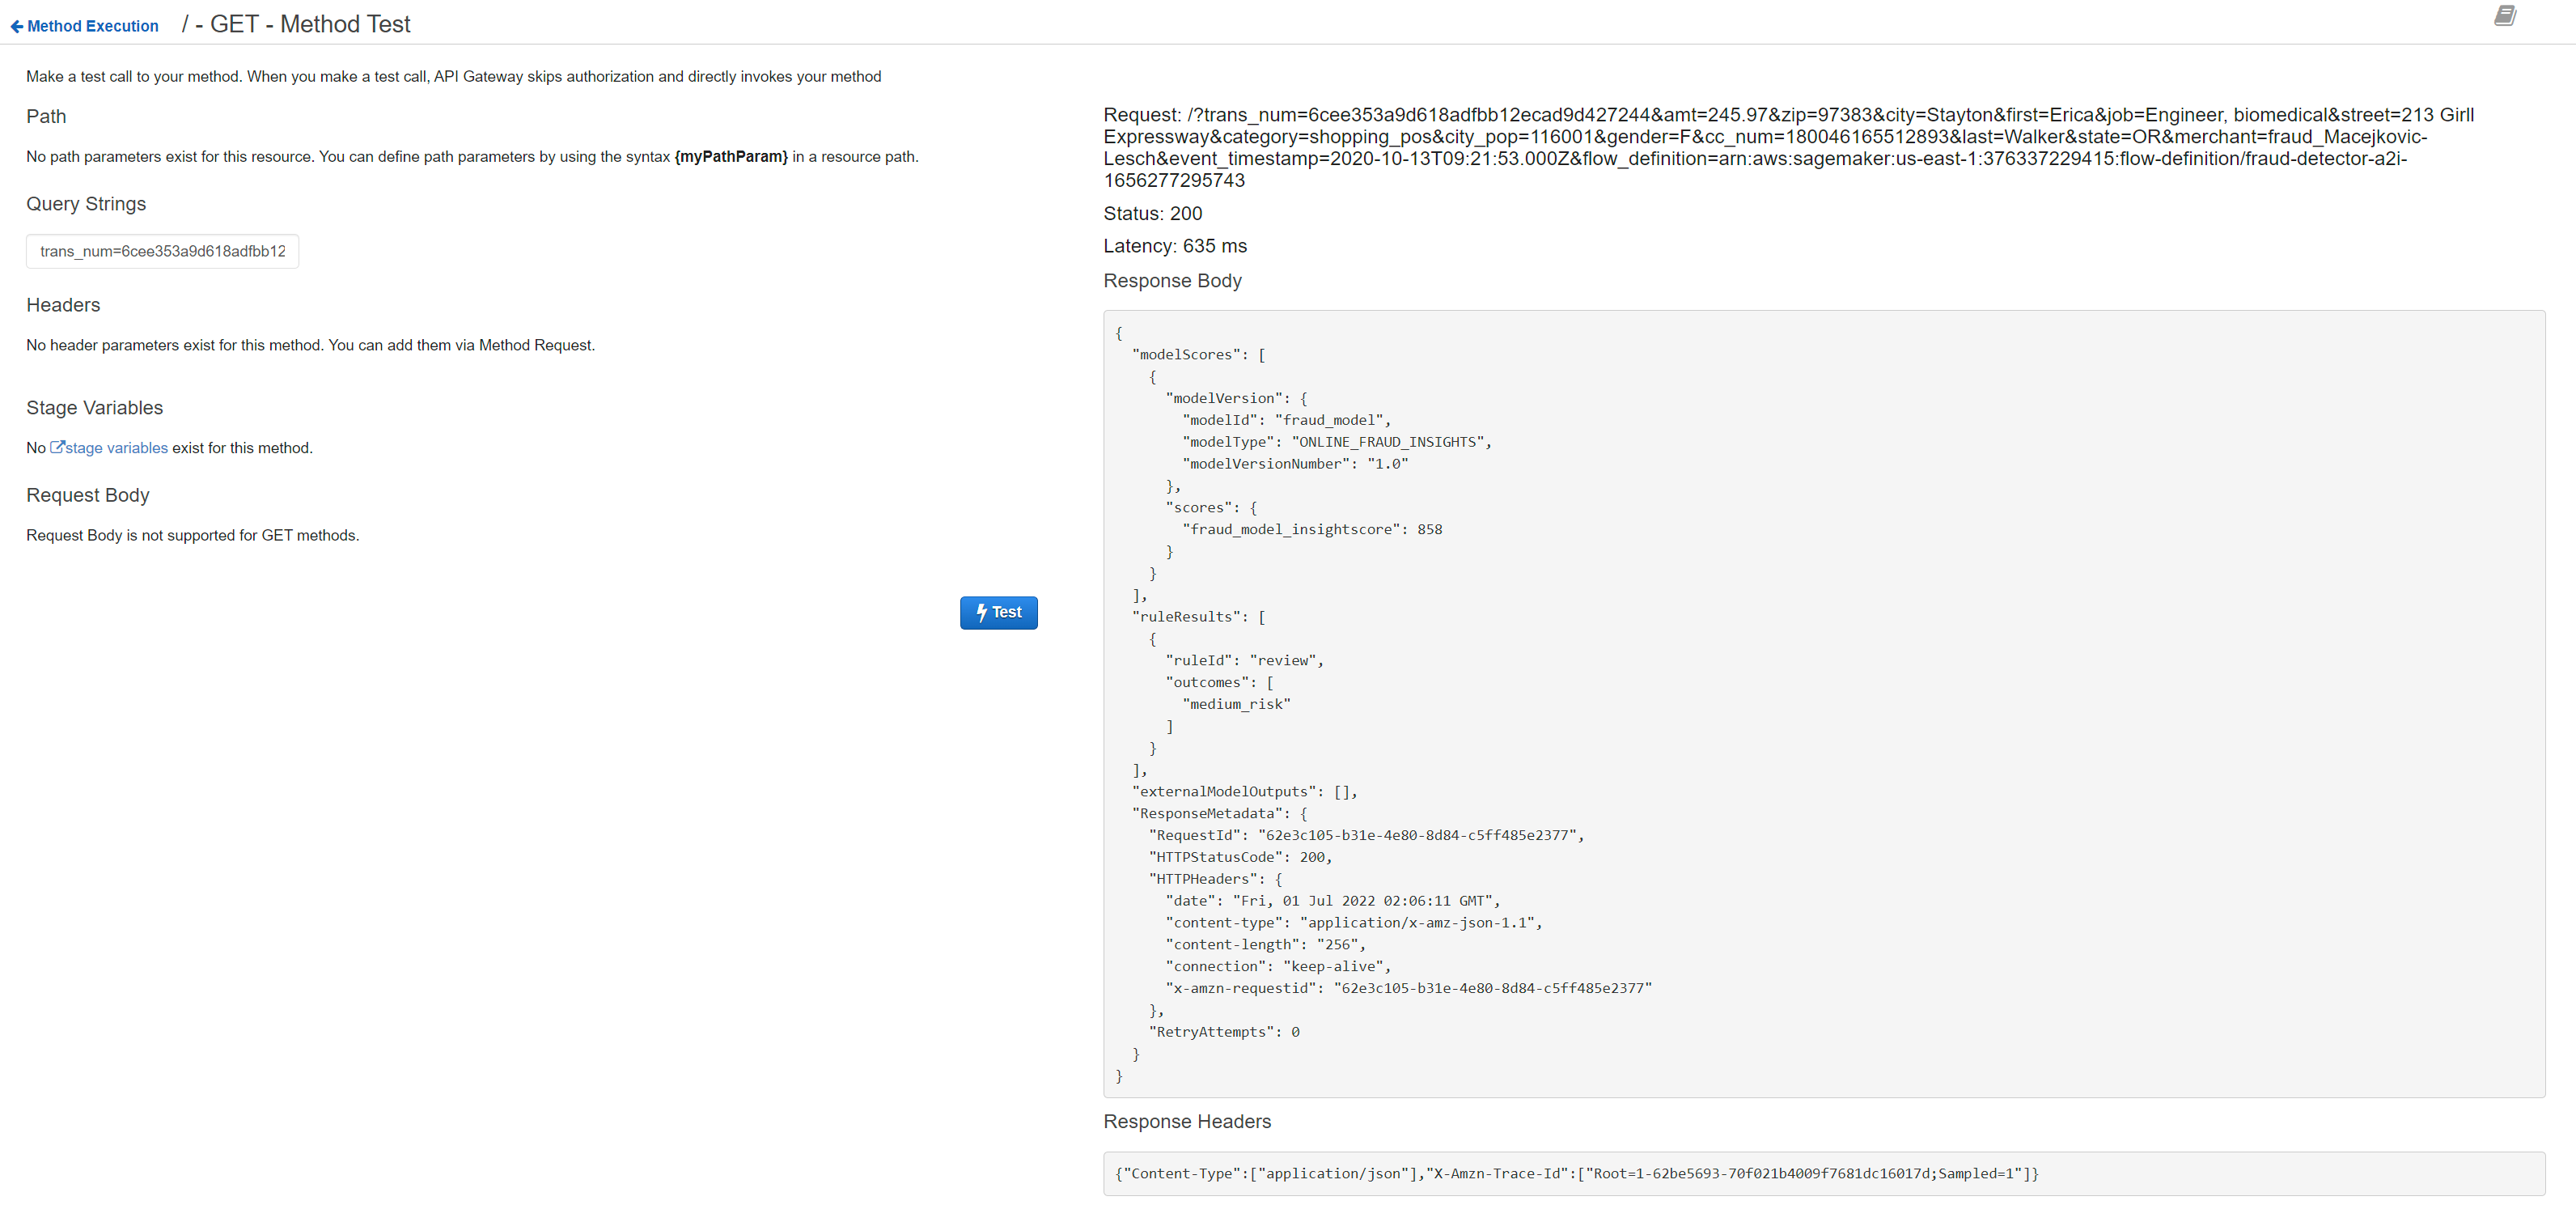
- Choose Save, and go back to MethodExecution pane. Click on Test button on the left.
- In the Query Strings box paste the following
1
trans_num=6cee353a9d618adfbb12ecad9d427244&amt=245.97&zip=97383&city=Stayton&first=Erica&job=Engineer, biomedical&street=213 Girll Expressway&category=shopping_pos&city_pop=116001&gender=F&cc_num=180046165512893&last=Walker&state=OR&merchant=fraud_Macejkovic-Lesch&event_timestamp=2020-10-13T09:21:53.000Z&flow_definition=arn:aws:sagemaker:us-east-1:376337229415:flow-definition/fraud-detector-a2i-1656277295743
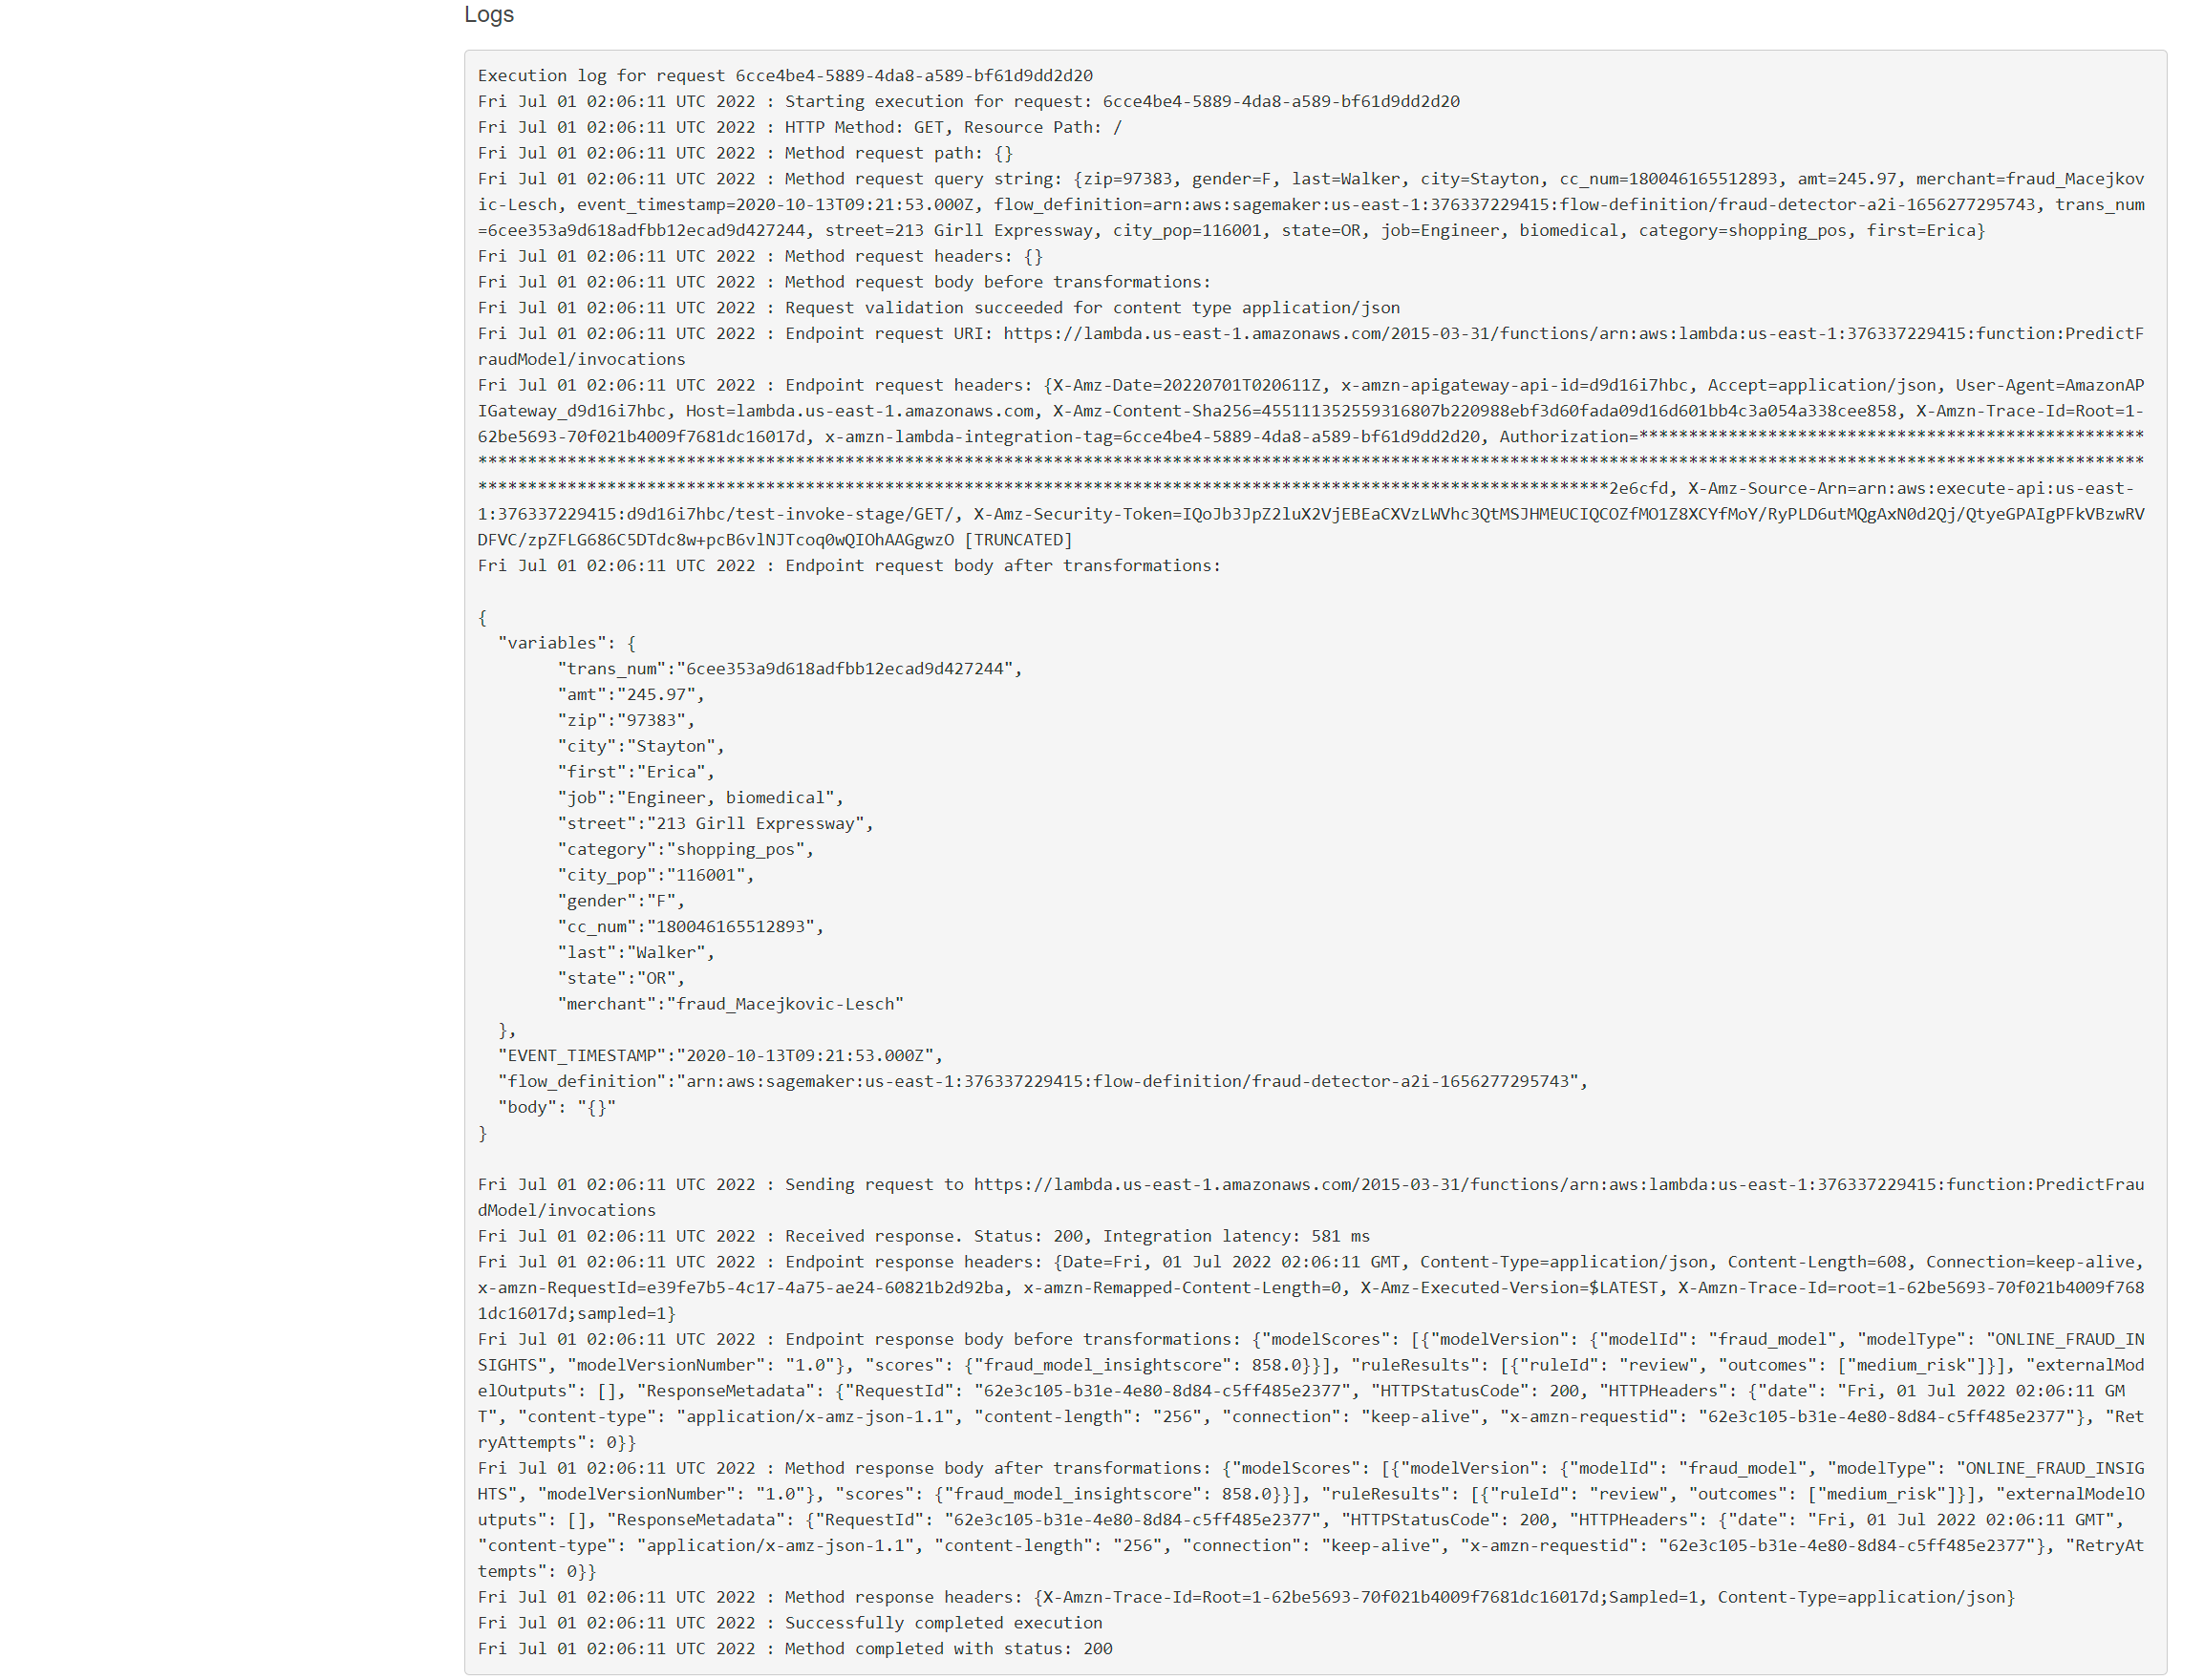
If successful you should see the response and logs as in screenshot below. You can also navigate to CloudWatch log stream group for Lambda invocation and check it has run successfully.
We can then proceed to deploying the API. Go back to Resources -> Actions and Deploy API. Select Deployment Stage ‘New Stage’ and choose name as ‘dev’. You should see the API endpoint to invoke on the console.
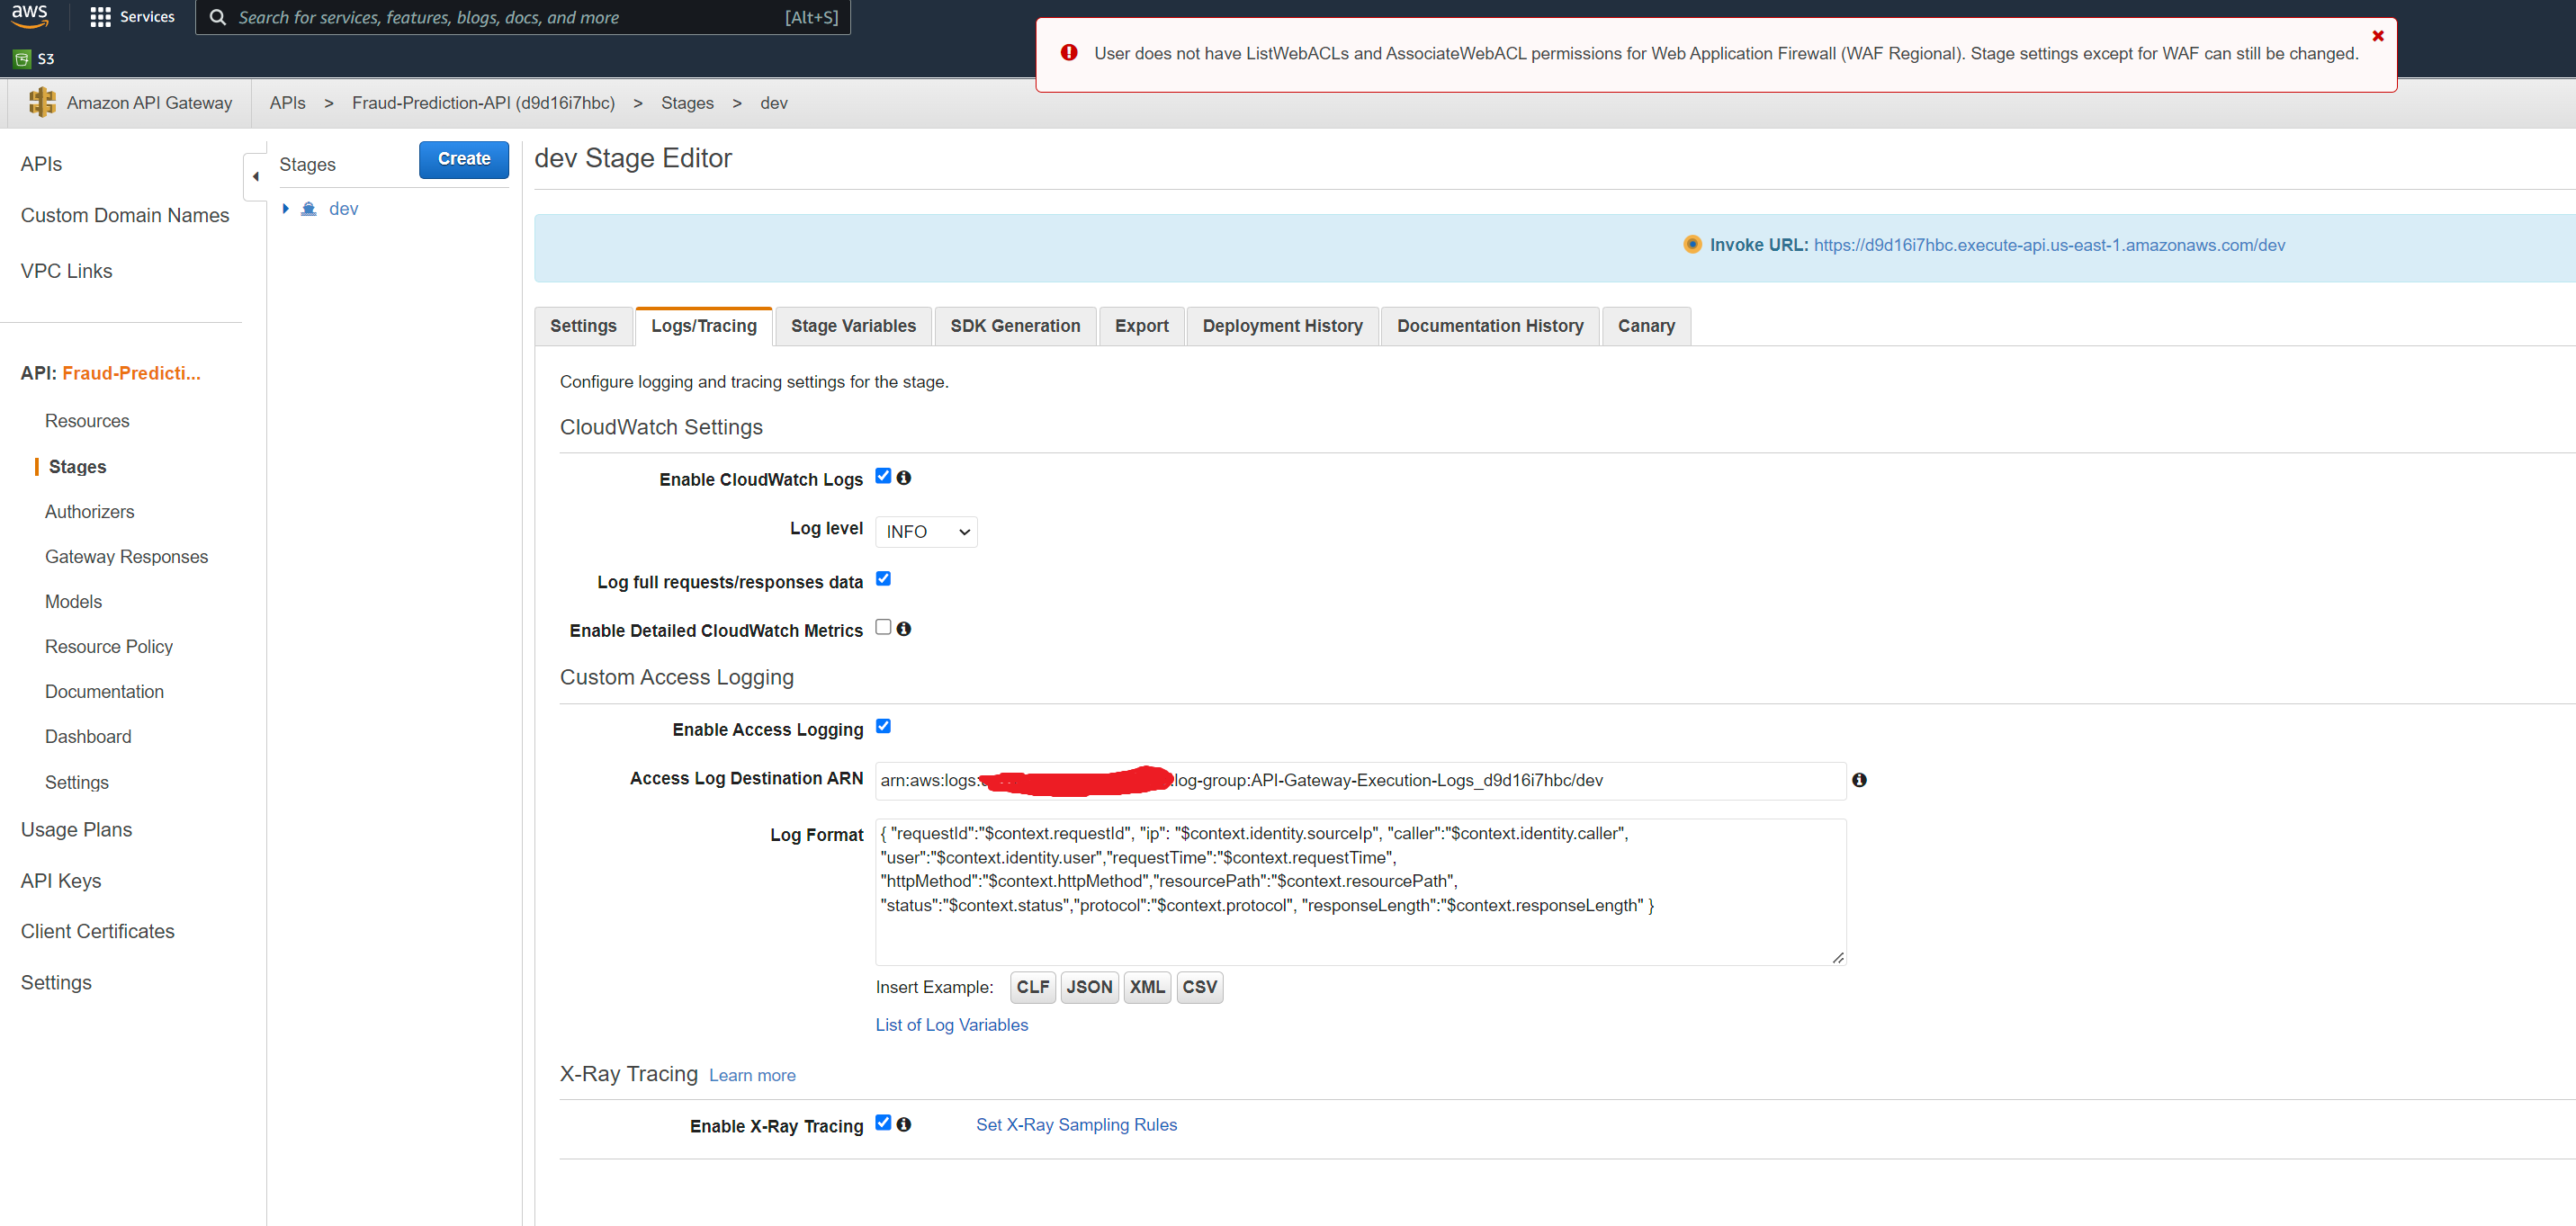
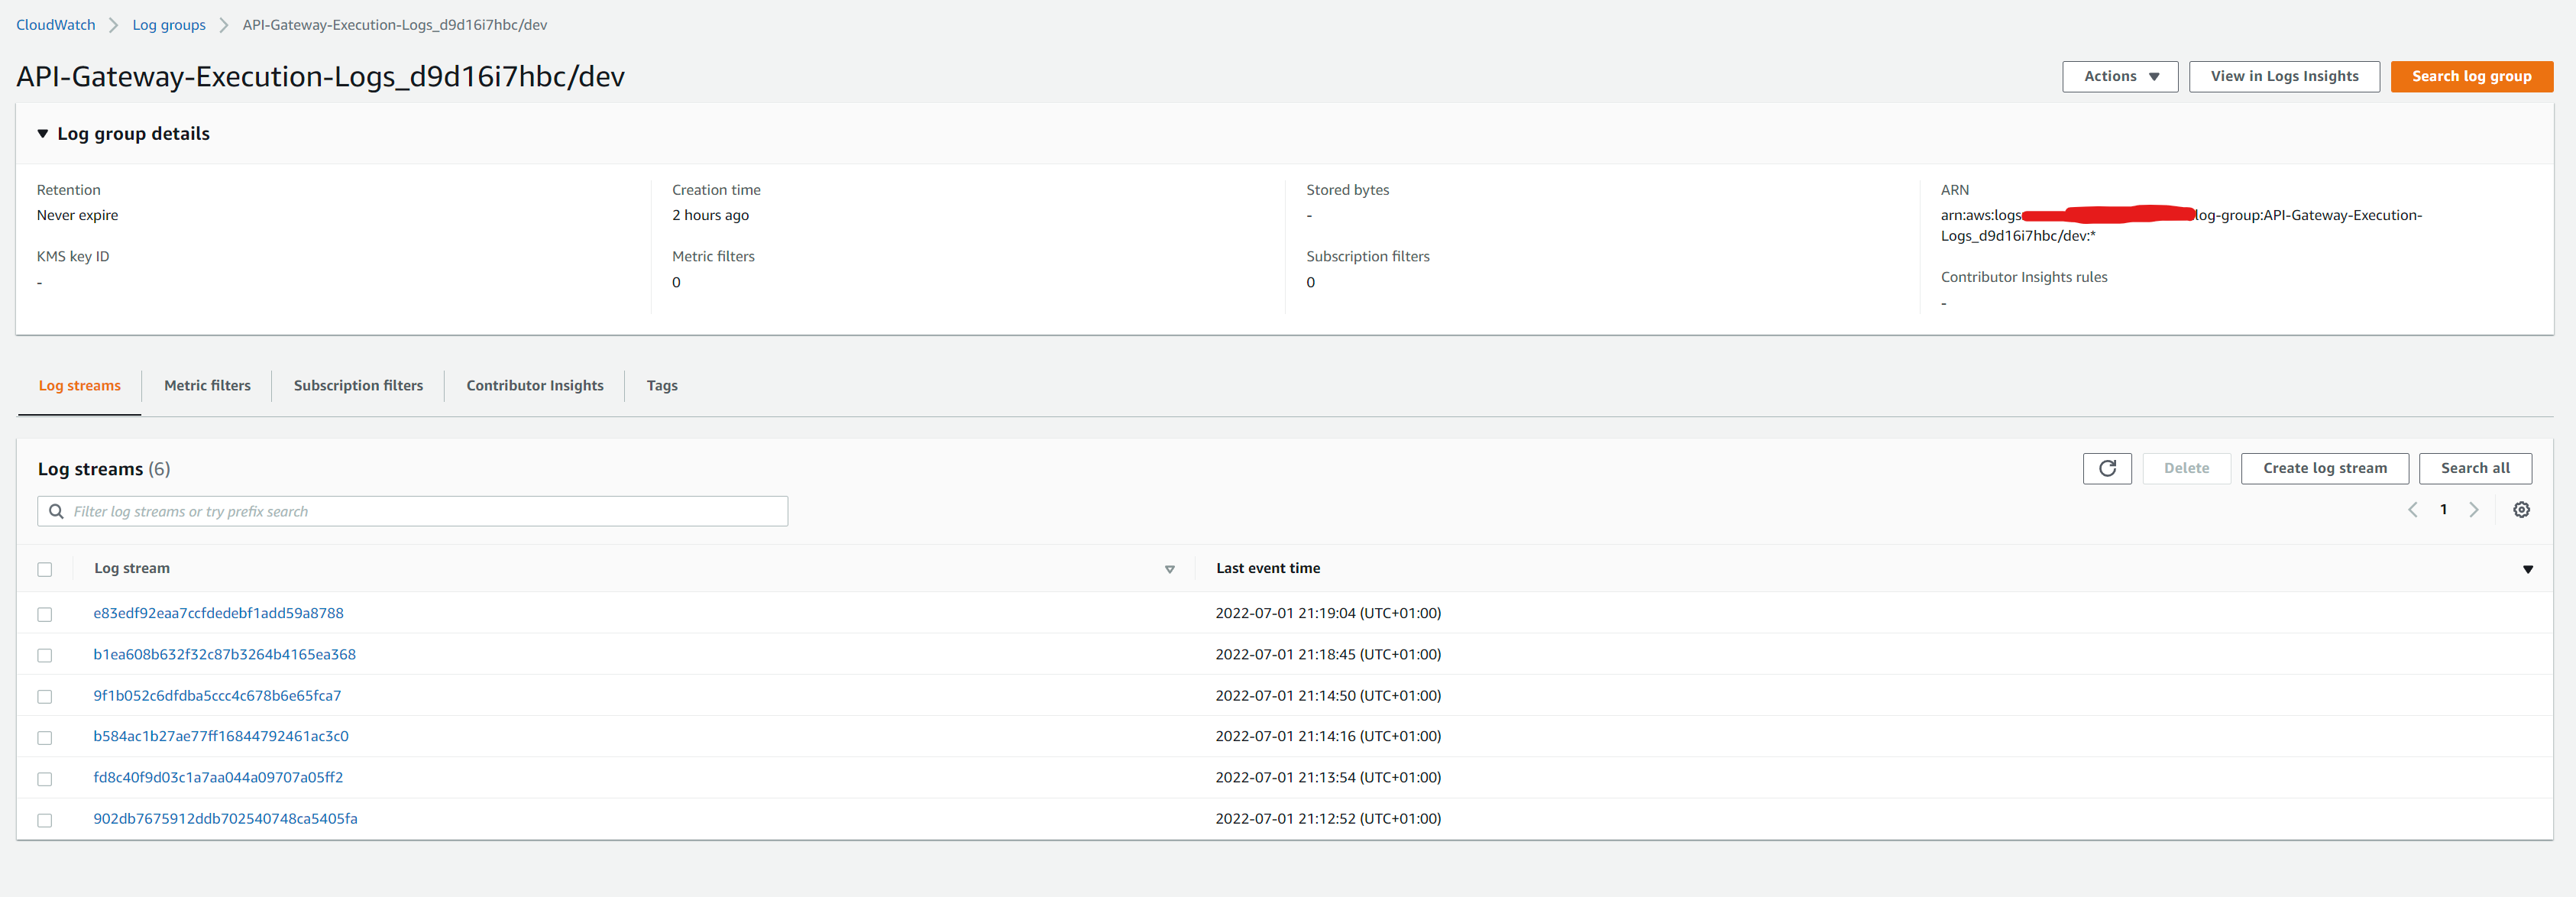
Finally make sure logging is setup to allow debugging errors in the REST API, ny following the instructions here https://aws.amazon.com/premiumsupport/knowledge-center/api-gateway-cloudwatch-logs/
The setup should look like below. Note that when you add the iam role to gateway console, it should automatically add the log group in the format ‘API-Gateway-Execution-Logs_apiId/stageName’. The arn for the log group end with ‘dev:*’. You need to only include the arn upto the stagename ‘dev’ as shown in the screenshot below - otherwise it will throw issues with the validation checks.
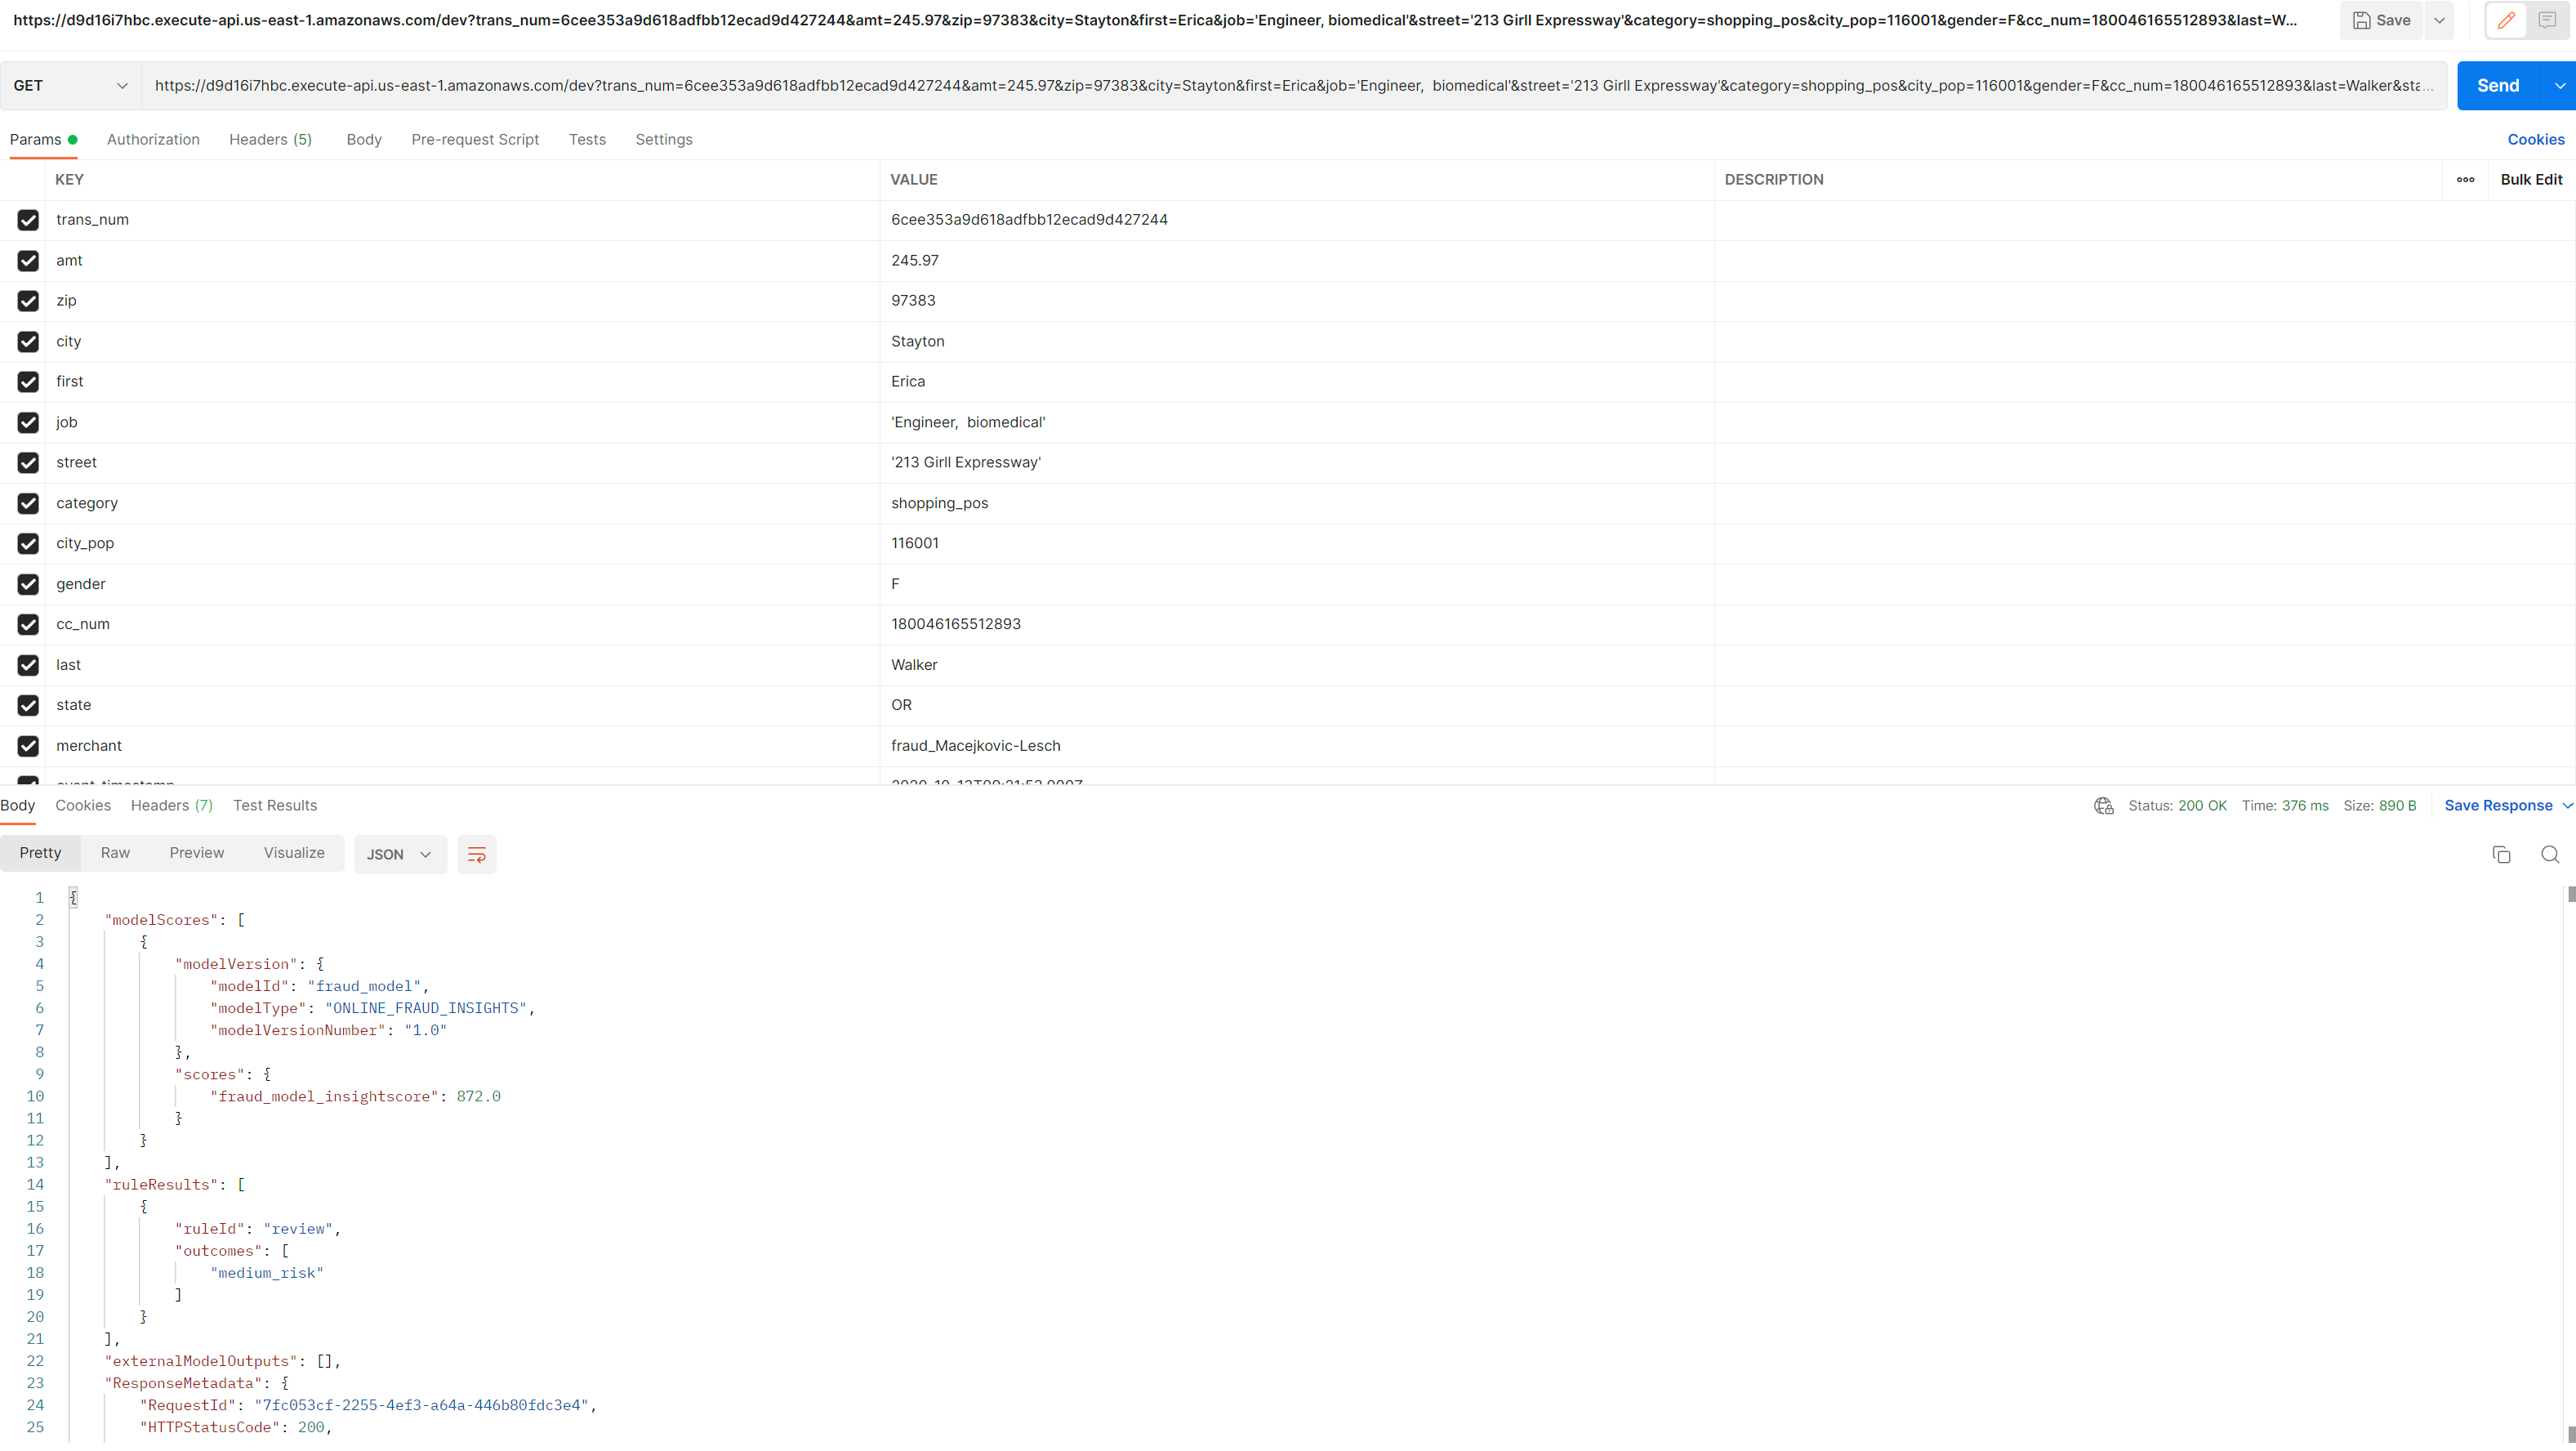
To test the API’s new endpoint, we can use postman for sending an API request https://learning.postman.com/docs/getting-started/sending-the-first-request/ Create postman account and select GET from the list of request types. TSince the get method is configured in ‘/’ root resource - we can invoke the api endpoint https://d9d16i7hbc.execute-api.us-east-1.amazonaws.com/dev with the query string parameters appended at the end (‘key=value’ format and separated by &). Paste the following command in the box as in screenshot below. You should see the parameters and values automatically parsed and populated in the KEY/VALUE rows below. Click send and you should see the response body at the bottom.
1
https://d9d16i7hbc.execute-api.us-east-1.amazonaws.com/dev?trans_num=6cee353a9d618adfbb12ecad9d427244&amt=245.97&zip=97383&city=Stayton&first=Erica&job='Engineer, biomedical'&street='213 Girll Expressway'&category=shopping_pos&city_pop=116001&gender=F&cc_num=180046165512893&last=Walker&state=OR&merchant=fraud_Macejkovic-Lesch&event_timestamp=2020-10-13T09:21:53.000Z
You can check the log streams associated with the latest invocation in the cloudwatch log group for API gateway. This will show messages with the execution or access details of your request.
Note: If any changes are made to the api configuration or parameters - it would need to be redeployed for the changes to take effect.
Generate Predictions
The architecture diagram above shows the two modes we can use for making predictions with Amazon Fraud Detector: batch and real-time. You can use a batch predictions job in Amazon Fraud Detector to get predictions for a set of events that do not require real-time scoring. You may want to generate fraud predictions for a batch of events. These might be payment fraud, account take over or compromise, and free tier misuse while performing an offline proof-of-concept. You can also use batch predictions to evaluate the risk of events on an hourly, daily, or weekly basis depending upon your business need. If you want to analyze fraud transactions after the fact, you can perform batch fraud predictions using Amazon Fraud Detector. Then you can store fraud prediction results in an Amazon S3 bucket. Although beyond the scope of this example, we could have also used additional services like Amazon Athena to help analyze the fraud prediction results (once delivered in S3) and Amazon QuickSight for visualising the results on a dashboard. Copy the batch sample file delivered in the glue_transformed folder (following successful glue job run) to batch_predict folder. This will trigger notification to SQS queue which has Lambda function as target, which starts the batch prediction job in Fraud Detector
1
$ aws s3 cp s3://fraud-sample-data/glue_transformed/test/fraudTest.csv s3://fraud-sample-data/batch_predict/fraudTest.csv
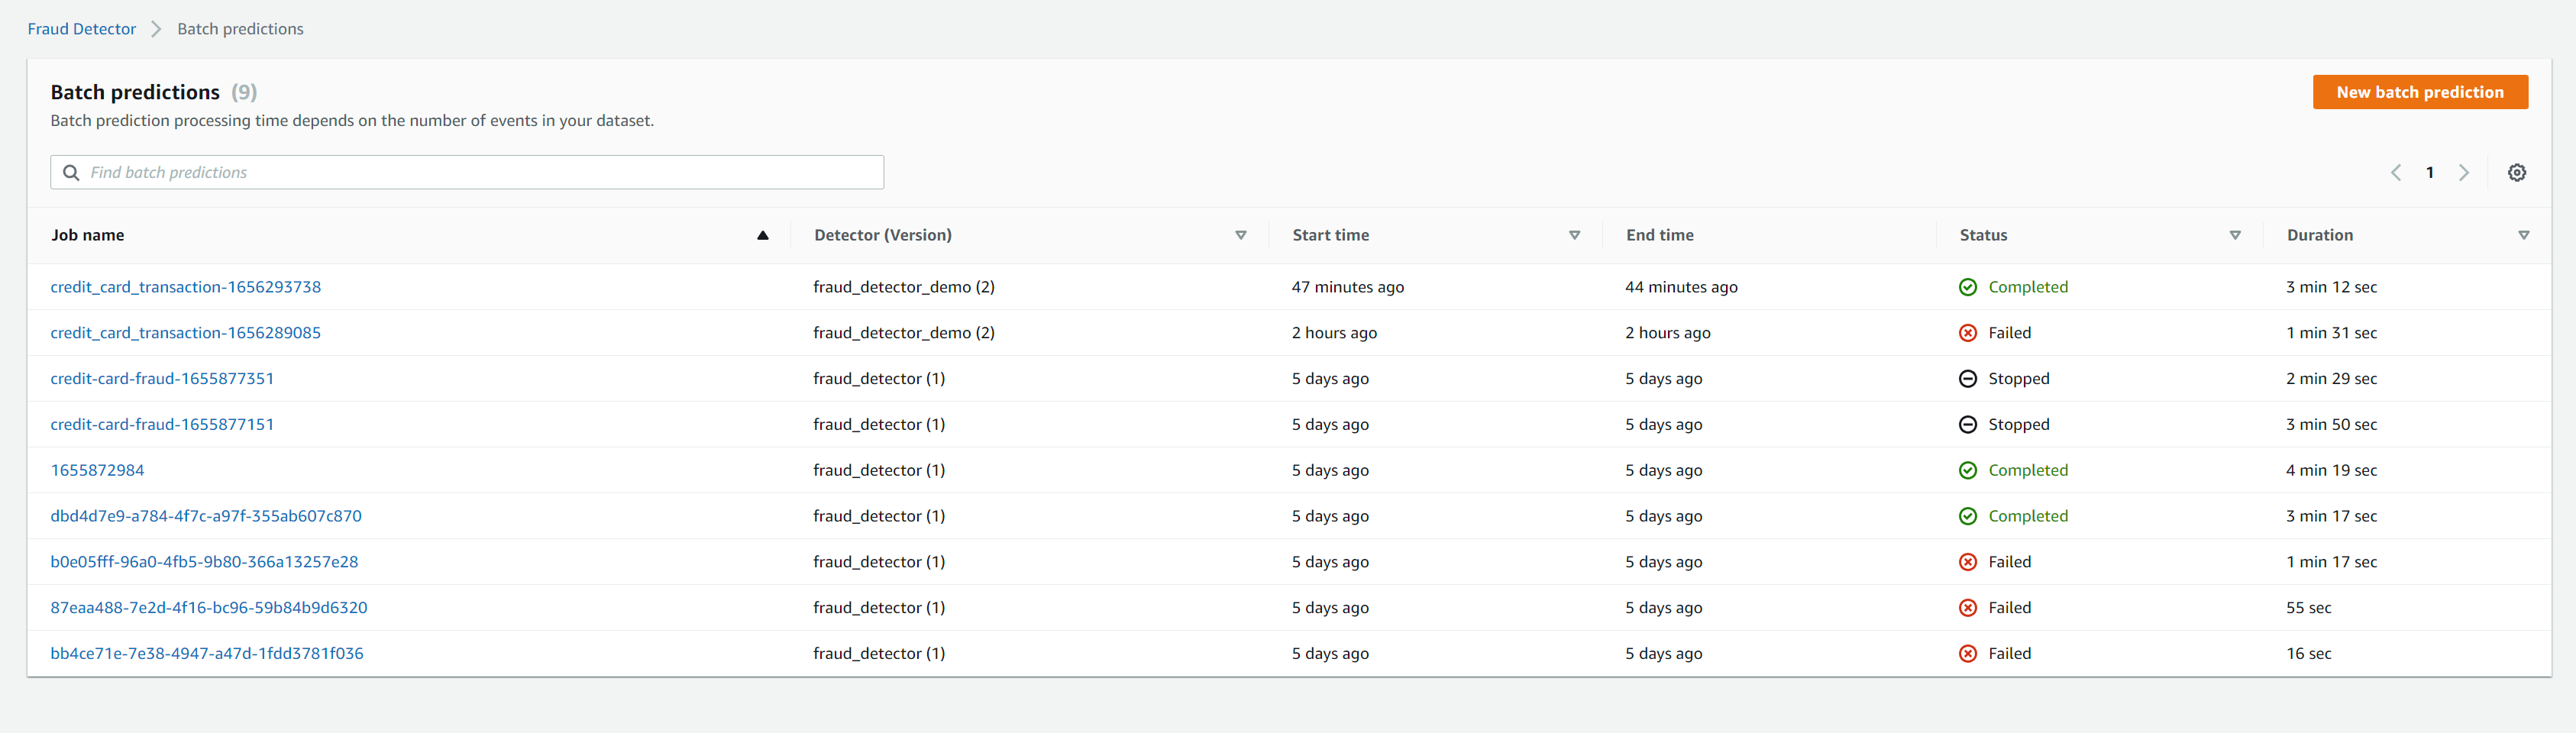
we can monitor the batch prediction jobs in Fraud Detector. Once complete,we should see the output in S3. An example of a batch output is available in datasets/dataset1/results/DetectorBatchResult.csv
In realtime mode, we will make use of the API gateway created and integrated with the lambda function which makes the ‘get_event_prediction’ api call to FraudDetector. In this example we are using the same lambda for batch and realtime predictions. The code in lamdba checks the
checks the event payload to see if certain keys are present which are expected from a request from API gateway (.i.e after the request is transformed via the mapping template in api gateway). We have configured the mapping template to create a variables key, so we can check if the payload has ‘variables’ key, to run realtime prediction. If the event payload has ‘Records’ key, it indicates the event is coming from SQS and will run a batch prediction job. Ideally, I could have had separate lambda for realtime and batch prediction to make it easier to manage.
To run realtime prediction, API gateway REST API has been configured to accept query string parameters and send the request to lambda as explained in the previous section.
To run batch and realtime prediction modes from local machine (for troubleshooting purposes) to call AWS Fraud Detector API directly, we can use the script in the projects/fraud/predictions.py are adapted compared to the code in lambda (for realtime mode). This uses custom cli arguments to pass the path to payload path (for realtime mode),
and the method of execution (‘realtime’ or batch) via the ‘prediction’ arg
- In batch mode
1
2
3
4
5
6
$ python projects/fraud/predictions.py --predictions batch --detector_version 2 --s3input s3://fraud-sample-data/glue_transformed/test/fraudTest.csv --s3output s3://fraud-sample-data/DetectorBatchResults.csv --role FraudDetectorRoleS3Access

27-06-2022 02:35:38 : INFO : predictions : main : 149 : running batch prediction job
27-06-2022 02:35:45 : INFO : predictions : main : 163 : Batch Job submitted successfully
{'batchPredictions': [{'jobId': 'credit_card_transaction-1656293738', 'status': 'IN_PROGRESS_INITIALIZING', 'startTime': '2022-06-27T01:35:39Z', 'lastHeartbeatTime': '2022-06-27T01:35:39Z', 'inputPath': 's3://fraud-sample-data/glue_transformed/test/fraudTest.csv', 'outputPath': 's3://fraud-sample-data/DetectorBatchResults.csv', 'eventTypeName': 'credit_card_transaction', 'detectorName': 'fraud_detector_demo', 'detectorVersion': '2', 'iamRoleArn': 'arn:aws:iam::376337229415:role/FraudDetectorRoleS3Access', 'arn': 'arn:aws:frauddetector:us-east-1:376337229415:batch-prediction/credit_card_transaction-1656293738', 'processedRecordsCount': 0}], 'ResponseMetadata': {'RequestId': 'af585d00-23f0-4a05-82dc-712057c9f912', 'HTTPStatusCode': 200, 'HTTPHeaders': {'date': 'Mon, 27 Jun 2022 01:35:44 GMT', 'content-type': 'application/x-amz-json-1.1', 'content-length': '623', 'connection': 'keep-alive', 'x-amzn-requestid': 'af585d00-23f0-4a05-82dc-712057c9f912'}, 'RetryAttempts': 0}}
- In realtime mode
1
2
3
4
5
6
7
8
9
10
11
12
13
14
15
16
17
18
$ python projects/fraud/predictions.py \
--predictions realtime --payload_path datasets/fraud-sample-data/dataset1/payload.json --detector_version 2 \
--role AmazonFraudDetectorRole

26-06-2022 04:13:54 : INFO : predictions : main : 152 : running realtime prediction

[
    {
        "modelVersion": {,
            "modelId": "fraud_model",
            "modelType": "ONLINE_FRAUD_INSIGHTS",
            "modelVersionNumber": "1.0"
        },
        "scores": {
            "fraud_model_insightscore": 24.0
        }
    }
]
Augmented AI for reviews
First need to create a user pool via AWS Cognito, and add yourself as user in the user group, so you can sign into the ] app using AWS Cognito https://docs.aws.amazon.com/cognito/latest/developerguide/tutorial-create-user-pool.html. Once you add yourself as a user (with email address), you will get an email notification with temporary credentials to log in and verify email address listed. Then we can create a private workforce and a private team associated with the user pool just created. Within a given private workforce, once can create multiple private teams, where a single private team is assigned the job of completing a given human review or labelling task e.g. labelling medical images. By creating and managing the private workforce using Amazon Cognito you avoid the overhead of managing worker credentials and authentication, as AWS Cognito, provides authentication, authorization, and user management for the users in the workforce. Following these instructions under ‘Create an Amazon Cognito Workforce Using the Labeling Workforces Page’ section to create a private workforce in Sagemaker console which uses AWS CognitTo as an identity provider https://docs.aws.amazon.com/sagemaker/latest/dg/sms-workforce-create-private-console.html#create-workforce-sm-console.
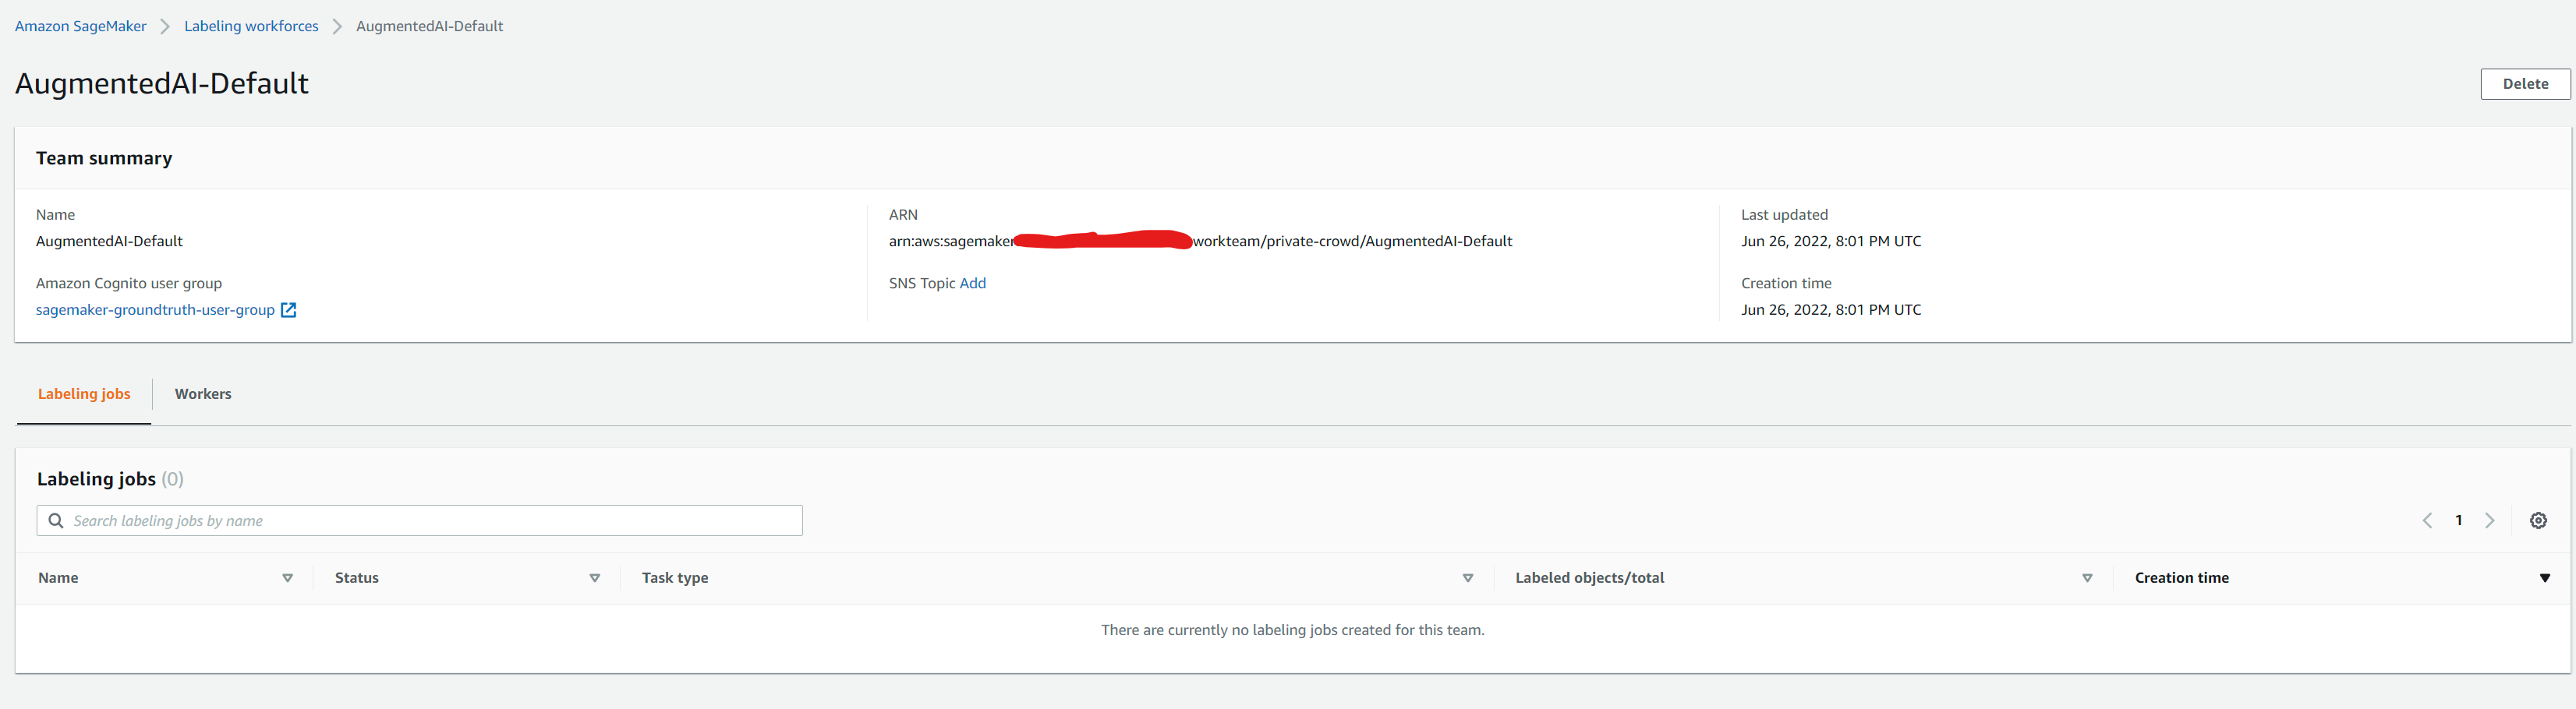
After you import your private workforce, refresh the page to see the Private workforce summary page as in screenshot below.
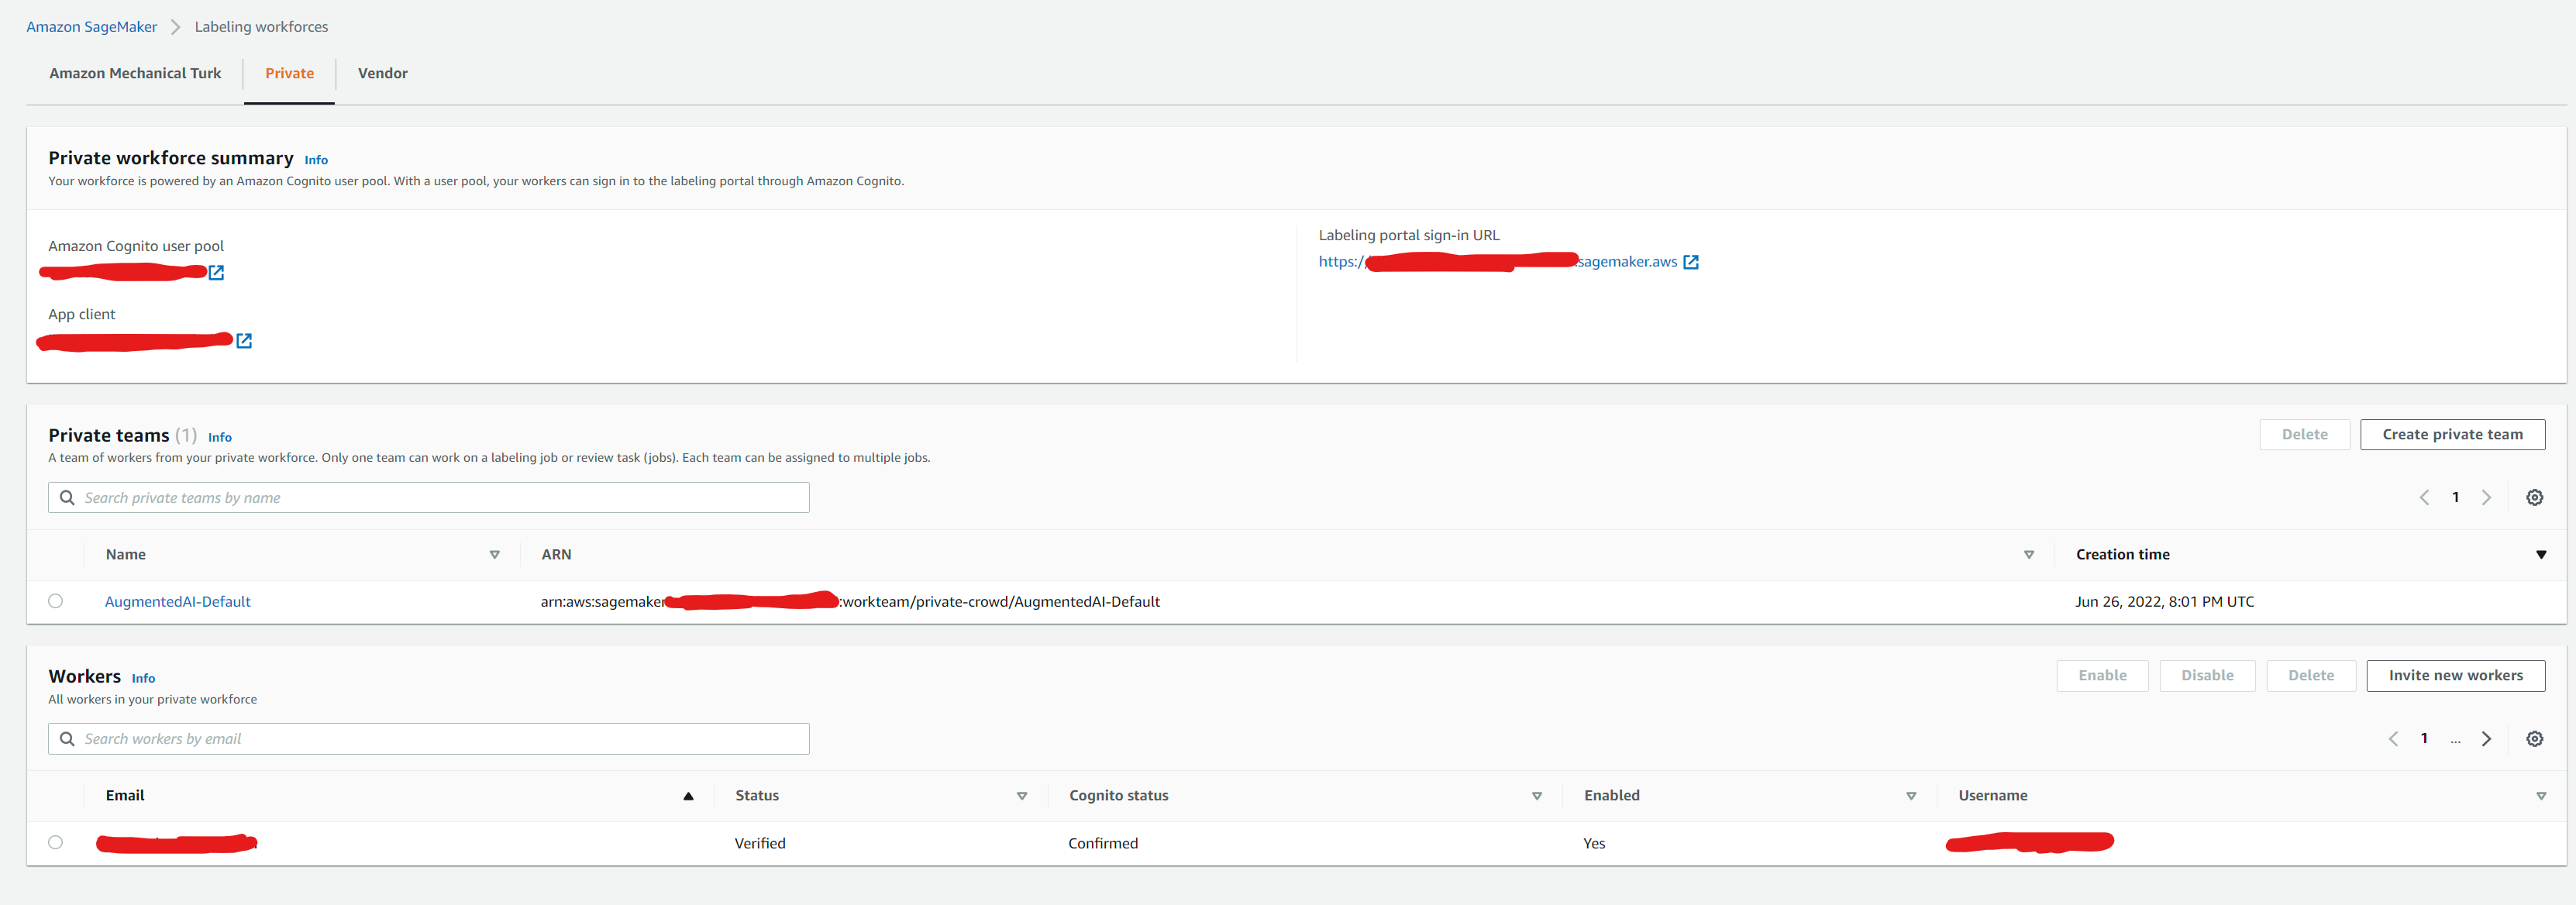
On this page, you can see information about the Amazon Cognito user pool for your workforce, the worker team name ‘AugmentedAI-Default’ for your workforce, and a list of all the members of your private workforce. This workforce is now available to use in both Amazon Augmented AI and Amazon SageMaker Ground Truth for human review tasks and data labeling jobs respectively. If you click on the private team name ‘AugmentedAI-Default’ , you should see the Cognito user group linked to it
Once the workforce is created, we can run the script below passing in the workforce arn as an arg to create a human task UI using a custom worker template defined in augmented_ai\fraud\constants.py. Amazon A2I uses this to generate the worker task UI, after passing it as argument to SageMaker API operation CreateHumanTaskUi. For instructions on creating a custom template, see Create Custom Worker Task Template. https://docs.aws.amazon.com/sagemaker/latest/dg/a2i-custom-templates.html The script also uses the Create Flow Definition API to create a workflow definition.
1
2
3
4
5
6
$ export PYTHONPATH=.
$ python augmented_ai/fraud/create_workflow.py --workteam_arn <workforce-arn>

Created human task ui with Arn: .......human-task-ui/fraud9079296d-f592-11ec-92fc-50ebf6424219
Created flow definition with Arn: ..........flow-definition/fraud-detector-a2i-1656277037953
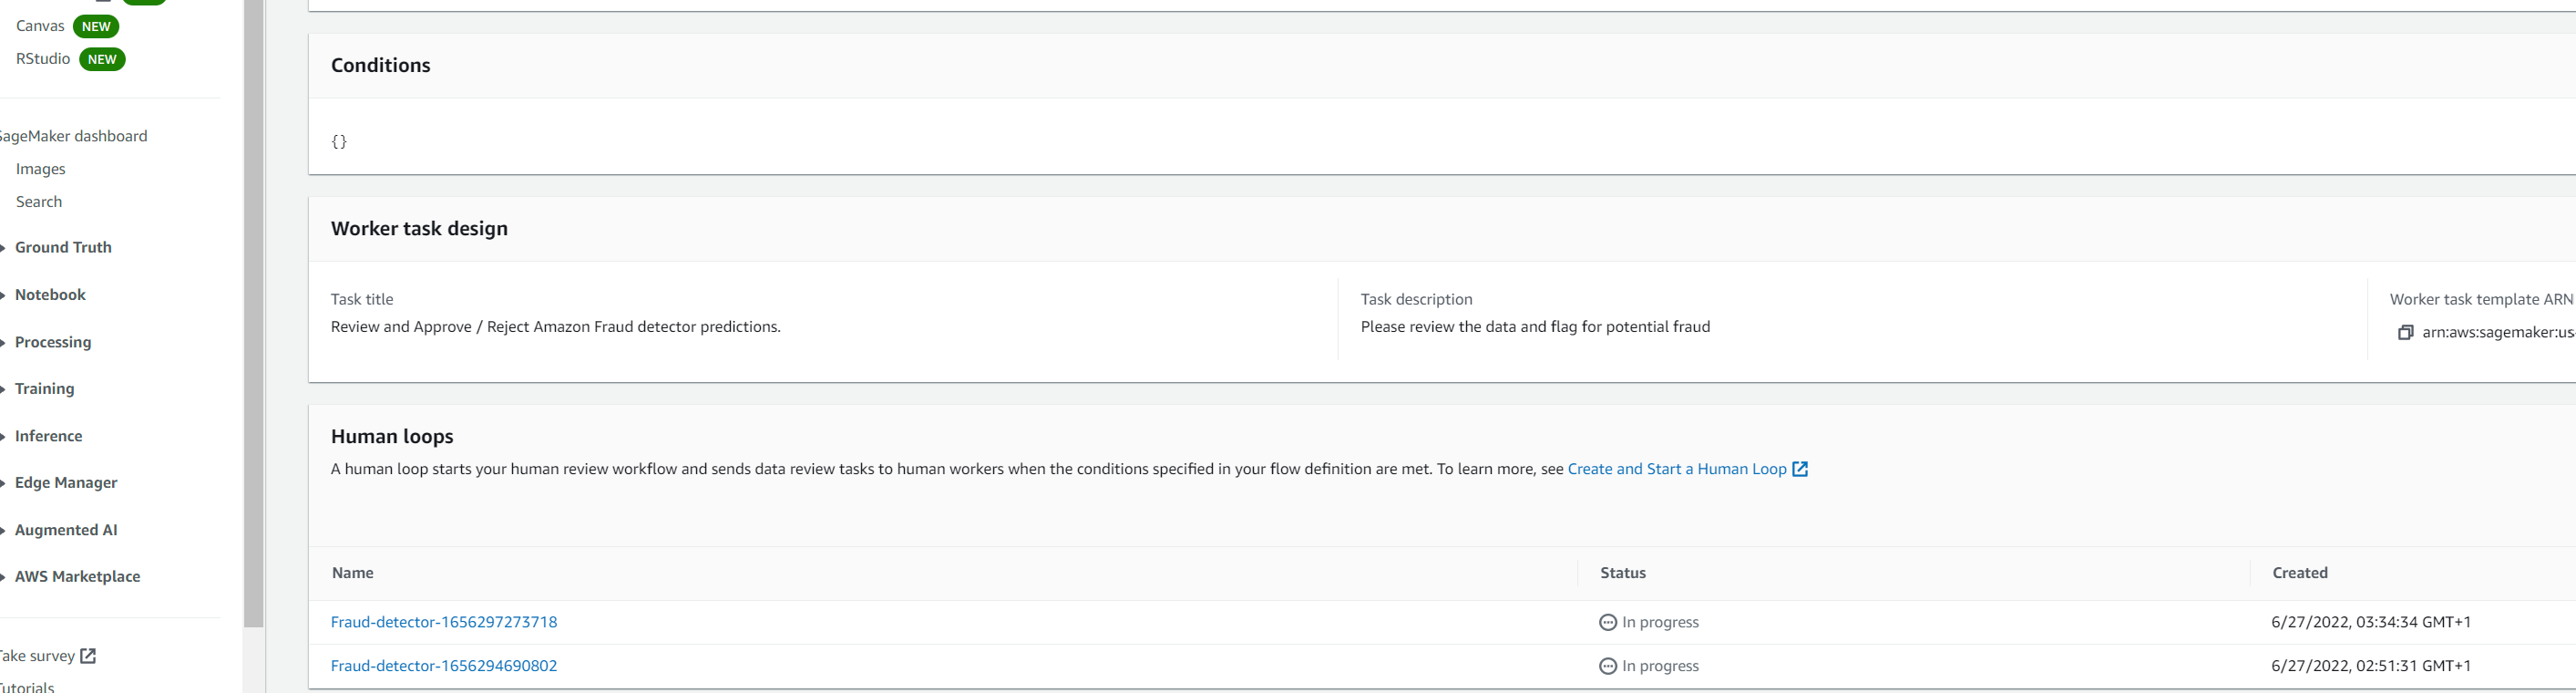
We had configured API gateway to use an optional parameter as well ‘flow_definition’. In the previous section this was not passed in and defaults to “ignore”, which skips the step for checking whether the data should be sent for human review or not. If an arn value for this is passed, then it will also start a human loop for reviews if the model insight scores is between the set threshold (700-900) as set in the lambda environment variables. SCORE_THRESHOLD_MIN and “SCORE_THRESHOLD_MAX. Note that this range was chosen as it matches the rules associated with fraud detector for labelling the prediction for review. This uses Augmented AI service (described in the next section), to send the model scores which are within this range to check if the labels predicted from the model are accurate or need to be corrected via human review. We will need to append the extra parameter flow_definition to the end of the query string as below. Replace
1
https://d9d16i7hbc.execute-api.us-east-1.amazonaws.com/dev?trans_num=6cee353a9d618adfbb12ecad9d427244&amt=245.97&zip=97383&city=Stayton&first=Erica&job='Engineer, biomedical'&street='213 Girll Expressway'&category=shopping_pos&city_pop=116001&gender=F&cc_num=180046165512893&last=Walker&state=OR&merchant=fraud_Macejkovic-Lesch&event_timestamp=2020-10-13T09:21:53.000&flow_definition=<arn>
if this ran successfully, you should see the human loop in progress as in screenshot below.
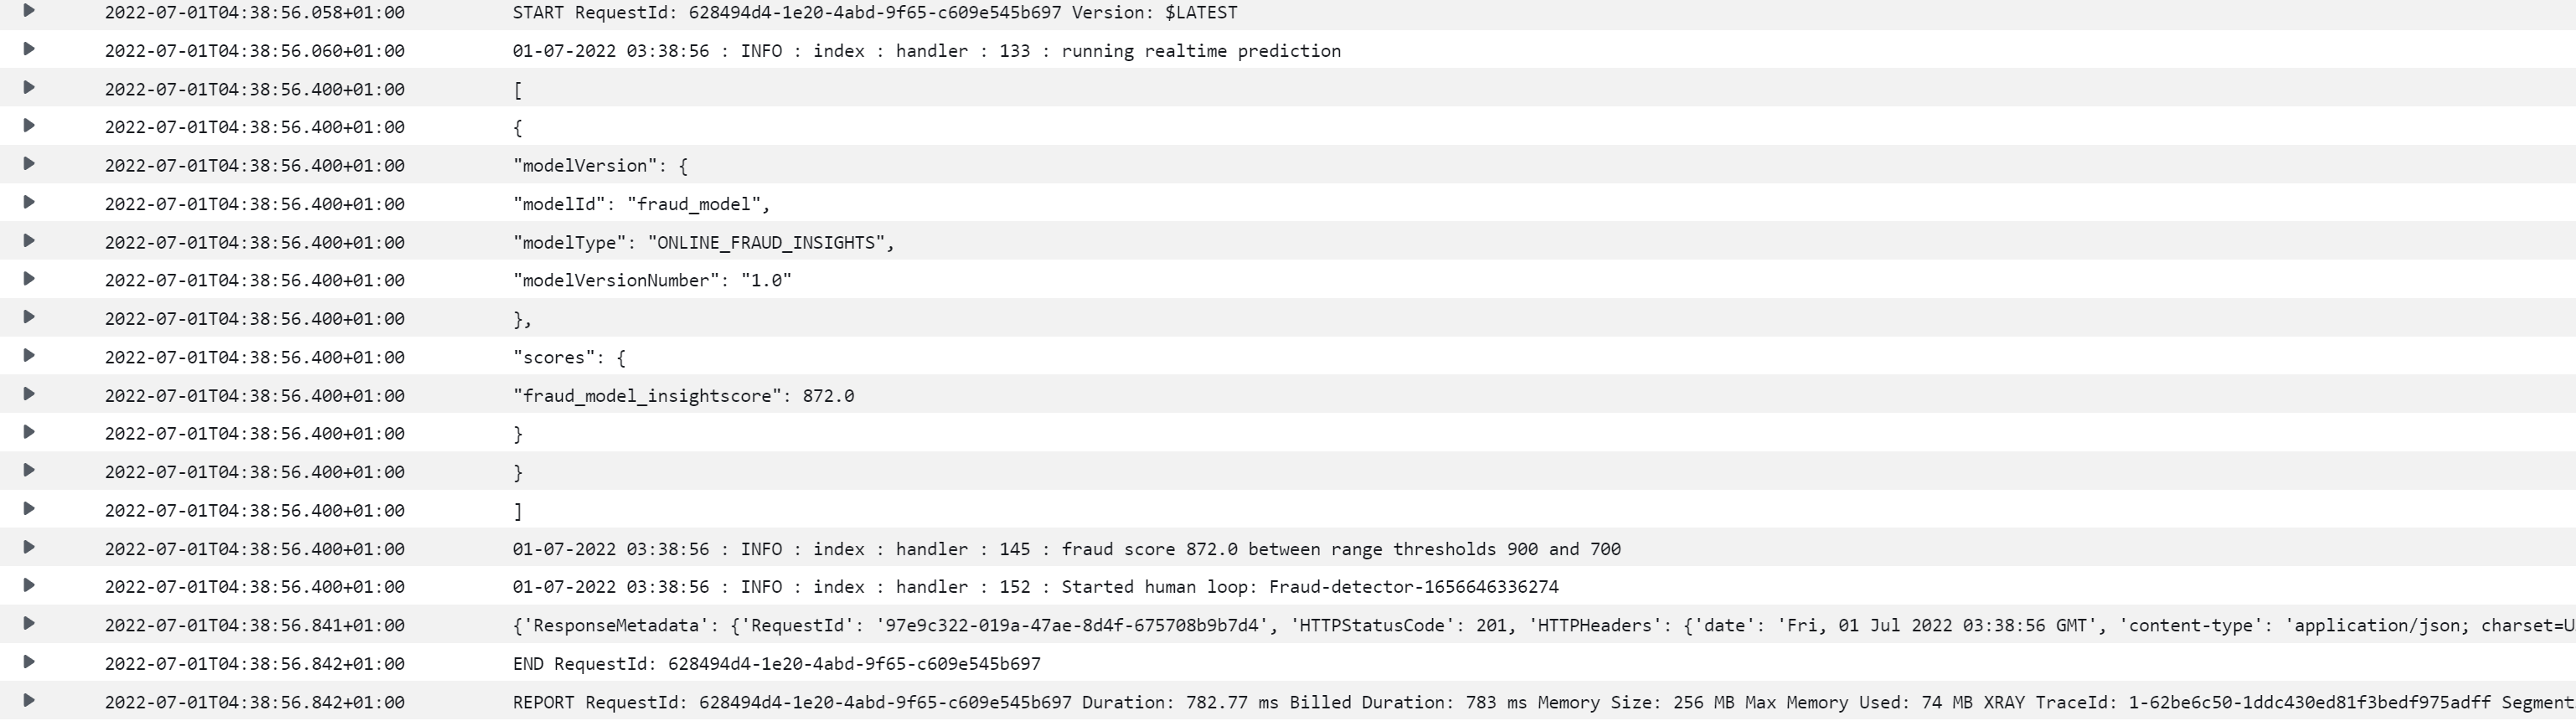
The log stream configured for lambda function can also be checked. The insight score is 872 and this should initiate the call to StartHumanLoop action and can be confirmed from the ‘Started human loop: Fraud-detector’ log message
Similarly, to run this from the local machine, we can use the same script which we ran in the previous section to generate realtime predictions. However, we need to pass in an extra argument --flow_definition with the arn value to enable HumanLoop. The example below uses payload which was marked for review from the model after batch prediction. When passed this payload via the realtime api - it outputs the prediction results as well as starts a human loop.
1
2
3
4
5
6
7
8
9
10
11
12
13
14
15
16
17
18
19
20
21
22
23
$ python projects/fraud/predictions.py --predictions realtime --payload_path datasets/fraud-sample-data/dataset1/payload.json --detector_version 2 \
--role AmazonFraudDetectorRole --flow_definition <arn>

27-06-2022 02:51:31 : INFO : predictions : main : 170 : running realtime prediction
27-06-2022 02:51:31 : INFO : predictions : main : 186 : fraud score 858.0 between range thresholds 900 and 700
27-06-2022 02:51:31 : INFO : predictions : main : 193 : Human loop input:
27-06-2022 02:51:32 : INFO : predictions : main : 196 : Started human loop: Fraud-detector-1656294690802

[
    {
        "modelVersion": {
            "modelId": "fraud_model",
            "modelType": "ONLINE_FRAUD_INSIGHTS",
            "modelVersionNumber": "1.0"
        },
        "scores": {
            "fraud_model_insightscore": 858.0
        }
    }
]

{'ResponseMetadata': {'RequestId': '0ccebd34-50be-4552-871b-d88912bf4c31', 'HTTPStatusCode': 201, 'HTTPHeaders': {'date': 'Mon, 27 Jun 2022 01:51:31 GMT', 'content-type': 'application/json; charset=UTF-8', 'content-length': '240', 'connection': 'keep-alive', 'x-amzn-requestid': '0ccebd34-50be-4552-871b-d88912bf4c31', 'access-control-allow-origin': '*', 'x-amz-apigw-id': 'UW79mE9eoAMFY7A=', 'x-amzn-trace-id': 'Root=1-62b90d23-48517924671f237c42c46512'}, 'RetryAttempts': 0}, 'HumanLoopArn': 'arn:aws:sagemaker:us-east-1:376337229415:human-loop/Fraud-detector-1656294690802'}
Teardown resources
Run the bash script passing in the ‘endpoint’ or ‘detector’ command depending on which resources you want to delete
For the endpoint resource:
1
sh projects/fraud/bash_scripts/teardown.sh endpoint
For tearing down the trained fraud model, detector (including rules), event type (including outcomes, variables, labels), run the following:
1
2
3
4
5
6
7
8
9
10
11
12
13
14
15
16
17
18
19
20
21
22
23
24
25
26
27
28
29
30
31
32
33
34
35
36
37
38
39
40
41
42
sh projects/fraud/bash_scripts/teardown.sh

Delete model versions

Delete model

Deleting detector version id 1

Deleting rule investigate
Deleting rule review
Deleting rule approve

Deleting detector id fraud_detector_demo

Deleting event-type credit_card_transaction

Deleting entity-type customer

Deleting variable trans_num
Deleting variable amt
Deleting variable city_pop
Deleting variable street
Deleting variable job
Deleting variable cc_num
Deleting variable gender
Deleting variable merchant
Deleting variable last
Deleting variable category
Deleting variable zip
Deleting variable city
Deleting variable state
Deleting variable first

Deleting label legit
Deleting label fraud

Deleting outcome high_risk
Deleting outcome low_risk
Deleting outcome medium_risk

Deleting cloud formation stack
Delete S3 bucket
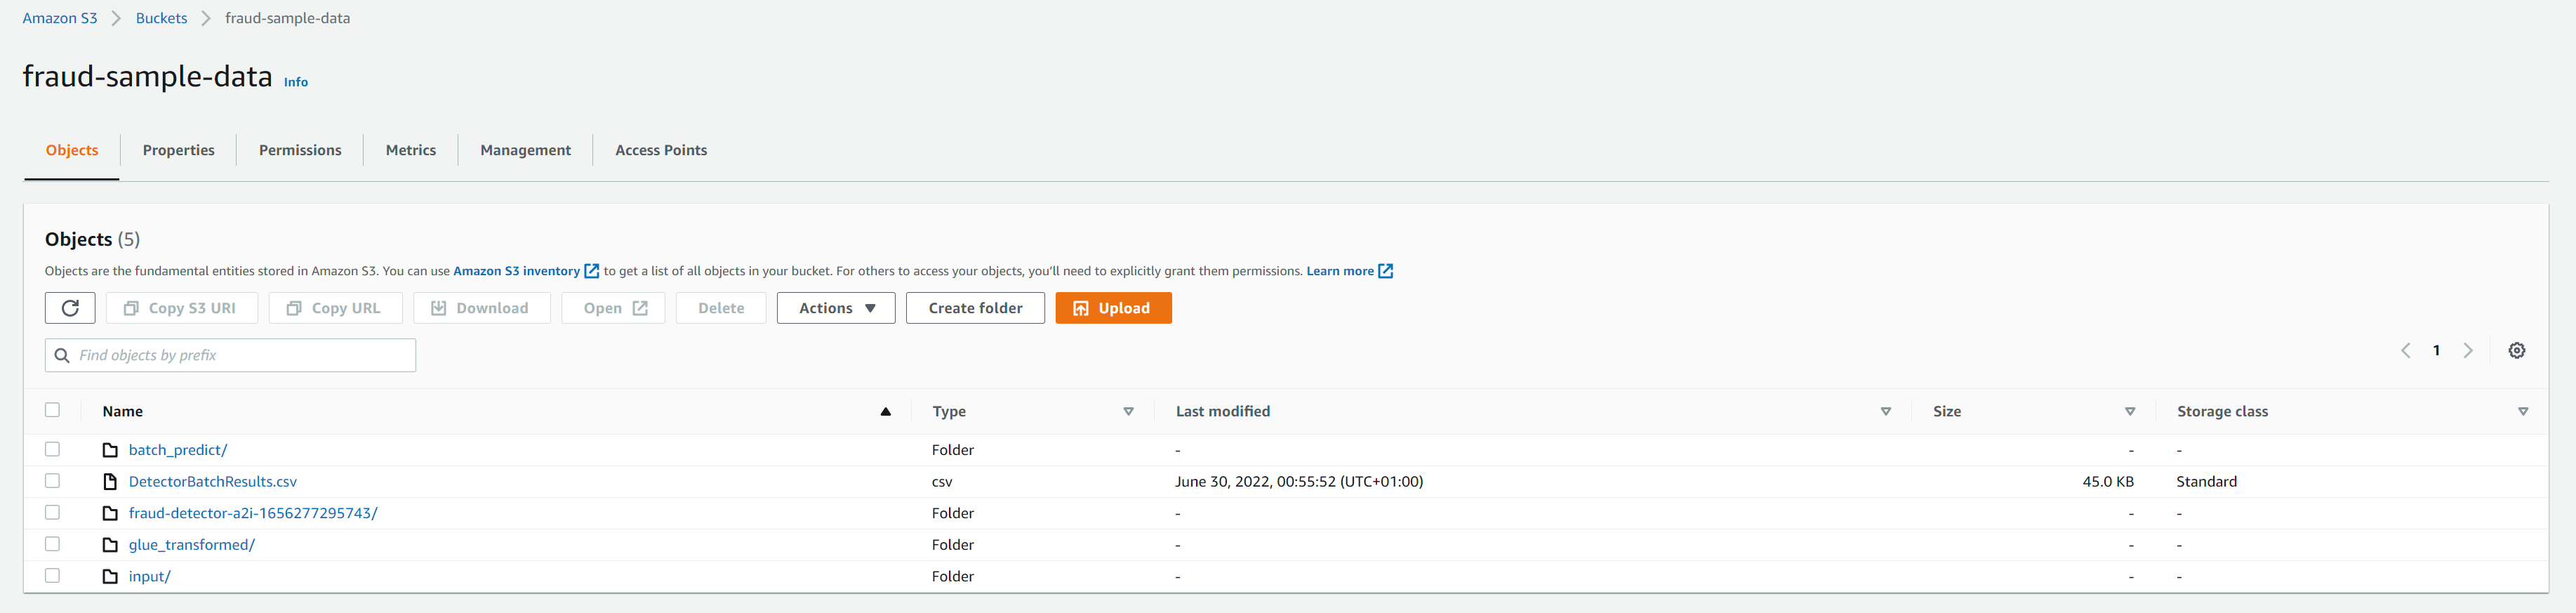
By the end of this example, the bucket should have the following folders corresponding to the different stages inputs/outputs discussed in the previous sections
Delete selected resources in bucket or entire bucket. If entire bucket not needed to be deleted, then --resource_list arg can be passed.
1
2
3
4
5
python s3/cleanup_resources.py --bucket_name=fraud-sample-data

2022-05-15 01:20:00,996 botocore.credentials INFO:Found credentials in shared credentials file: ~/.aws/credentials
2022-05-15 01:20:01,335 __main__ INFO:Deleting all objects in S3 bucket fraud-sample-data as resource key not provided
2022-05-15 01:20:02,707 __main__ INFO:Deleted bucket fraud-sample-data
Comments powered by Disqus.